The ultimate guide to help you return to rock climbing
An evidence-based, structured, and measurable framework for returning to climbing safely and effectively.
So you’ve gotten the clearance to return to climbing. Great news!
Being away from climbing for either an injury or other life circumstances can be such a hard mental battle and there’s a good chance you’re more psyched than ever to get back to the sport. Then the question dawns on you — “how do I actually do this safely?”
Musculoskeletal injuries are very commonly recurrent so returning to the sport safely and systematically is critical in order to make informed decisions about how we progress. Whether it’s a pulley tear, chronic elbow pain, a nagging shoulder problem or an injury anywhere in the body, we need to be systematic, measured, and evidence-based with how we return to climbing.
This article is designed to be an all-encompassing guide to returning to climbing safely and effectively whether you’re returning from an injury or just time away from the sport. Anyone can give you the advice of: “don’t climb too much too fast”, “start small and gradually climb more and climb harder”, or “don’t do it if it hurts” — but how do you actually navigate this process?
The goal of this article is to give you systematic guidelines and all the considerations you need to safely and confidently return to climbing, like:
- How to measure your climbing volume and intensity
- How to systematically progress your climbing volume/intensity
- Considerations for hold/grip type and body positions
- How long does it normally take to get back to climbing at 100%?
- Common questions for returning to climbing
- Can I climb if I have pain?
- Will I ever get back to the same level of climbing after an injury?
- How do I wean off of taping my finger or wrist?
- How do I get more confident with jumping off a boulder or taking a lead fall?
- Additional tips for returning to climbing safely and effectively
Let’s face it, actually quantifying our return to climbing is almost impossible. Runners have it easy: distance, pace, incline. That’s all they have to think about when returning to running and each of those are easy to measure. As climbers we have to consider: grade, number of boulders/pitches, how long each of those boulders/pitches are, hold type, wall angle, style of the climb (dynamic/static, reachy vs scrunchy, shouldery/fingery, techy vs powerful), indoor vs outdoor, and each unique climbing injury has different considerations. So the first thing we need to do is to (as best we can) quantify climbing volume and intensity.
How to measure your climbing volume and intensity
For this we need to consider both how much (volume) and how difficult (intensity) the climbs are that we’re performing during a climbing session. We will call this the “Total Load” of climbing.
To calculate this I’ve created a chart that can give us a framework to consider both volume and intensity. Add up the point values of all the climbs you do during a session to give you a single number, which is your Total Load. At the end of the article there are examples of how to tally your Total Load and how to calculate an appropriate progression.
Return To Climb Point Scale

*The obvious caveat is that this framework does not take into consideration the style of climbing or the type of holds used. Refer to the sections below for additional considerations to address those variables.
Now you can quickly tally your Total Load of climbing to give a measure of how much stress you’re putting on your tissues. This allows you to calculate how much you should progress/regress and where you should start with your return to climbing program.
Where should I start?
This answer will depend on the extent of your injury or the amount of time you’ve taken off from climbing. Estimate your Total Load from before your injury or before your break and use chart 3 below to find your starting point.
How should I progress?
This answer will depend on the extent of your injury or the amount of time you’ve taken off from climbing. Estimate your Total Load from before your injury or before your break and use chart 3 below to find your starting point.
There is a generally agreed upon model of progression used in the physical therapy literature that is used to treat tendon, muscle, and joint pain. This is called the “soreness rules” and is widely used in post-operative and return to sport protocols.1,2,3
Notes on the soreness rules: soreness is defined as the symptoms (pain or stiffness) that you are rehabilitating from. This is different than delayed onset muscle soreness which is the usual muscle soreness you get from working out. For example: if you’re returning to climb after a pulley injury you may have soreness to your skin, a mild pinch in shoulder and stiffness in your low back after a climbing session, but the symptom you want to pay attention to in this case is the pain experienced in the finger from the pulley injury.
In many cases our tissues won’t tell us their true capacity until the next day. Tendons, muscles, and joints often feel better after getting warmed up which can give us a false sense of the actual state of the tissue. Once those tissues cool down those symptoms can return with a vengeance. Paying attention to how your tissues feel the day after a climbing session will often give a better picture of the physiologic state of those tissues.
In general, we want to regress our total load if your symptoms feel worse the day after a session, maintain the same level if your symptoms feel unchanged, and progress if your symptoms feel improved or if you feel no symptoms the day after a session. To keep it simple I like to talk about it as a “red light”, “yellow light”, or “green light”. Use this chart to guide your progression.
Soreness Criteria

Returning From Injury and Time Off Climbing
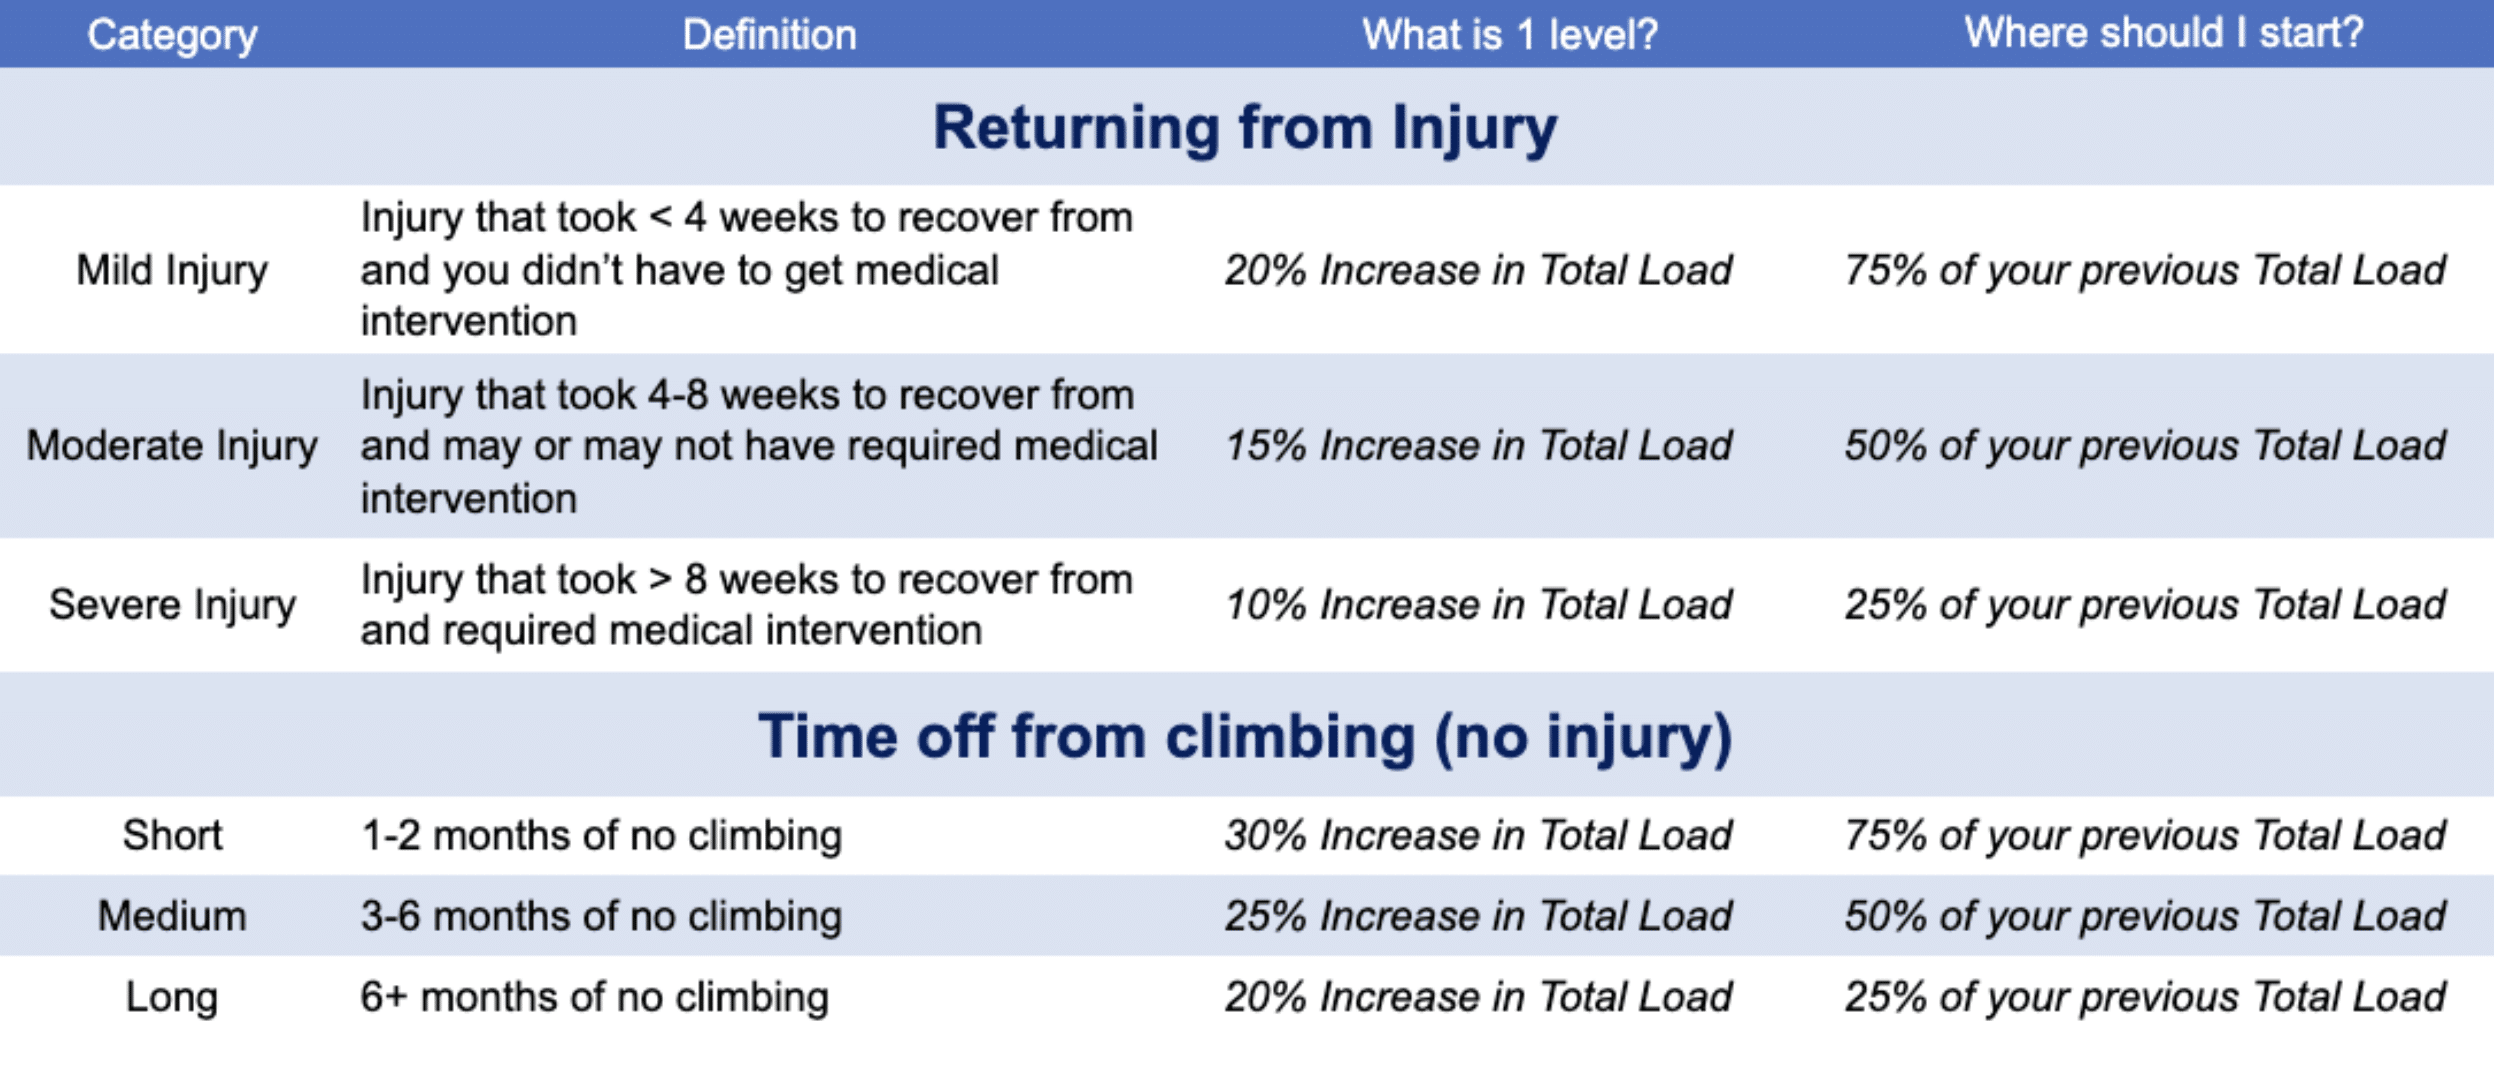
These progressions can seem painfully slow for many climbers. Trust the process. This progression ensures that you will have a smooth, linear recovery rather than the boom and bust associated with doing too much too fast.
PSA — Hold types matter!
These progressions can seem painfully slow for many climbers. Trust the process. This progression ensures that you will have a smooth, linear recovery rather than the boom and bust associated with doing too much too fast.
Obviously, not all routes are created the same. A 5.11b could range from a friction slab with little hand use at all, to a complex dihedral route with lots of mantling, to a sea of slopers on vertical, to a slightly overhung crimp ladder.
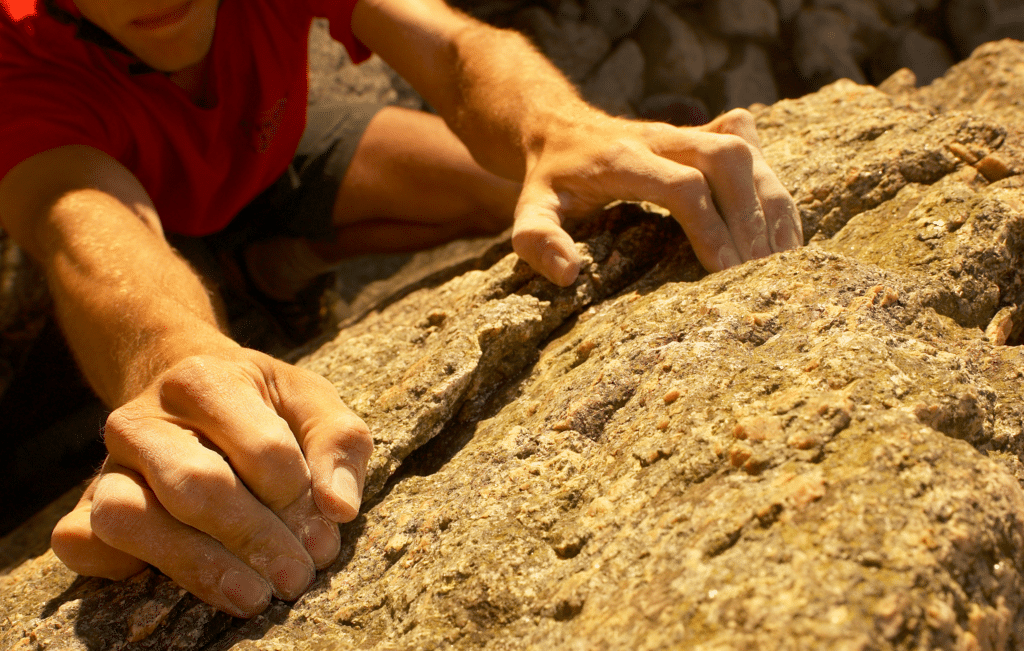
All of these will stress different tissues in totally different ways. I recommend doubling the point value of routes/boulders that have holds that are likely to aggravate your injury. Here are examples of common climbing injuries and the hold types that will be more likely to aggravate those tissues while they’re healing.
- Pulley injuries — Crimps! Any smaller crimp where you use a half or full grip position are likely to aggravate an injured pulley. Opt for open crimping instead. Finger bucket jugs can also put pressure on the pulley, causing pain.
- Flexor tendon injuries — Also aggravated by hard crimping (open, half, or full), pockets, pinches, and slopers and can be irritated by finger buckets that put pressure on the tendon.
- Wrist pain or TFCC sprains — Slopers, underclings, gastons are likely to be aggravating, and overhangs and dynamic movements can also cause pain.
- Medial or lateral elbow pain — Crimping (half or full), pinches, and underclings.
- Shoulder pain — Gastons, underclings, mantling, and the shoulder gets progressively more stressed at the end ranges of motion whether it’s overhead or reaching laterally (more on this later). The scapular muscles have to work harder on overhangs.
- Neck pain (belayer’s neck) — overhangs, overhead pulling, and iron cross movements are likely to be aggravating.
- Ankle sprains — Jumping down off the bouldering wall or taking a lead fall will definitely be irritating. Heel hooks, perches, and slab climbing can also cause pain. Overhangs are great for ankles!
- Knee injuries — Heel hooks, drop knees, perches, and high stepping are likely to be aggravating.
- Hip pain — High steps, drop knees, wide stemming, and some flagging positions can be irritating.
When calculating your Total Load you can make adjustments based on what hold types are on the routes you’re climbing to individualize to your specific injury.
How long will it take before I can climb without restrictions?
When you’re climbing with no pain, no restrictions, and you’re trying as hard as you want — I like to call it “Full Climbing”.
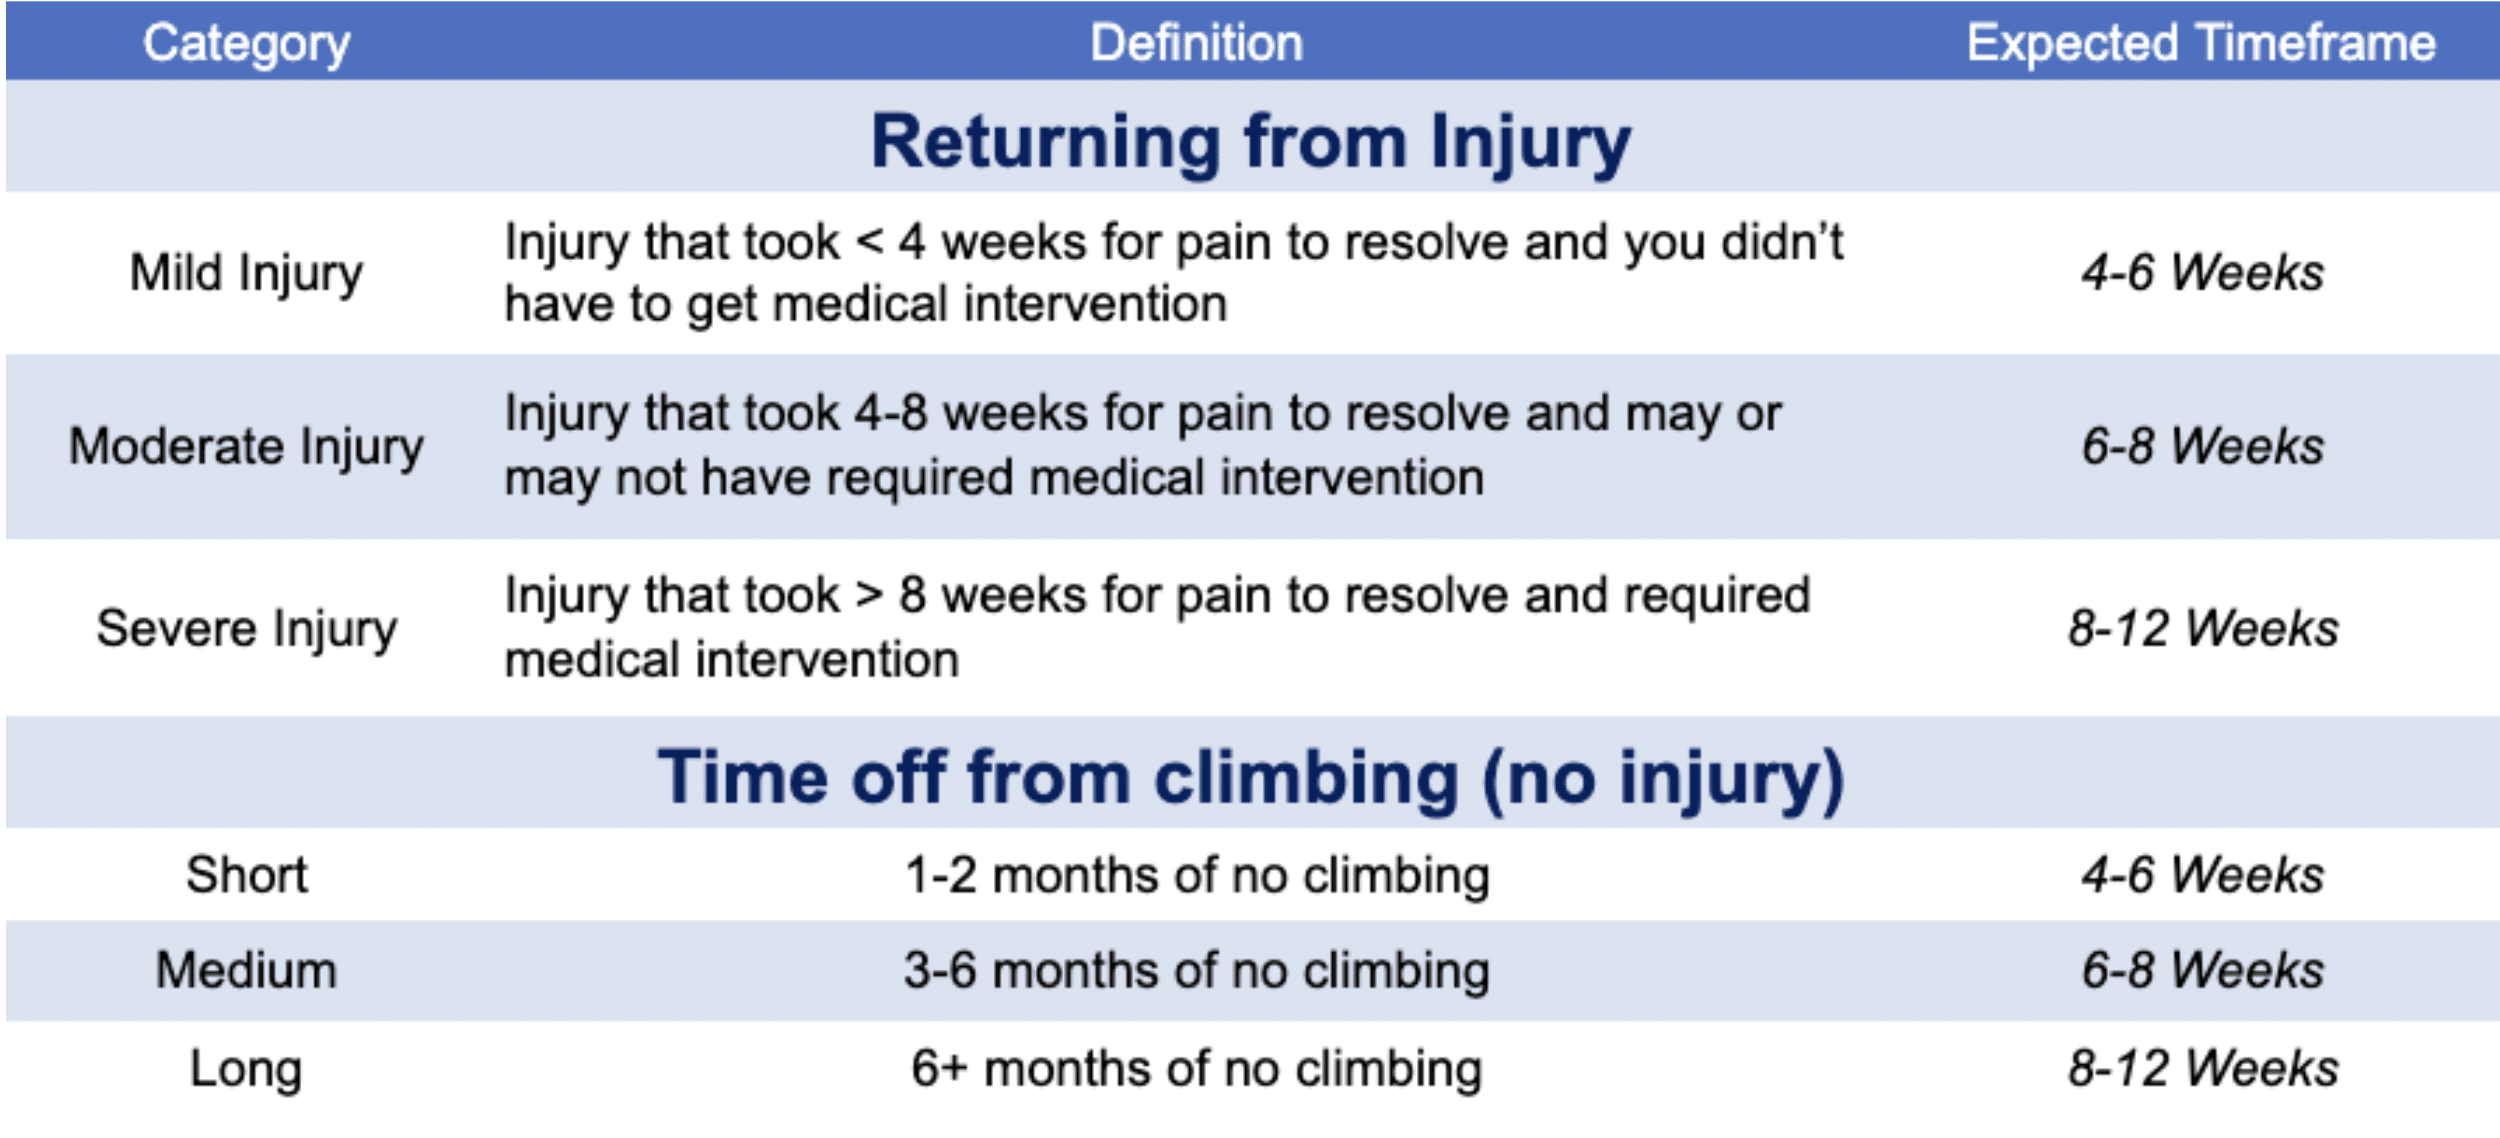
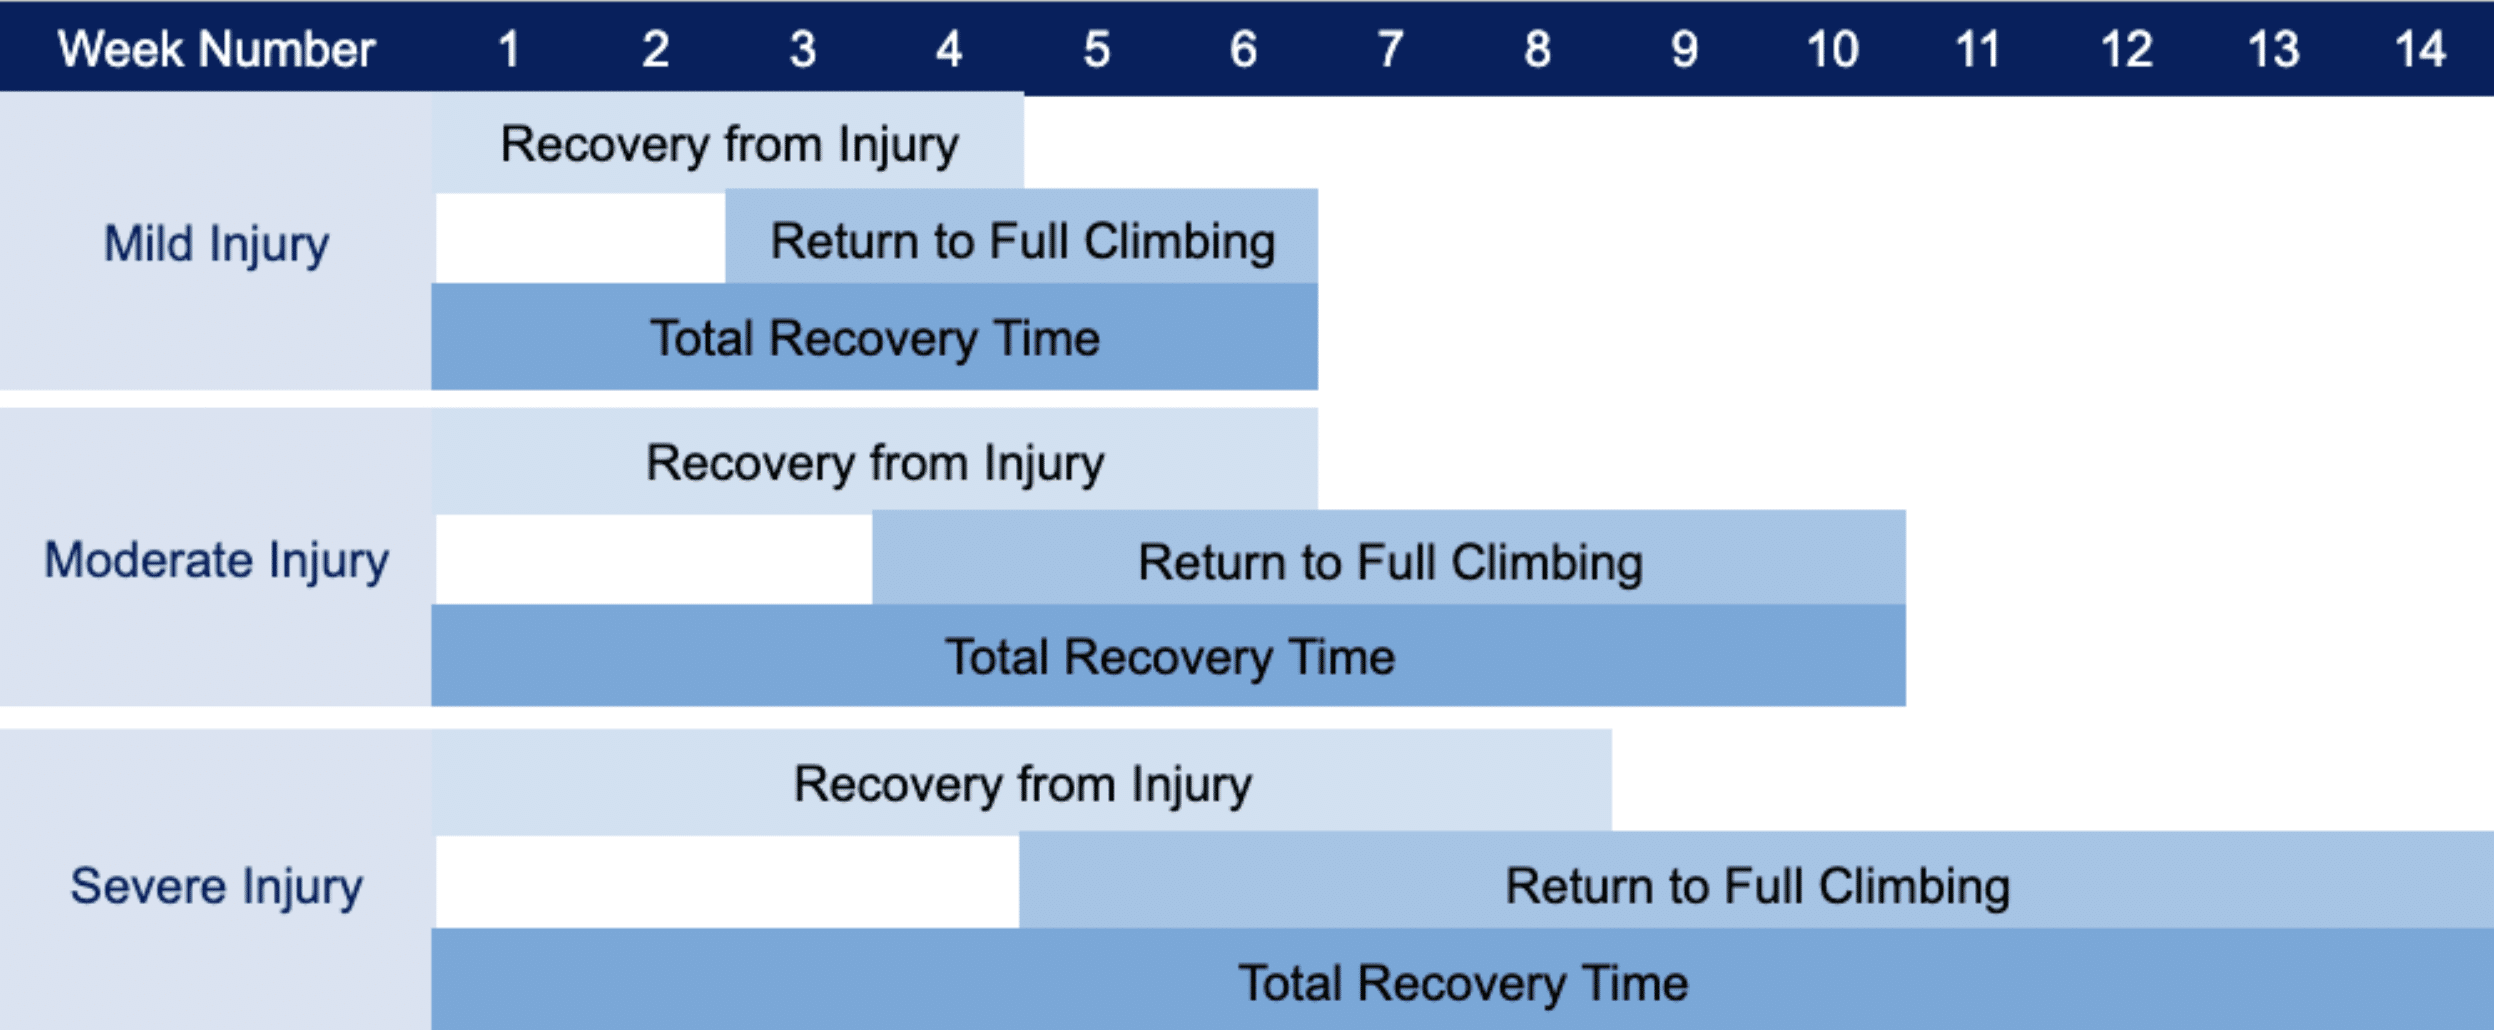
The timeframes for returning to full climbing depend on a variety of factors including the extent of the injury, time away from climbing, and the personal goals you want to achieve. The primary tissues that get injured for climbers (muscles, tendons, ligaments, joints) generally take 8-12 weeks to fully heal.
But tissue healing is only one part of the equation. Just because a tissue is healed or pain free does not mean that it is ready to be used at full capacity. Depending on the extent of the injury, time away from climbing, and your personal goals, our tissues need additional time to adapt to the demands of Full Climbing. To estimate the total time it will take to return to Full Climbing we need to consider how long it takes for your tissues to heal and how long it takes to build up your climbing tolerance/ability.
The charts below give general timeframes for both tissue healing and return to Full Climbing. Both need to be considered when judging if your recovery is progressing as expected.
Unrestricted Return to Climbing Timelines
Return to Climb Table
“Shoulder Spheres”
When returning to climbing after a shoulder injury there are some additional considerations. We obviously need to be mindful of Total Load but we also need to be mindful of shoulder/arm positioning when climbing, especially if you are recovering from a rotator cuff injury, impingement, or a labrum injury. Pulling with your arm fully stretched laterally to the side or fully overhead can be particularly challenging for the structures of the shoulder. I recommend limiting the range of motion at the shoulder and progressing this range of motion as tolerated.
You can quantify how far we’re reaching with our arms using your own body measurements and create cutoffs to use as a means to progress. Use the distance from your shoulder to your elbow, wrist, hand and finger tips as cutoff points. Each of these lengths creates an arc around your body that I like to call “spheres”. Keeping the sphere small reduces stress on the shoulders. Increasing the sphere will increase stress on the shoulders. Use the video and chart below to quantify which sphere to remain within while returning to climbing.
- Sphere 1 (green): don’t grab holds that are farther away from your body than your elbow can touch.
- Sphere 2 (yellow): don’t grab holds that are farther away from your body than your wrist can touch.
- Sphere 3 (red): don’t grab holds that are farther away from your body than the base of your fingers can touch.
Another important note is that some movement types are particularly demanding on the shoulders. Gastons are one of those movements to be especially mindful of. Progress the amount you use gastons more conservatively than normal hold types. Gastons are perfectly safe for your shoulders as long as you build up your tolerance appropriately.
Shoulder Spheres

Don’t get stuck on the “what ifs?”
Below are common questions climbers will ask when they are returning back to climbing
Can I climb if I have pain?
This answer is between you and your healthcare provider and will depend on the extent of your injury and your personal ability to hold back when you’re at the gym or at the crag. Always consult your healthcare provider if you’re experiencing pain while climbing.
For some conditions it is ok to climb when you are experiencing pain and this is why we have the “soreness rules”. The biggest take-home message is that you do not have to be 100% pain free before you start climbing. This is why it’s critical to be working with a healthcare provider who understands the ins and outs of climbing so they can set appropriate boundaries with your Total Load.
Healthcare providers who don’t understand climbing often simultaneously underestimate and overestimate the challenges of climbing on the body. When you ask “so can I climb?”, most think that you’re immediately going back to single arm mono pull ups or jumping directly into the Adam Ondra training plan and they also can’t comprehend how light climbing can be on the body for an intermediate or experienced climber if they’re just doing laps on 5.8.
On the flipside, many healthcare providers don’t truly understand how much stress goes through the fingers or shoulders when you are trying to climb at your limit. They may think that once your pain is gone, you’re ready to get fully back to climbing but they may not understand that getting back to your previous level of climbing takes time and a lot of hard work to build your tissue tolerance.
Will I ever get back to the same level of climbing after an injury?
The peer reviewed studies on this topic show a much more grim outlook than what my colleagues and I experience when treating climbers.
A recent study by Lum and colleagues surveyed 237 climbers with a variety of injuries that were either treated surgically or non-surgically.4 They found that 80% of climbers that did not undergo surgery returned to the same level or better than before their injury and 70% of climbers that underwent surgery returned to their prior level of climbing or better. An important note about this study is that it did not inquire about what types of treatments (if any) the participants underwent.
As a physical therapist who has been treating climbers for over 7 years I can confidently estimate that well over 90% of climbers who go through a full rehab program return to their previous level of climbing, and many of them return better than before.
This study showed that climbers that didn’t undergo surgery took an average of 4.4 months to return to their previous level of climbing and those that underwent surgery took 9.1 months to return to their prior level. The results also showed that 92% of climbers who underwent surgery for their injury were satisfied with their results and that it took an average of 9.1 months to return to their previous level of climbing.
Another study by Simon and colleagues found that only 34% of climbers who underwent rotator cuff repair surgery returned to their prior level of climbing but the majority returned to within 2 grades of their previous level.5 Again, in my years of experience I have seen better overall outcomes.
How do I wean off of taping my finger or wrist?
The peer reviewed studies on this topic show a much more grim outlook than what my colleagues and I experience when treating climbers.
A recent study by Lum and colleagues surveyed 237 climbers with a variety of injuries that were either treated surgically or non-surgically.4 They found that 80% of climbers that did not undergo surgery returned to the same level or better than before their injury and 70% of climbers that underwent surgery returned to their prior level of climbing or better. An important note about this study is that it did not inquire about what types of treatments (if any) the participants underwent.
As a physical therapist who has been treating climbers for over 7 years I can confidently estimate that well over 90% of climbers who go through a full rehab program return to their previous level of climbing, and many of them return better than before.
This study showed that climbers that didn’t undergo surgery took an average of 4.4 months to return to their previous level of climbing and those that underwent surgery took 9.1 months to return to their prior level. The results also showed that 92% of climbers who underwent surgery for their injury were satisfied with their results and that it took an average of 9.1 months to return to their previous level of climbing.
Another study by Simon and colleagues found that only 34% of climbers who underwent rotator cuff repair surgery returned to their prior level of climbing but the majority returned to within 2 grades of their previous level.5 Again, in my years of experience I have seen better overall outcomes.
Taping can be very helpful for pain relief and is commonly used in the management of finger and wrist injuries. There is good evidence in support of H-taping for pulley injuries6 and anecdotal evidence for circumferential taping or using a wrist “widget” for wrist injuries. When weaning off of the use of tape I recommend a “bottom-up” approach. Initially, stop using tape on easier climbs but continued to use it on harder climbs. Then progressively increase the difficulty of the climbs you do without the tape.
Taping Taper

How do I get more confident with jumping off a boulder or taking a lead fall?
You can systematically increase the intensity of dynamic loading such as jumping off a boulder or landing from a lead fall. This progression not only builds tissue capacity over time but also increases your confidence to be able to tolerate these challenges.
Progression of Height

One climber to another: tips to get you back climbing safely
Should I start in the gym or outside?
I almost always recommend starting back to climbing in a gym for several reasons:
- It is easy to climb easy routes and the holds tend to be good and plentiful.
- The grades are usually very consistent (even if they’re not perfect), allowing you to be more structured.
- It is easy to create a structured program so you can ensure you are doing the appropriate Total Load.
- It’s easy to get a good warm up at the gym.
- It’s easy to choose the ideal route types and avoid the ones that will aggravate your symptoms.
Use the gym as a tool and don’t be afraid to break the rules.
If you’re climbing a route that’s an appropriate grade and come upon a hold that you know might aggravate your symptoms (a small crimp or an overhead undercling), don’t force yourself to use it. Grab that pink hold on the route next door, grab the draw and pull past, or just jump off and do the bottom of the route again. The goal is to climb safely and to appropriately challenge your tissues.
Don’t feel like you have to play by the rules. Nobody is going to care if you use some extra footholds to make the clipping stance safer.
Don’t slow down. Change lanes.
Just because you’re doing easy climbing does not mean it has to be mindless. This is your opportunity to finally work on those drills you’ve been meaning to try for the last two years. Practice your breathing cadence, focus on your footwork, practice flagging, practice static climbing. This is truly the best time to focus on improving your technique because that may have been what caused your injury in the first place! You can get ideas for specific drills here.
Climb with people who are good influences on you.
Our friends and partners make a huge impact on our choices so when you’re returning to climbing go with the people who will support you doing laps on the top rope 5.10a, rather than the ones who will push you to “just give it a shot” on the overhung 11c. Tell those other friends that you’ll gladly climb with them again in 3 months.
On the flip side, don’t be “that guy” for your friends who are recovering from an injury.
Write down and track your Total Load, then plan your sessions ahead of time.
Keep a small notebook or track on your phone the number of climbs and their difficulty. It’s hard to keep track of the climbs you do in a single session, let alone over a period of months. Documenting allows you to accurately track each session so you can remember your total load from the last session, identify your response to that session (green light, yellow light, red light), and to plan your next session accordingly.
Always consult your healthcare provider if you are not progressing as expected.
After reading this article you should have a general understanding of what a normal progression is and if you’re getting persistent pain or you’re not able to consistently get “green lights” after your sessions, there could be an underlying impairment causing your symptoms or you could just need a more individualized climbing plan.
As a physical therapist who specializes in treating rock climbers, I spend a lot of time teasing out the nuances of each individual’s return to climbing program.
Having a structured, measurable framework has a number of benefits but the most important are the mental benefits. For us climbers, not being able to climb sucks — but what is often more mentally taxing is not knowing how much to climb once you return to the wall.
I hope you can use this framework to confidently guide your own return to climbing program. Take the guesswork out of it so you can focus on the most important part — enjoying the climbing.
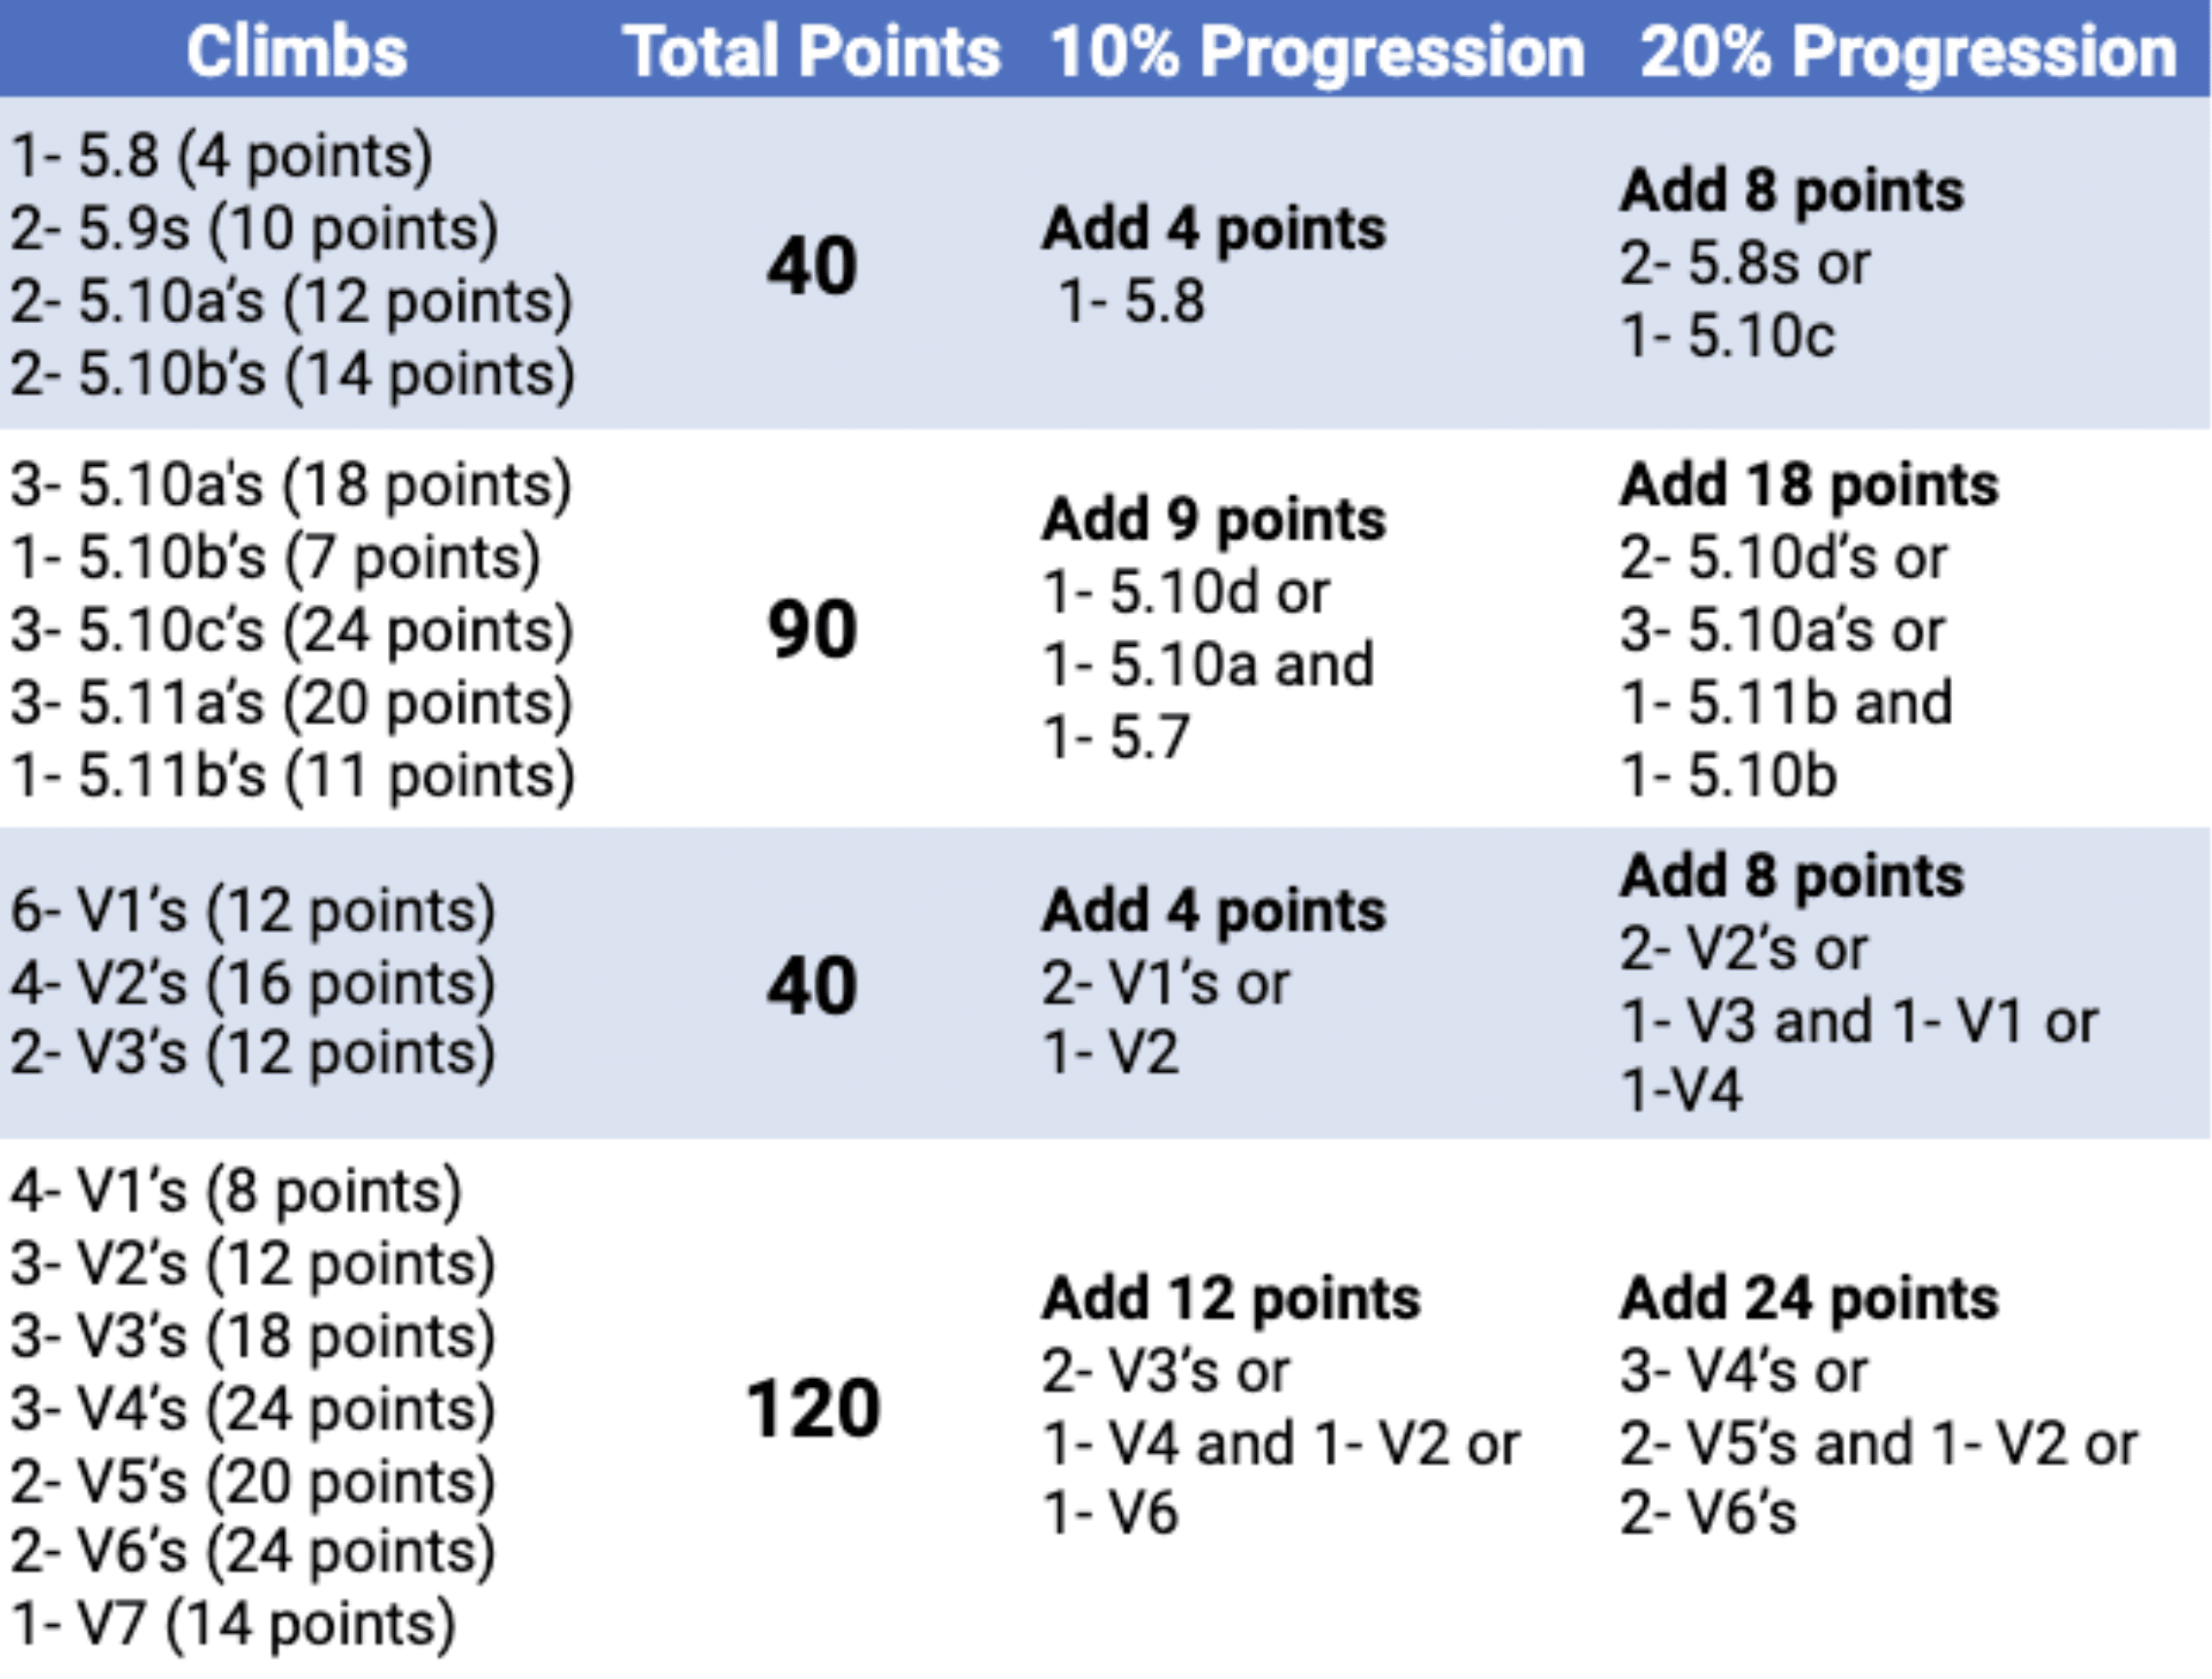
Here is an example of how to use the point system to quantify your Total Load and to make appropriate progressions.
Point System Example
Author Bio

Evan Ingerson is a physical therapist and board certified orthopedic specialist who practices at Mend in Boulder, Colorado. He specializes in treating rock climbers and returning them to the wall safely and effectively. Evan has been treating rock climbers for over 7 years from beginners to international competitors and he wrote this article because he was tired of all the mediocre advice being given to climbers about their return to climbing programming. Evan is a climber of over 20 years and is a 10 time youth national competitor. Please get in touch at evan@mendcolorado.com. Check out his link tree for additional content.
References
-
University of Delaware. Soreness Rules. chrome-extension://efaidnbmnnnibpcajpcglclefindmkaj/https://cpb-us-w2.wpmucdn.com/sites.udel.edu/dist/c/3448/files/2016/10/SorenessRule_2015-17jkl39.pdf
-
Fees M, Decker T, Snyder-Mackler L, Axe MJ. Upper extremity weight-training modifications for the injured athlete. A clinical perspective. Am J Sports Med. 1998;26:732-742.
-
Adams D, Logerstedt DS, Hunter-Giordano A, Axe MJ, Snyder-Mackler L. Current concepts for anterior cruciate ligament reconstruction: a criterion-based rehabilitation progression. J Orthop Sports Phys Ther. 2012;42(7):601-614. doi:10.2519/jospt.2012.3871
-
Lum ZC, Park L. Rock climbing injuries and time to return to sport in the recreational climber. J Orthop. 2019;16(4):361-363. Published 2019 Apr 12. doi:10.1016/j.jor.2019.04.001
-
Simon M, Popp D, Lutter C, Schöffl V. Functional and Sports-Specific Outcome After Surgical Repair of Rotator Cuff Tears in Rock Climbers. Wilderness Environ Med. 2017;28(4):342-347. doi:10.1016/j.wem.2017.07.003
-
Schoffl I, Einwag F, Strecker W, Hennig F, Schoffl V. Impact of taping after finger flexor tendon pulley ruptures in rock climbers. J Appl Biomech. 2007;23(1):52-62. doi:10.1123/jab.23.1.52
- Disclaimer – The content here is designed for information & education purposes only and the content is not intended for medical advice.

