Femoroacetabular Impingement Syndrome (FAI)

Do you have pain in the front of your hip or groin?
- Is sitting cross-legged or in low chairs uncomfortable?
- Is your hip pain worse following a climbing session?
- Have you noticed high-stepping or cross-over moves cause you pain?
If you answered yes to any of these questions, you may have Femoroacetabular Impingement Syndrome (FAI). Check out the article below to learn how to diagnose and self-treat this condition.

https://orthoinfo.aaos.org
Femoroacetabular Impingement Syndrome (FAI) is a common injury seen in climbers. The hip joint is a ball and socket joint made up of the femur (ball) and the pelvis (socket). When the shape of the ball or socket are altered, a “pinching” of the bones and surrounding tissue can result. There are two types of anatomical presentations that can cause pinching; a cam and a pincer Impingement. Imagine that you place a piece of pro in a vertical seam directly under a bulge and the stem of the cam keeps rubbing on the bulge as you climb higher; this is similar to a pincer impingent. Now imagine that your buddy shoves a fully retracted oversized cam in a small crack that is seemingly impossible to clean because of the size of the cam; this is similar to a cam impingent. One or both of the anatomical presentations may be the reason that climbers may develop FAI. In addition to the anatomy, specific climbing movements such as high-stepping, boulder sit starts and large cross-over moves can leave you susceptible to pain with this condition.
How do you know if you have Femoroacetabular Impingement Syndrome?
Watch and perform the movement shown in the video below, or have a friend perform the motion passively on you as seen in the next video. If a recognizable pain is felt in the front (anterior) of your hip with either or both of these tests, you may have femoroacetabular impingement syndrome (FAI).
There are many ways to treat FAI including rest, physical therapy, and surgery. Conservative treatment of the injury, via physical therapy, is a must.
This article presents a series of videos that you can use to self-rehabilitate your hip in order to return to pain-free, high-level climbing. If the program laid out below is not helpful in treating your injury, consider an alternative diagnosis and the need for formal treatment from a Doctor of Physical Therapy.
The progression of exercises follows the Rock Rehab Pyramid protocol guidelines outlined in Dr. Jared Vagy’s book Climb Injury-Free.

1. Unload 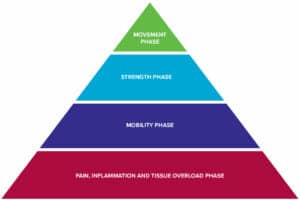
FAI syndrome results from over-stressing the tissues that comprise the front of your hip. Pain and inflammation at the injury site can be expected as a result of this repeated “pinching” of the bones and surrounding tissue. Unloading the injured tissues and avoiding anything that will reproduce your painful symptoms is an annoying but necessary first step in your recovery from FAI syndrome. If high-stepping or cross-over moves continually aggravate your hip, avoid the movement. If sitting in a low chair or deep squatting bothers you, modify the position or activity. Positions where your thigh is close to your chest or crossed over your other leg should be avoided. Once you have given your hip some rest and the pain has calmed down, you can begin the Mobility phase of the Rock Rehab Pyramid.
2. Mobility
Foam Roller for Piriformis/Deep hip muscles
Allowing the deep muscles of you hip to loosen and relax can help with your hip pain. If the starting position is too painful, instead of crossing your leg over your opposite knee, cross your leg over your opposite foot. Perform for up to 3 mins.
Supine inferior femur glide with hip flexion (Powerband)
Before trying this mobilization, find a movement or position that you know is bothersome. Perform the movement before and after the mobilization. If your symptoms are improved following the technique, continue performing up to 3x/day. Using a Powerband, fix one end to a stable surface and perform the movement shown in the video. Your arms should be doing all of the work allowing the muscles of your hip to relax. Avoid reproduction of pain!
Quadruped inferior femur glide with hip flexion (Powerband)
Try this similar mobilization out to see which one (lying on your back or in quadruped) your prefer!
Same suggestions apply as noted in previous video description!
Dowel Squat
The next step to improving your hip mobility following your hip injury is to return to squatting in a controlled pattern. Using a dowel helps to prevent overarching of your low back which can contribute to your hip pain. The three points of contact for the dowel are sacrum (tailbone), mid-thoracic spine (between shoulder blades), and back of head. These contact points must remain unchanged throughout the squat!
3. Strength
Following an injury to the hip, the surrounding musculature including the glutes, hip flexors, and deep hip rotators will be working improperly due to a phenomenon known as arthrogenic muscle inhibition. It is vital to retrain and strengthen the muscles surrounding the hip to prevent future re-injury and progress your climbing. Perform the exercises shown below 3-4x/week for 6 weeks for true strength gains and improved hip performance.
Seated Hip Rotator Strengthening
Grab a stick or dowel, a theraband, and a high seat to complete the exercise show below!
Sideplank Clam Shells
Check out a post in Climbing Magazine by Dr. Jared Vagy “The Climbing Doctor” to learn more. Click here read the article and learn the proper performance of this essential exercise!


Single Leg Squat with Hip Mobilization
For a more advanced exercise to be performed once you have mastered the previous exercises described, try out this single leg movement. Once you are able to perform the exercise pain free with the band applying a mobilization, attempt the same movement without the band.
4. Movement
The Activation Position with Side-Stepping
To target all of the muscles we have been strengthening and prepare you to get back on the wall, acquire a 6 yard theraband (available here) and try out this exercise. To set up the theraband correctly, refer to this link (need link for setup). First, just sink into a comfortable squat to activate the muscle groups, once you are able to maintain the position for 30 seconds without a break, begin small side-steps as shown in the video.
Author Bio

Dr. Scott Dickenson is a physical therapist and athletic trainer. He earned his Doctorate in Physical Therapy at the University of Southern California and is currently completing an Orthopedic Residency at the University of Delaware. Scott has been fortunate enough to climb in Yosemite, Joshua Tree, Idyllwild, Squamish, and Lake Tahoe.
Please contact Scott if you have any questions:
Email: scottbdickenson@gmail.com
- Disclaimer – The content here is designed for information & education purposes only and the content is not intended for medical advice.

One Comment
Leave A Comment
Related Posts

Great post, thank you! I lost my footing and fell straight down on my right leg (no time to react & reposition) only several weeks ago. Couldn’t figure out what hip injury I had until I just watched your videos. My hip is much better now, but not 100%. I’m going to try these exercises.