Returning To The Fingerboard After A Finger Injury
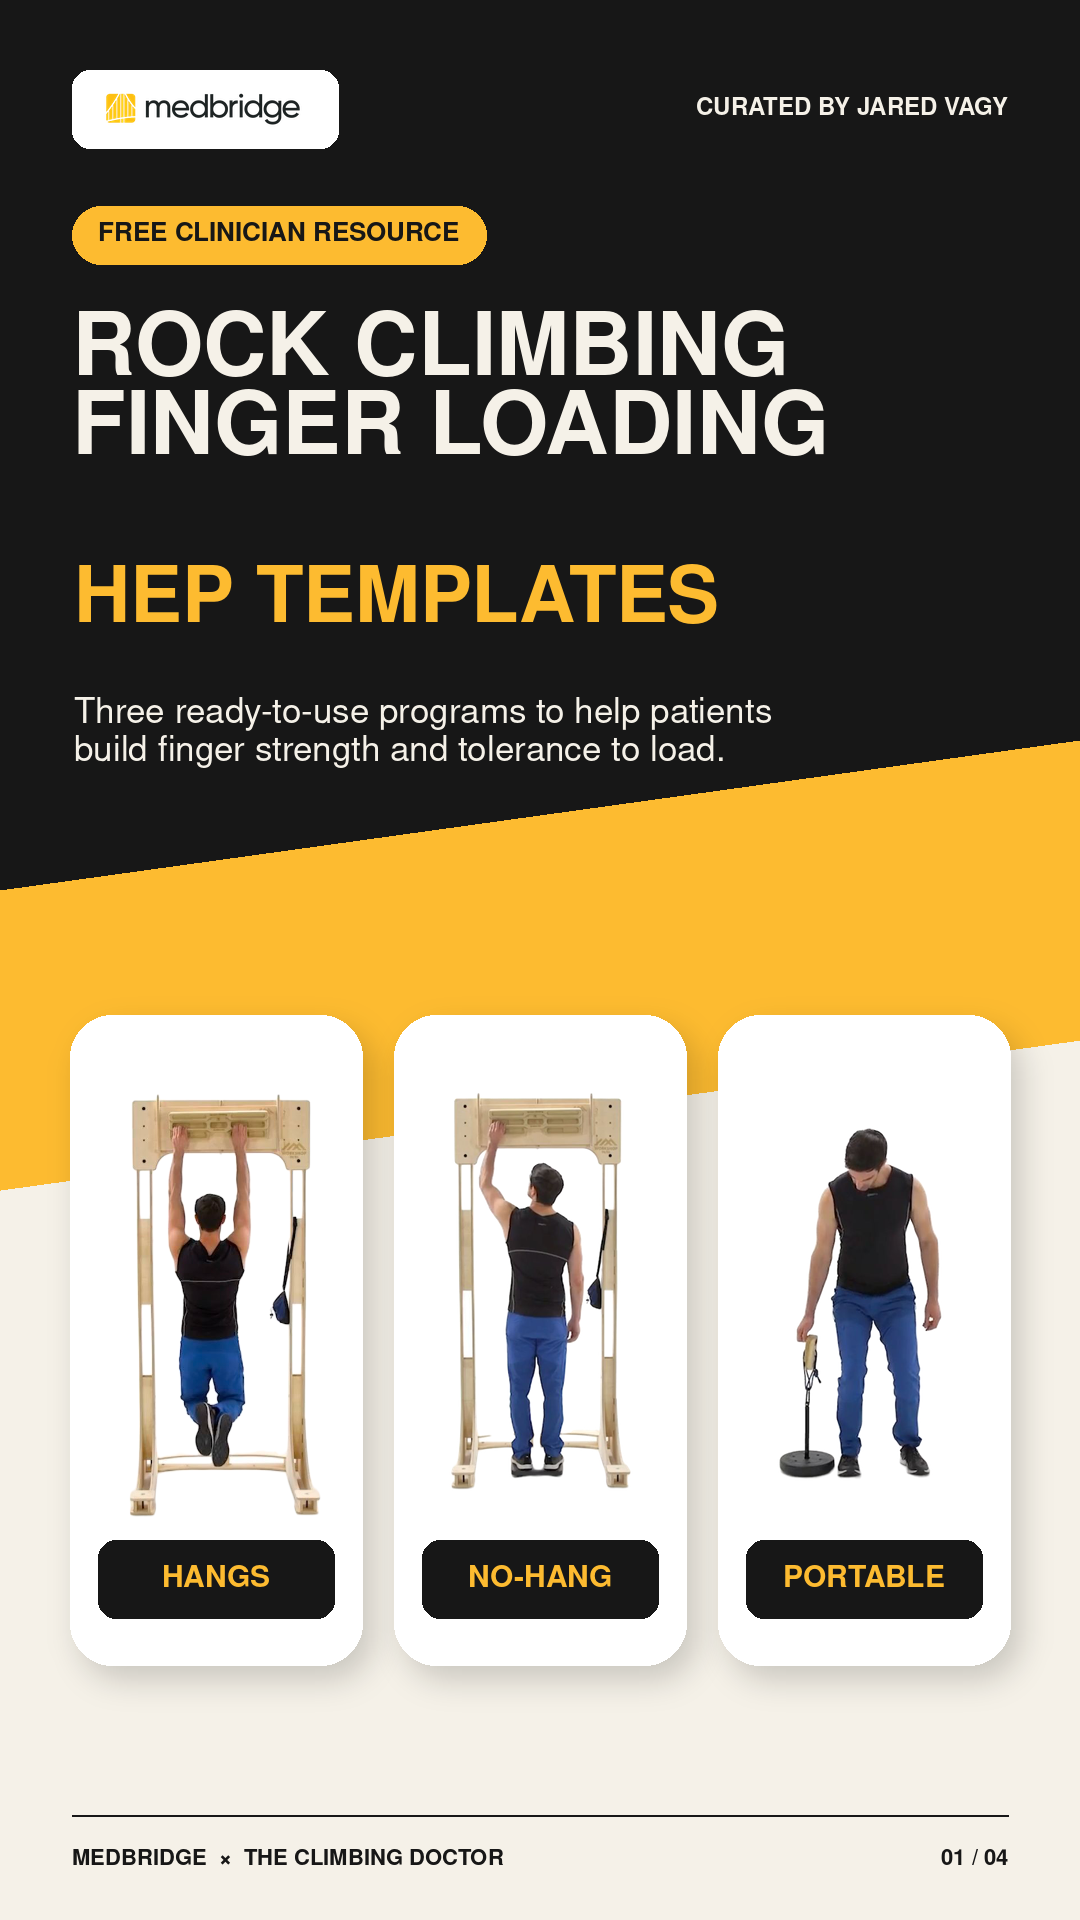
Three ready-to-use programs: hangs, no-hang, and portable.
When a finger is injured, the goal is not simply to avoid loading it. The goal is to find a way to load it that the tissue can tolerate, then gradually build capacity across the grips, positions, and forces climbing demands.
A fingerboard can make that process more precise. Rather than guessing whether a session was too much, you can adjust the amount of bodyweight through the fingers, the grip position, the edge size, and the type of contraction. This gives you a way to begin with a comfortable entry point and progress toward the demands of climbing.
That matters because different grips can place very different forces on the finger structures. Compared with an open grip, crimping increases the force on the A4 pulley by about four times and the force on the A2 pulley by about thirty times.1 The ring and middle fingers are also exposed to high pulley forces during climbing, which helps explain why they are commonly injured.2 A small change in grip, edge, or load can therefore make a meaningful difference in what an injured finger experiences. If you want to read more, see Pulley Injury Anatomy, Biomechanics and Research.
In this article, we’ll go through three ways to load the fingers. One adjusts how much bodyweight your fingers support. One lets you measure and control the force more directly. The third allows you to train the finger flexors through different movements and contractions away from the wall. Together, they provide multiple ways to progressively reload an injured finger while building back toward climbing.
Program 1: Stationary Fingerboard Hangs
A climber can hang with two arms, one arm, weight removed, bodyweight, or added weight. These options create a practical progression for an injured finger: begin by reducing the load enough to make the exercise tolerable, then gradually build toward bodyweight, more demanding grips, and eventually added resistance. Let’s go through each option.

Measure pull force on a scale, then train at a selected percentage of maximum.
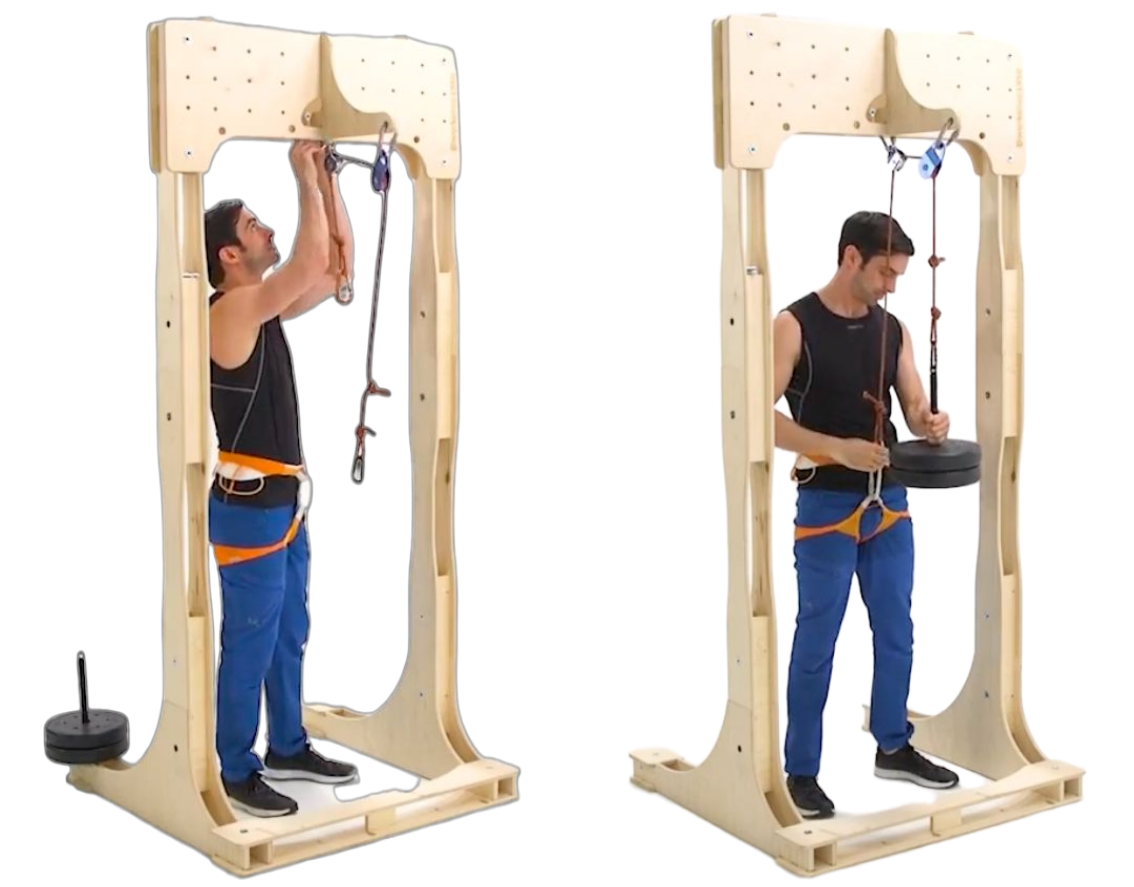
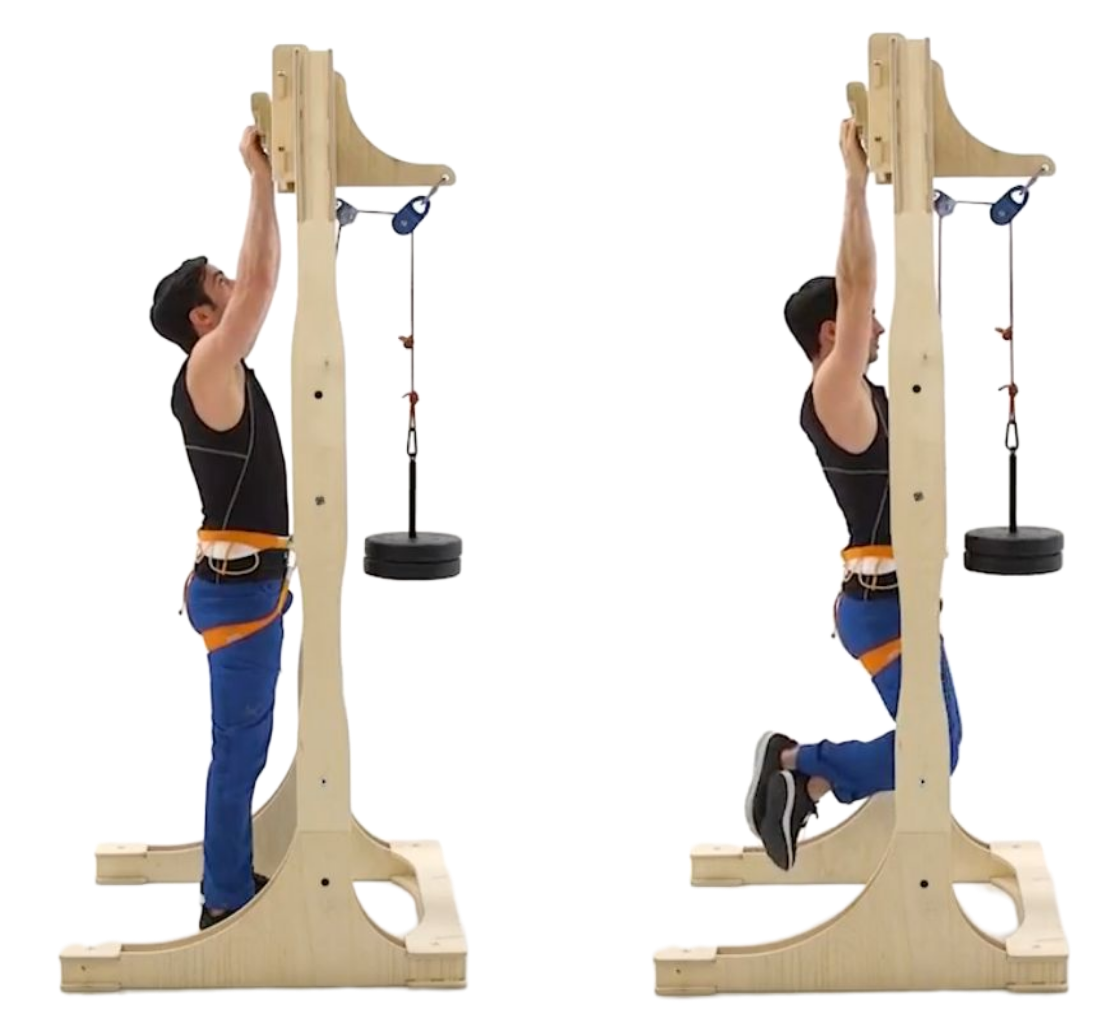
This is the one most climbers skip, and it’s the one that makes finger training possible if you can’t hold your bodyweight yet. A pulley system takes a set amount of weight off of you, so a hang that would otherwise be impossible becomes something you can control.
Equipment: fingerboard, harness, weights, two pulleys, carabiners, and a piece of cordelette.
Setup: Hang the two carabiners either both in front of you, or one in front and one to the side, and secure the pulleys to them. The cordelette runs through each of the pulleys. If there’s nothing to clip to, drill two eye screws into the wall or door frame beneath the fingerboard to act as anchors. Grasp the weight stack and attach it to one end of the cordelette with a carabiner, then attach the other end to your harness.
Movement: Select your hold or edge depth. Reach both hands overhead and grasp the holds. Bend your knees, tighten your core, engage your shoulder blades, and soften your neck. The pulley system will subtract the weight from your body, which is what makes the hang easier. After you’ve finished, remove the carabiner from the harness and lower the weight.
Tip: Keep even pressure on your fingers and avoid overgripping. Chalk is recommended to improve your contact friction with the holds.
This is the version everybody already knows. All you need is a fingerboard.
Movement: Select the hold or edge depth. Reach both hands overhead and grasp the holds. Tighten your core and engage your shoulder blades. After you’ve completed the hang, lower back down.
Tip: Keep your neck muscles soft while you hang. Shrugging up toward your ears is a common habit and it doesn’t help you. Chalk up.
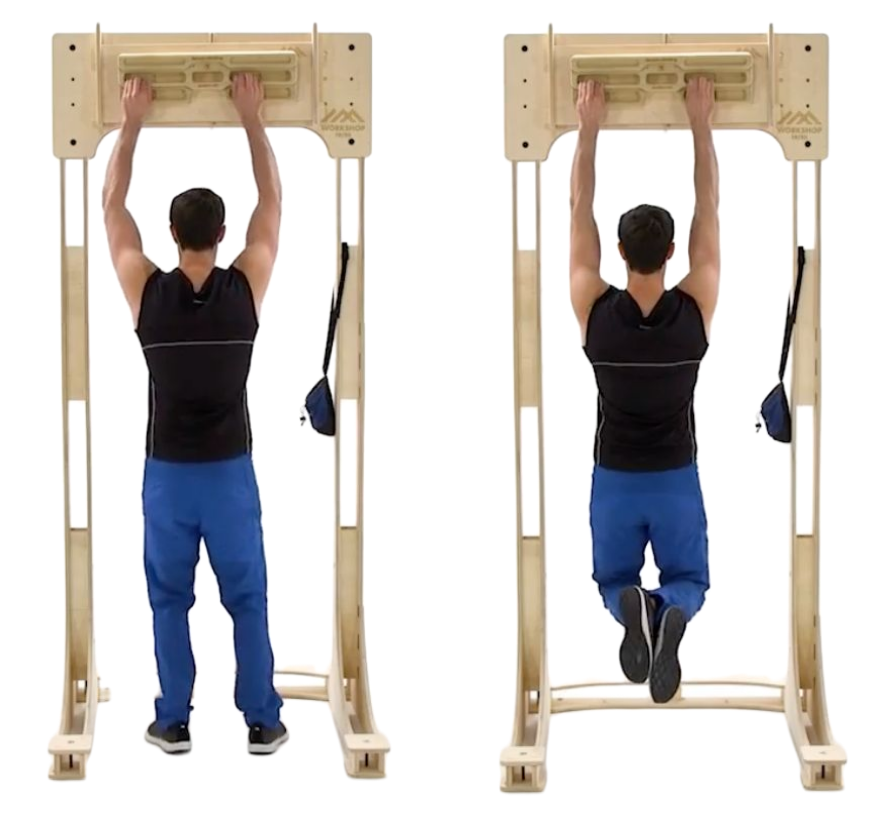

Once bodyweight on your chosen edge feels comfortable, adding weight is a more controllable way to progress than dropping down to a smaller edge. Added weight is a number you choose. A smaller edge changes how the load is distributed through the finger, and that’s harder to predict.
Equipment: fingerboard, dip belt or harness, and added weight.
Movement: Add the selected weight to the dip belt or harness and fasten it across your waist. Select your hold or edge depth. Reach both hands overhead and grasp the holds. Tighten your core, engage your shoulder blades, soften your neck, and bend your knees. Keep even pressure on your fingers and avoid overgripping. Lower back down when you’ve finished.
Tip: Chalk up.
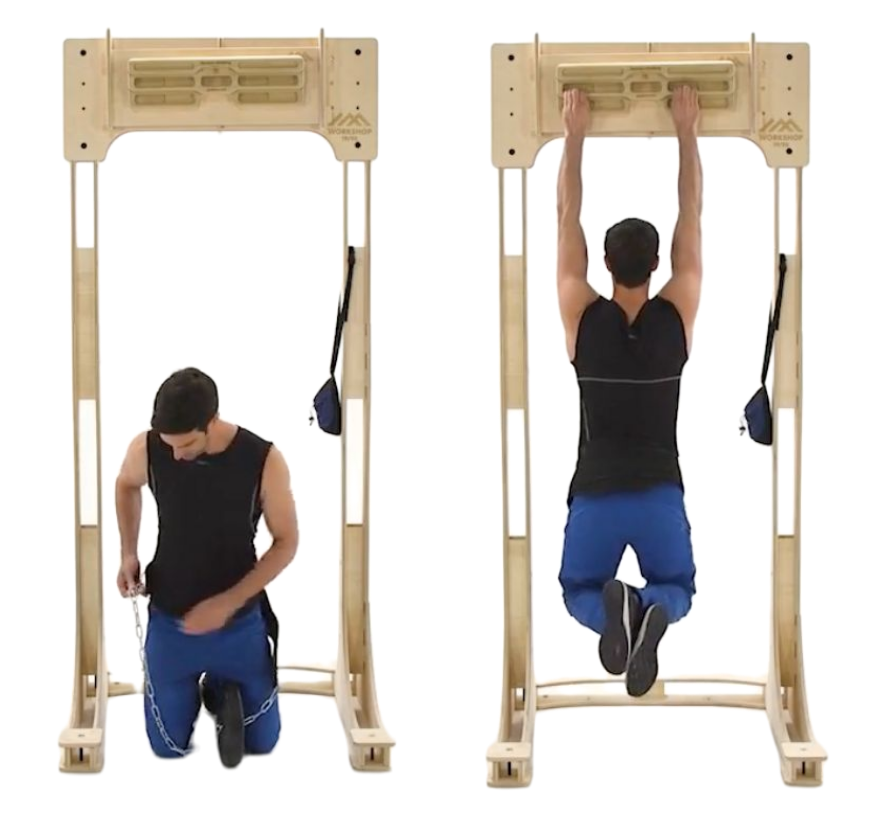
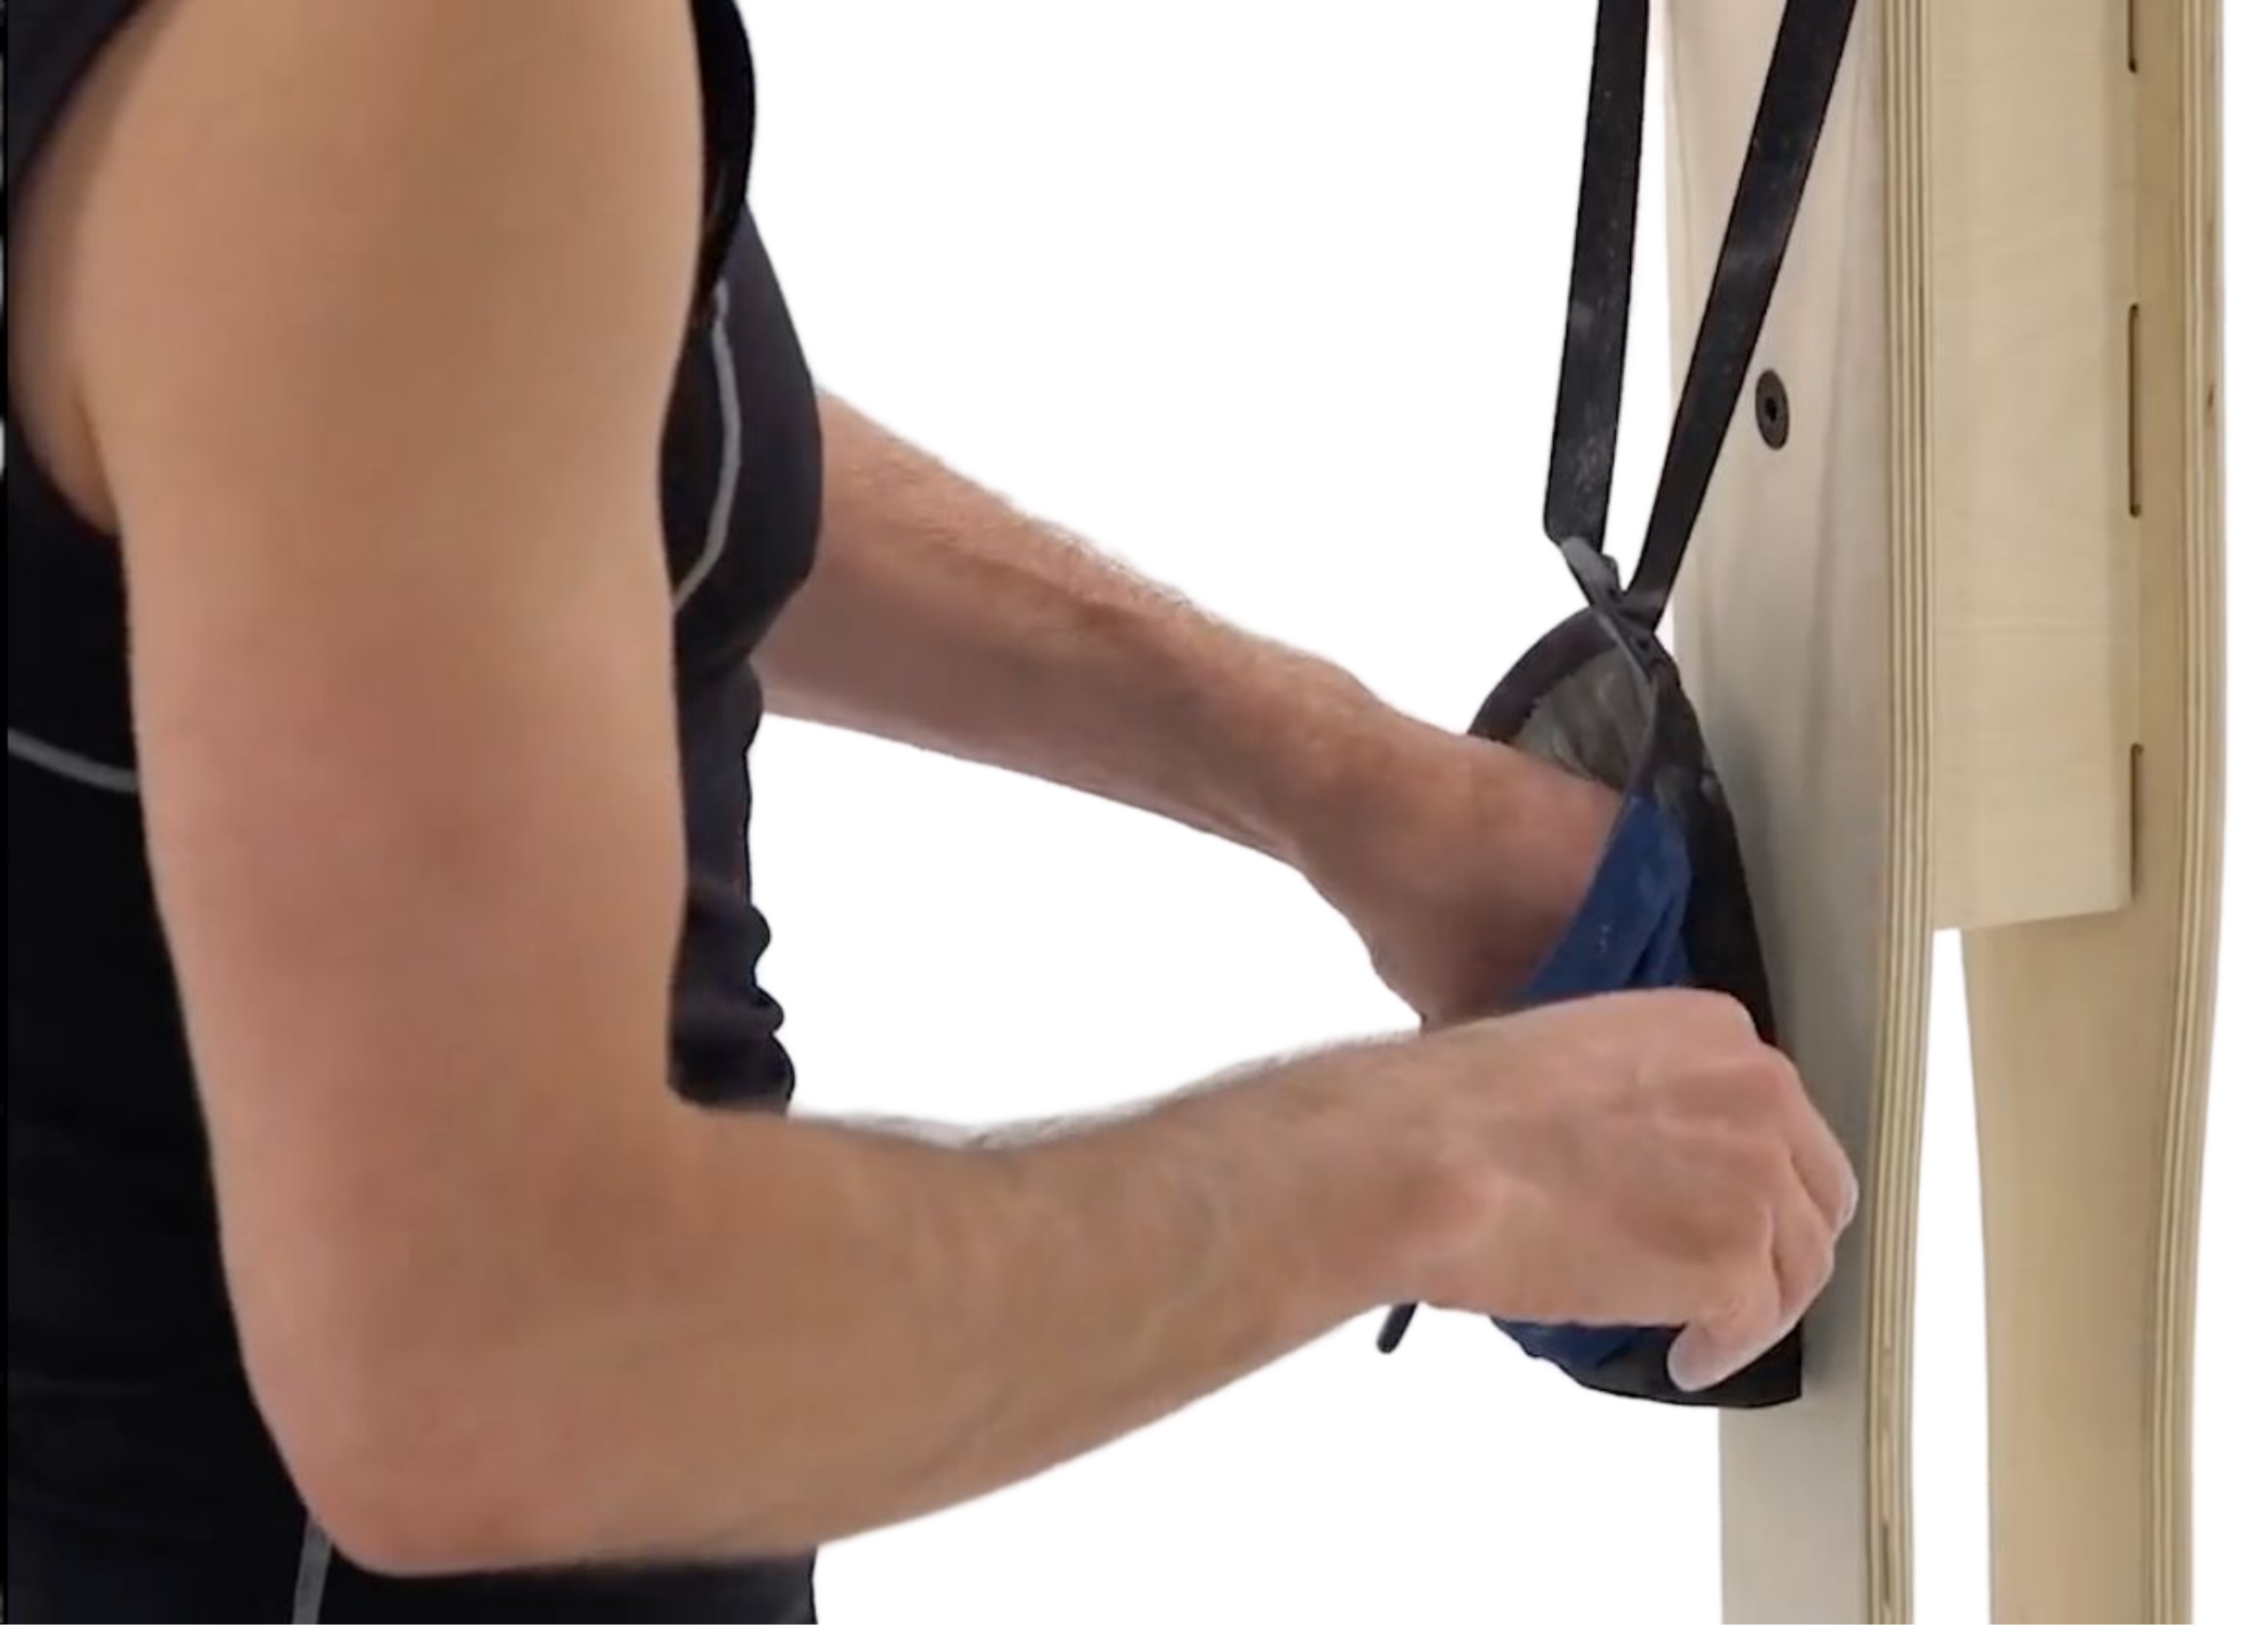
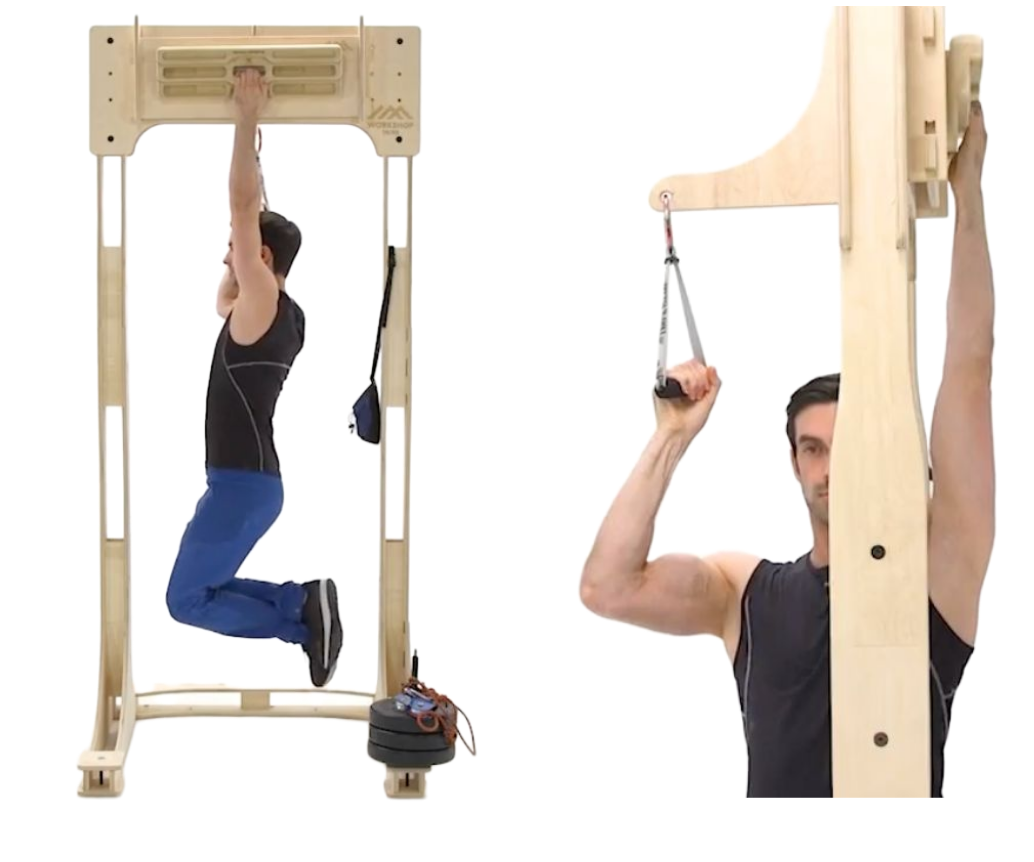
Going from two arms to one is a big jump. It’s the same bodyweight, but now it’s on one hand instead of two. Using the opposite hand for assistance lets you make that jump gradually.
Equipment: fingerboard and a handle secured beneath or behind the board.
Movement: Grasp the handle with your elbow bent. Reach with your opposite hand for the selected hold with your elbow straight. Bend your knees, tighten your core, engage your shoulder blades, and soften your neck. Hang for the prescribed amount of time, then lower back down.
Tip: To quantify how much you’re assisting, or to add a level of challenge, swap the fixed handle for a pulley system. Run a cordelette between two pulleys and secure each pulley with a carabiner. Attach a handle to one end of the cordelette and the prescribed weight to the other. Pull down on the handle with one arm while the other arm grasps the hold overhead with a straight elbow.

What To Look For While You Hang
Hanging is also the best opportunity you’ll get to study how your fingers work. Hang one- or two-handed from an edge you can hold in a half crimp for at least ten seconds. Either have a partner observe your fingers or set up your phone to record a video, then watch for asymmetries in your finger positioning.4
These are known as splits and shifts. A split occurs when a single finger separates to one side. A shift happens when all the fingers move to one side together. Counting the thumb as digit one, the common patterns are a digits 2-4 shift, a 2/3 split, a 3/4 split, and a 4/5 split. Notice whether they’re symmetric or whether they only happen on one side. The images below, from my book The Resilient Climber, show symmetric alignment next to the three most common splits:
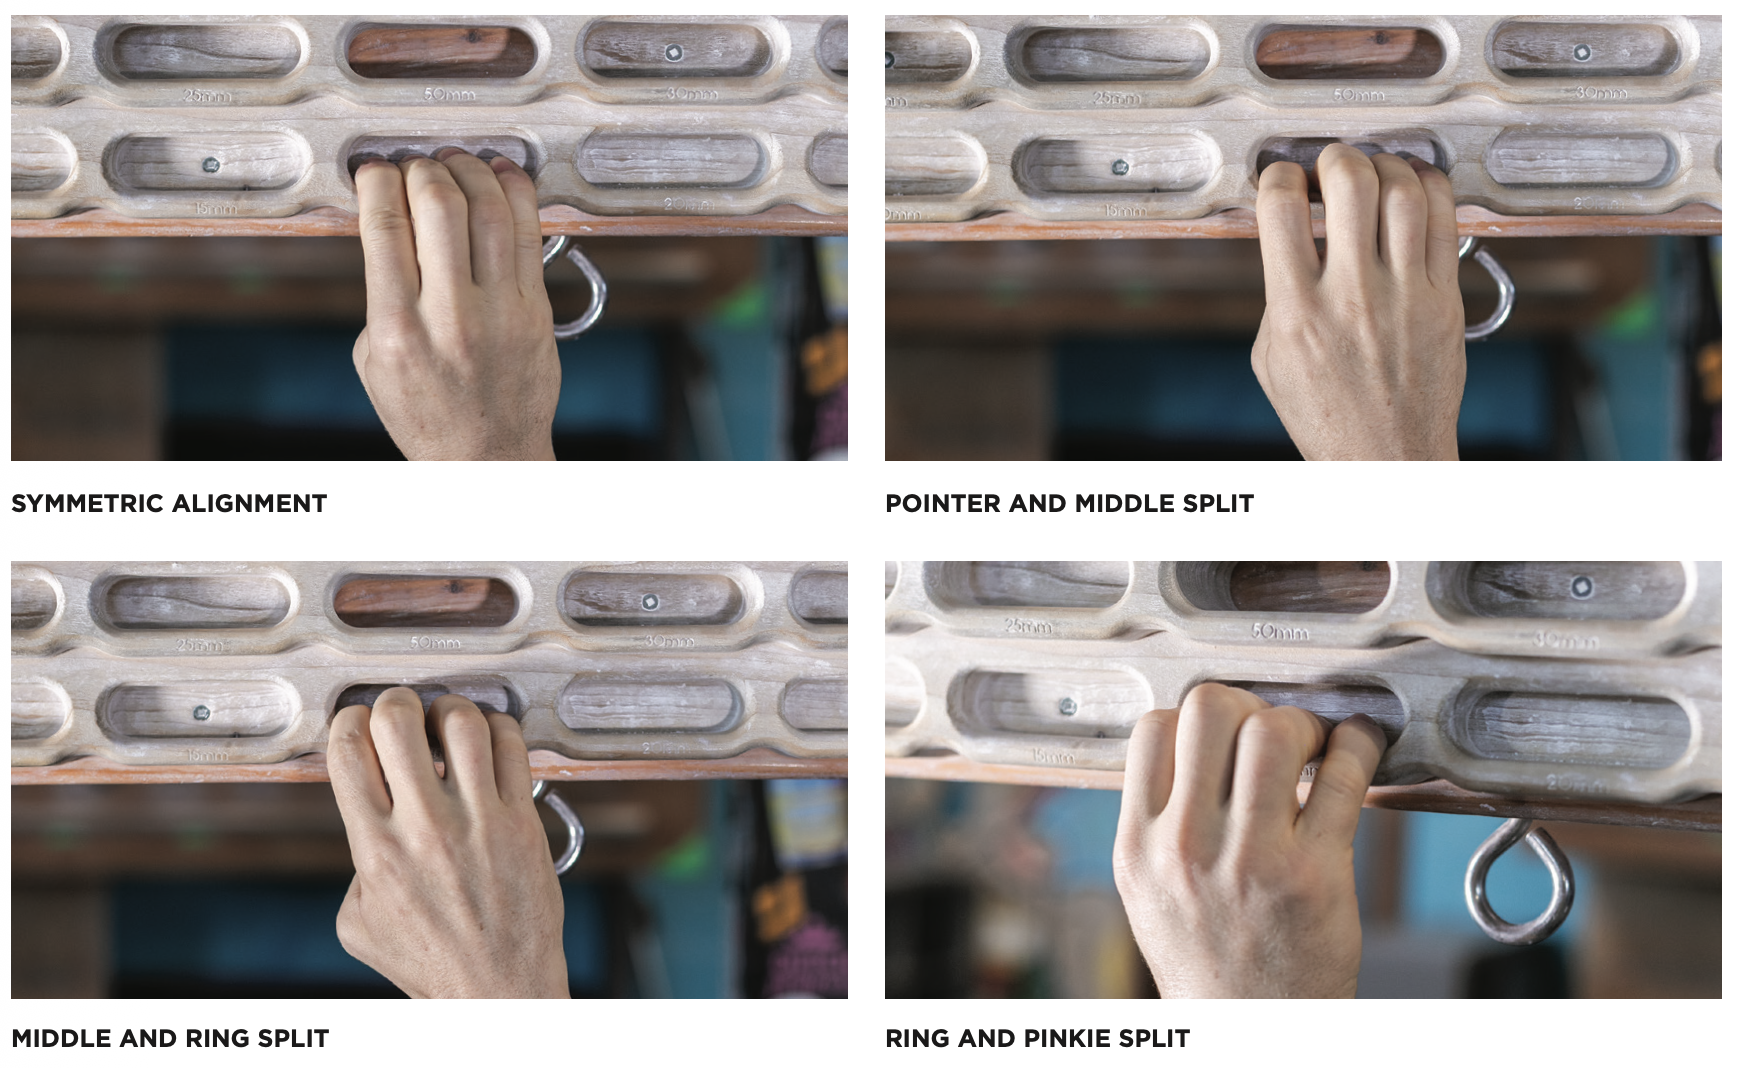
Splits and shifts on a fingerboard edge. Images from The Resilient Climber.⁴
Splits and shifts are fairly common on smaller crimps and they aren’t necessarily bad. What matters is whether you can correct them on larger edges. If you can’t, that uneven load becomes a problem over time, and it’s worse on a fingerboard than on the wall because you’re repeating the same position over and over. You can’t change your finger length, but you can address the things that contribute to it: weakness in the fingers and hands, and further down the chain into the wrists and shoulders.
Program 2: Stationary No-Hang Protocol
The second program takes the hang away. Your feet stay on the ground, you pull down on the hold instead of hanging from it, and a scale tells you how hard you pulled. This is the cheapest version of something I do in the clinic with tension and compression dynamometers. If you want the full picture of no-hang testing, including fixated versus non-fixated positions and what the numbers can tell you about an injured finger, see No Hang Finger Strength Testing For Climbers. A bathroom scale is the most accessible version of this. It won’t give you the precision of a dynamometer, so use it to track yourself over time rather than to compare against another climber on different equipment.
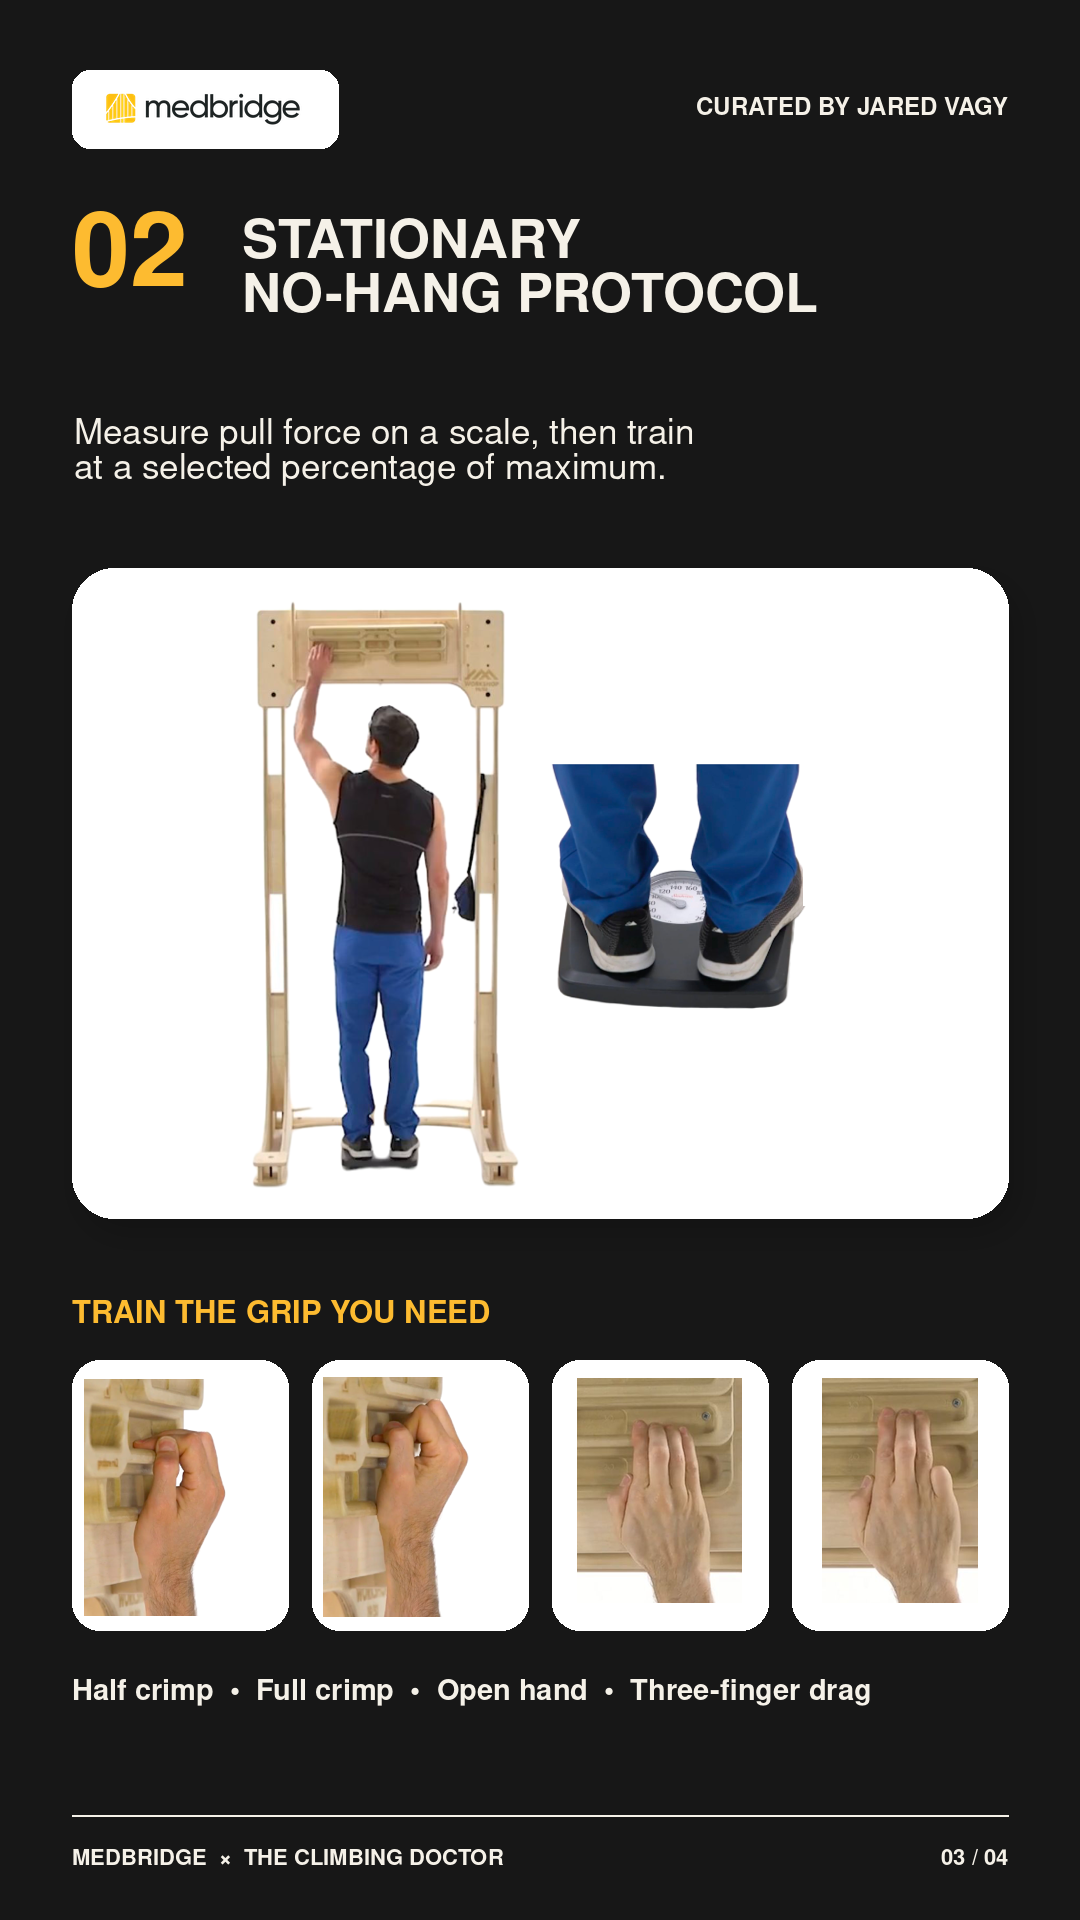
Measure pull force on a scale, then train at a selected percentage of maximum.
Equipment: fingerboard and a scale.
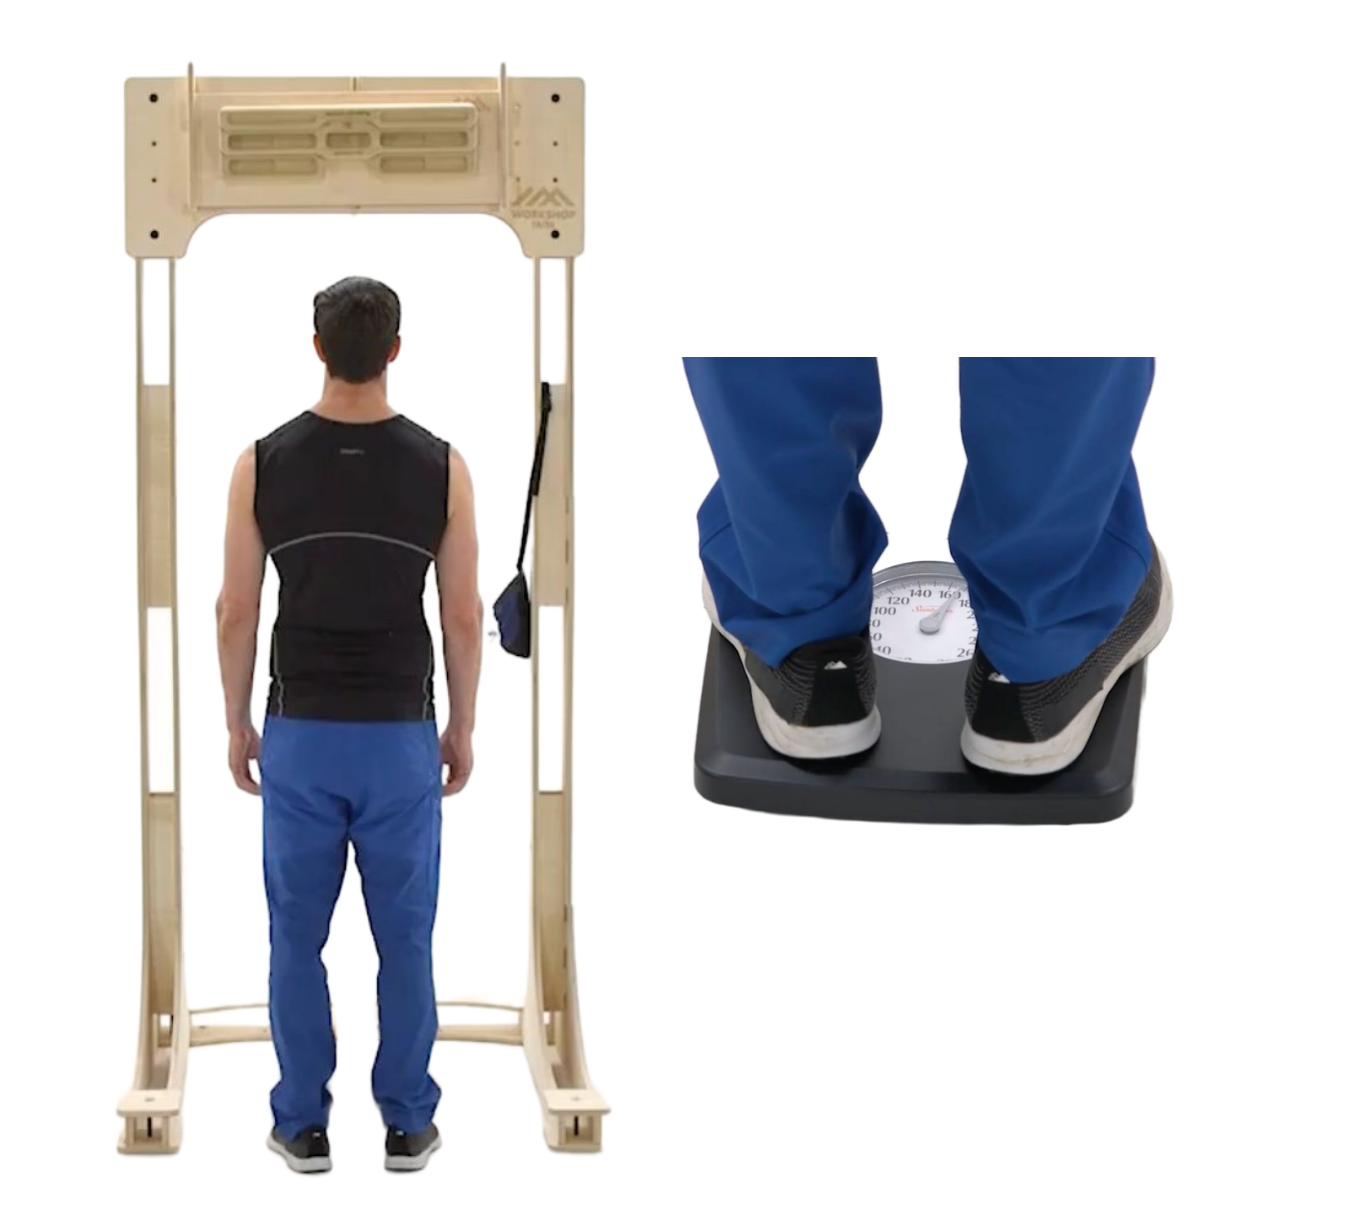
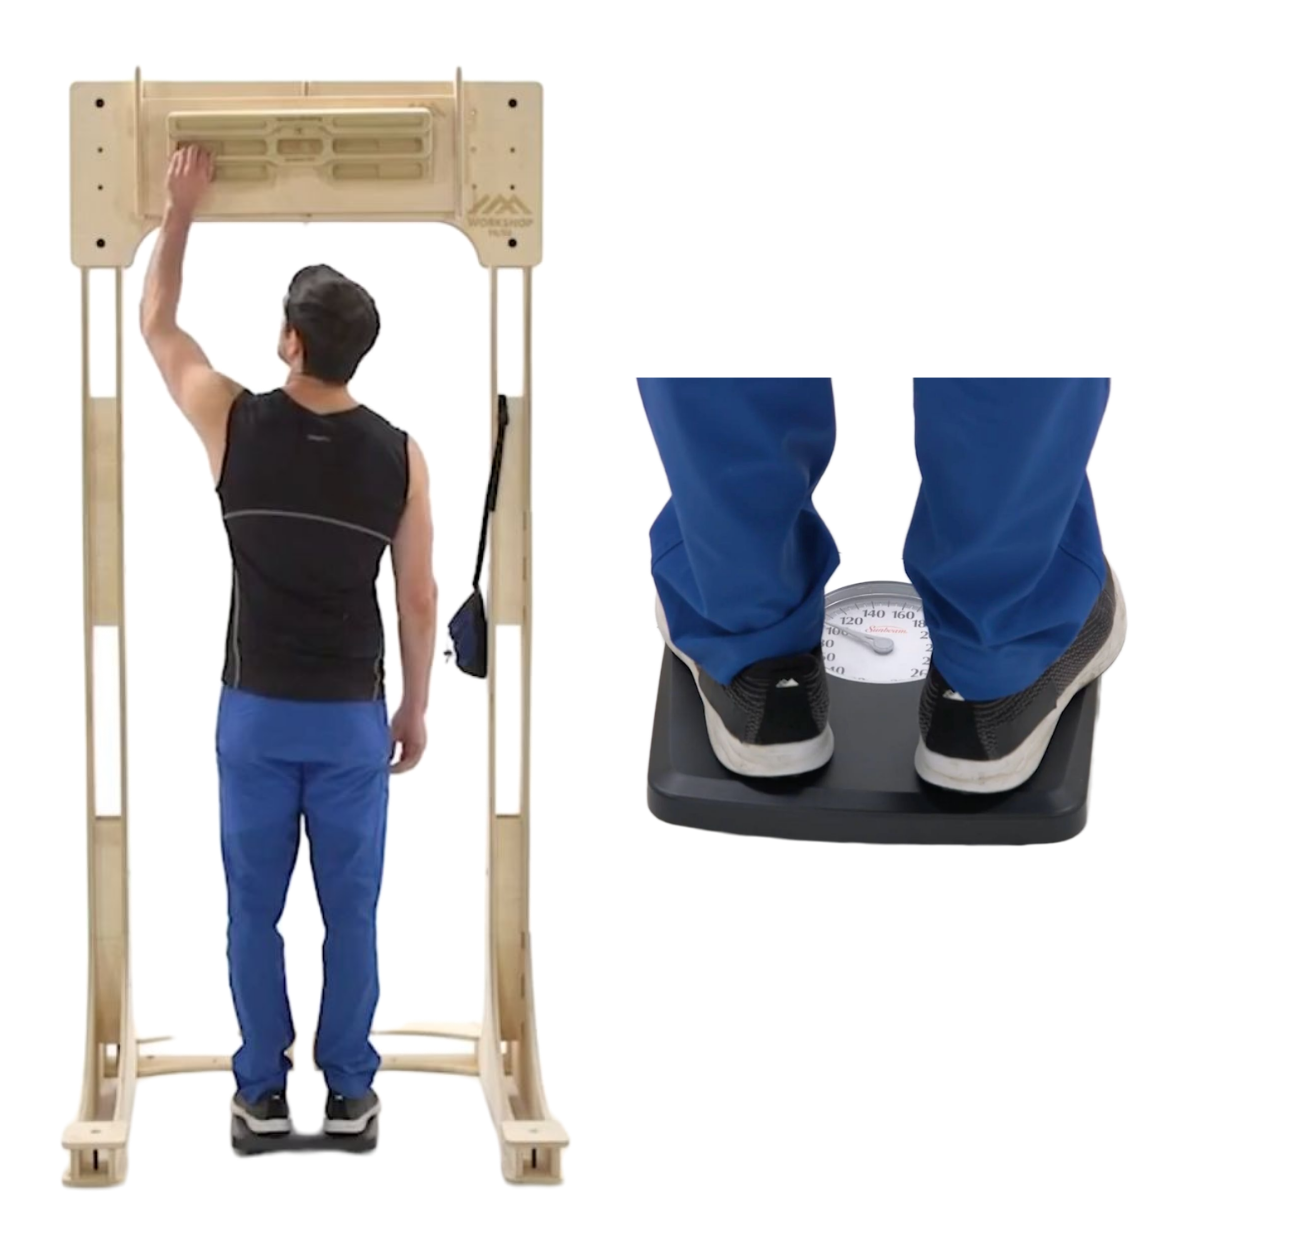
Setup: Warm up thoroughly first. Stand on a scale beneath the fingerboard and calculate your weight. In the example below, the climber weighs 170 lb.
Movement: Reach one arm overhead and grasp onto the selected hold with a straight arm. Pull down toward the ground with maximal force and hold it for three to six seconds. As you pull, you’ll see the weight on the scale decrease. Here, it goes from 170 lb to 100 lb. Subtract the reading on the scale from your overall weight. In this case, 100 is subtracted from 170, which equals 70 lb. That’s the climber’s maximal pull force.
170 lb – 100 lb = 70 lb of maximal pull force
Tip: Here are two examples of how to perform no-hang pulls based on a set percentage of maximal pull force. To pull 50% of maximal force, this climber takes 50% of 70 lb, which is 35 lb, and subtracts that from their body weight of 170 lb. That equals 135 lb, so they pull down until the scale reads 135 lb. To pull 70% of maximal force, they take 70% of 70 lb, which is 49 lb, and subtract that from 170 lb. That equals 121 lb, so they pull down until the scale reads 121 lb.
Target scale reading = body weight – (target % x maximal pull force)
If you can take the scale all the way to zero, the edge is too easy. Add weight and test again. Use the same edge each time so the numbers stay comparable, and retest periodically. As your maximum goes up, every percentage-based session gets heavier on its own. The reference values below were collected on a rung 23 mm deep with a 12 mm radius.5
What Your Number Means
A number on its own doesn’t tell you much until you have something to compare it to. Draper and colleagues tested crimp strength on a 23 mm rung across 132 climbers and broke the results down by ability.5 These values reflect the weight taken off the scale, not the weight left on it, and they aren’t normalized by climber weight.
| Climbing ability | Average left | Average right | Range left | Range right |
|---|---|---|---|---|
| Lower | 77 lb | 86 lb | 51-104 lb | 64-106 lb |
| Intermediate | 95 lb | 99 lb | 71-117 lb | 73-130 lb |
| Advanced | 101 lb | 110 lb | 73-119 lb | 79-139 lb |
| Elite | 112 lb | 119 lb | 84-143 lb | 86-152 lb |
Lower is below 5.9. Intermediate is 5.10a-5.11d for men and 5.10a-5.11a for women. Advanced is 5.12a-5.13b and 5.11b-5.12c. Elite is 5.13c-5.14d and 5.12d-5.14a. Values were reported originally in kilograms.
Use these for context, not as a target. Crimp strength does go up with climbing ability, but it’s only one component of climbing performance, and overemphasizing finger strength training can lead to finger injury. The most useful comparison is against your own previous number, and against your other hand.
Equipment: fingerboard.
Setup: Stand beneath the fingerboard.
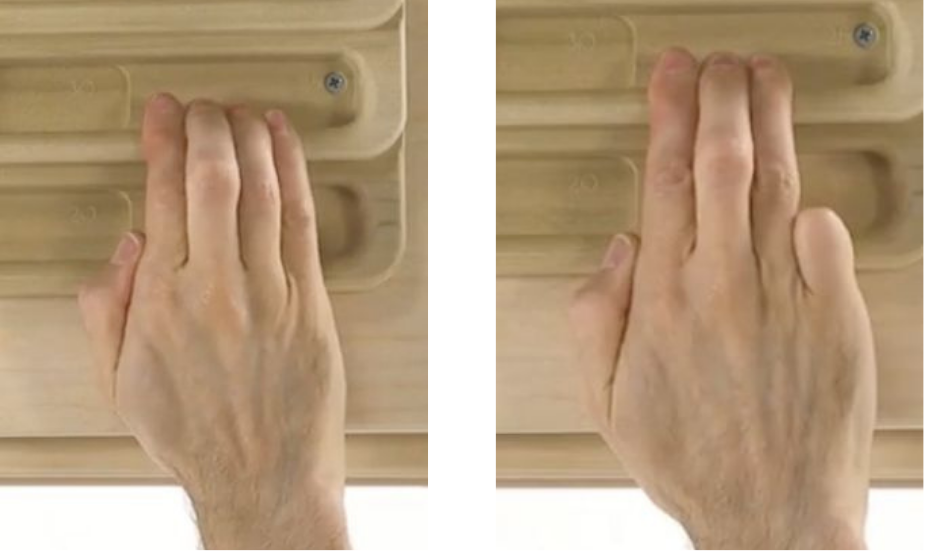
Movement: Reach one arm overhead and grasp onto the selected hold. You can grasp using one of four grips:
- Half crimp: the first and second finger joints bend without the third hyperextending.
- Full crimp: the first and second joints bend while the third hyperextends. The thumb typically presses over the tip of the index finger.
- Open hand: a minimal bend at each joint with all four fingers on the hold.
- Three-finger drag: same as open hand, but you drop your pinkie finger.
Select one of these hold types and pull down toward the ground. You can use a stool or a step to change the angle of your arm and get the position you want.
Tip: Keep your neck relaxed and your shoulder blades engaged. If you’re strong enough to lift your body off the ground with your finger and arm strength, add weight into your opposite hand to keep your body anchored on the ground, and make sure your feet stay stable.
Your grip choice is a second way to adjust the load without touching the weight. Think of it like this: for a pulley, the open-hand grip is jogging, the half crimp is running, and the full crimp is sprinting. That gives you a progression to work through, and it’s the reason to train crimp positions deliberately rather than avoid them.


Program 3: Portable Fingerboard Exercises
The third program takes finger loading off the wall entirely. A portable fingerboard, sometimes called a finger block, is a small hold that you load with a weight or resistance band. It fits in a pack and lets you train each hand independently, which can be useful when one finger or hand needs a more gradual progression. Anchor one low with a cordelette and step on it to create tension, or hang it from a tree branch, and you have a finger warm-up at the crag.
It also gives you options beyond hanging. You can load the finger flexors isometrically, concentrically, and eccentrically, while changing the grip, resistance, arm position, and range of motion. That variety can help bridge the gap between early rehabilitation and the more varied demands of climbing.
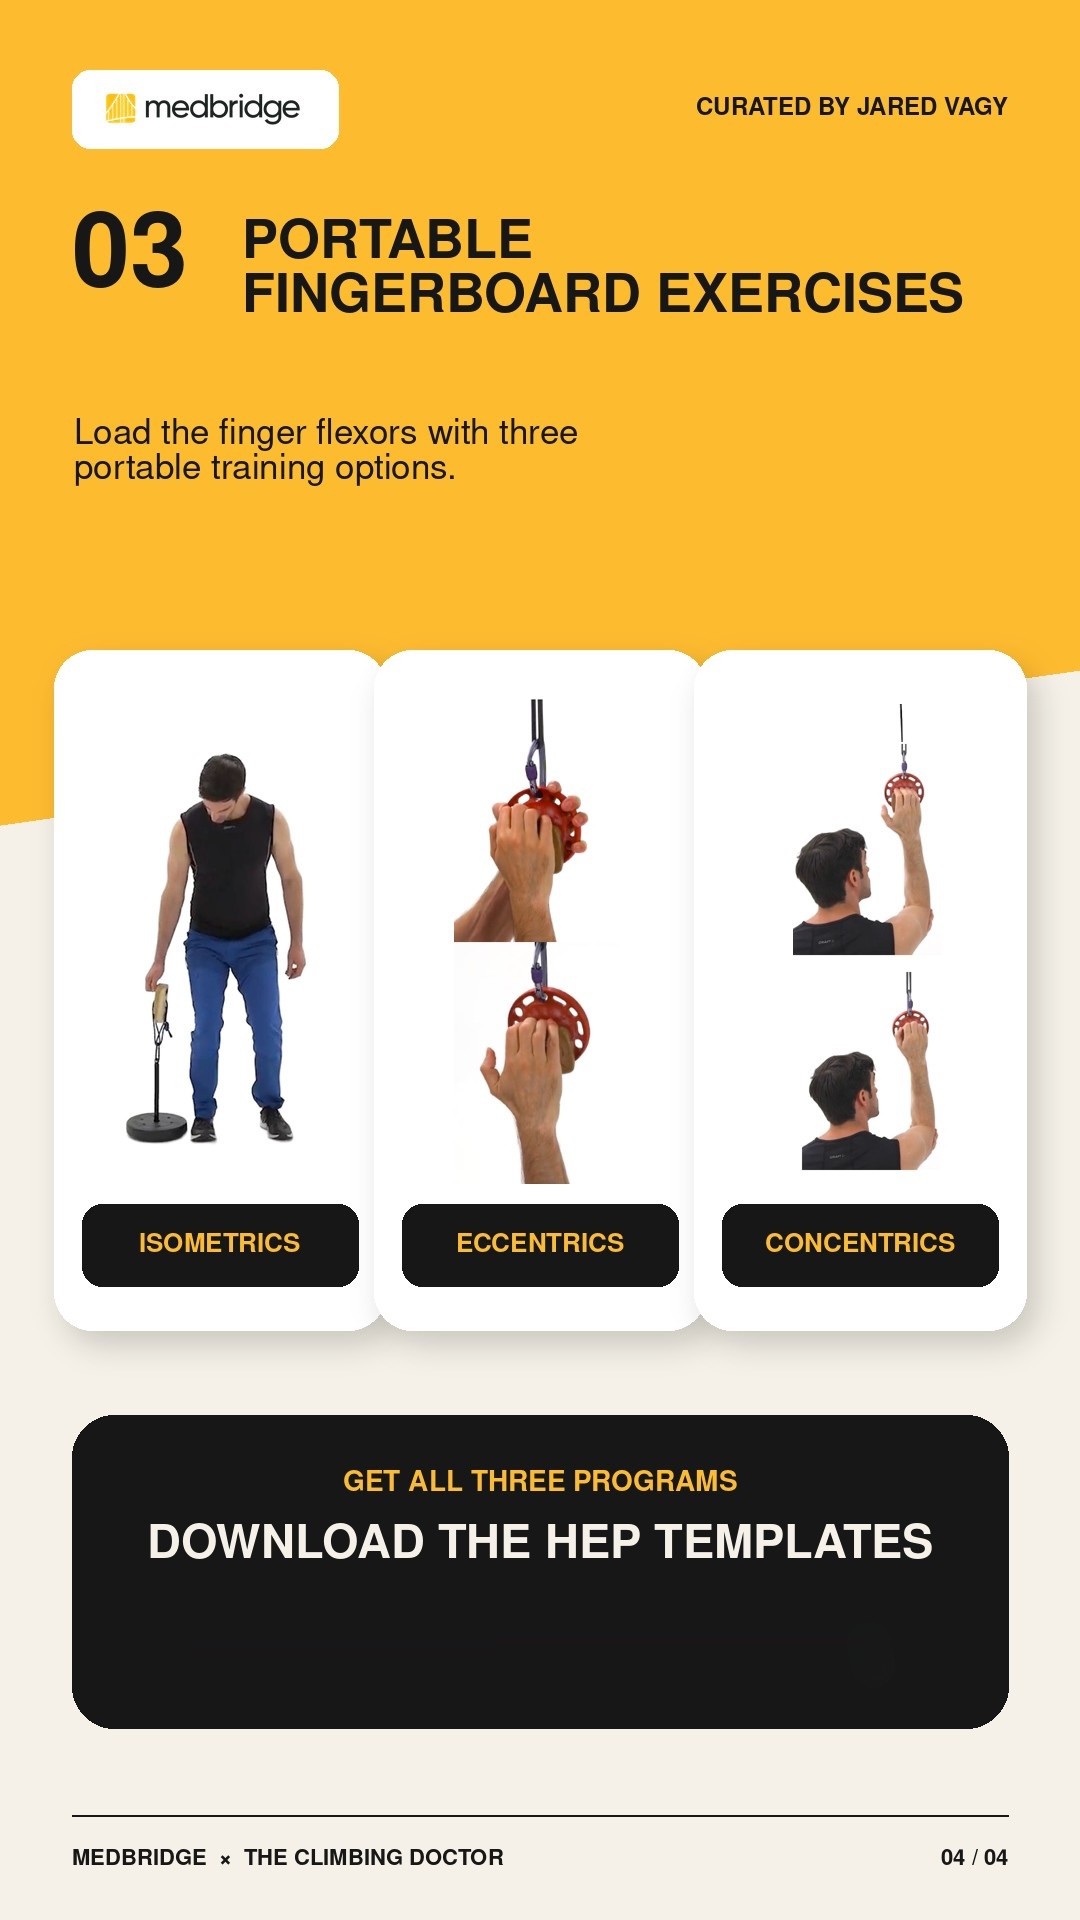
Load the finger flexors with three portable training options.
Equipment: portable fingerboard and an added weight.
Movement: Connect the portable fingerboard to the added weight and select the grip you want to train. Use the fingerboard to lift the weight off the ground and hold for the prescribed duration. Lower the fingerboard and weight back down to the ground.
Tip: Keep your shoulders pulled back and your neck soft. You can perform this with a selection of holds and edge depths. For example, a 10 mm edge, a 20 mm edge, a two-finger pocket, a pinch, or a one-finger pocket.
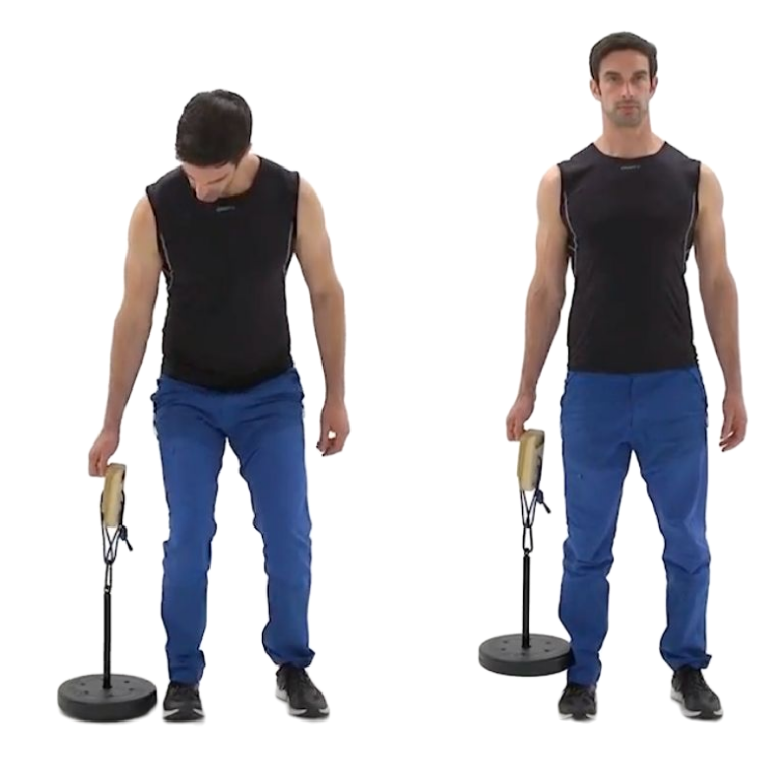
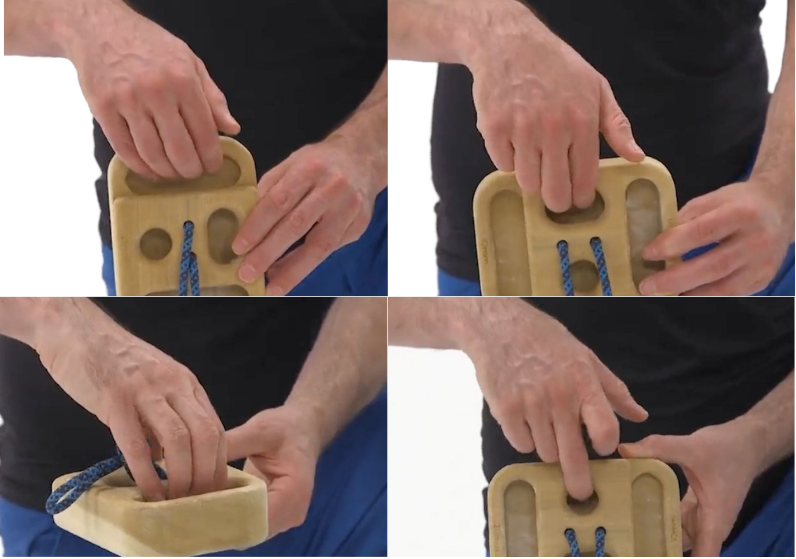
This is where the muscle produces force while it lengthens, which here means slowly opening your grip under load. It’s worth training on purpose. Pulley injuries are most often associated with a crimp grip, but they sometimes occur during the eccentric component of gripping, when the fingertips are starting to open up.
Equipment: portable fingerboard and either a cable or a strong resistance band anchored overhead.
Movement: Connect the portable fingerboard to the cable or resistance band and make sure it’s secure. Squat down into a crouch with your arms straightened overhead. Lower your elbow to shoulder height. Use your opposite hand to pull the fingerboard downward toward your palm, then slowly straighten your fingers. The emphasis is on slowly opening up the grip.
Tip: Use slow and controlled movements and focus on the quality of the motion rather than the load.
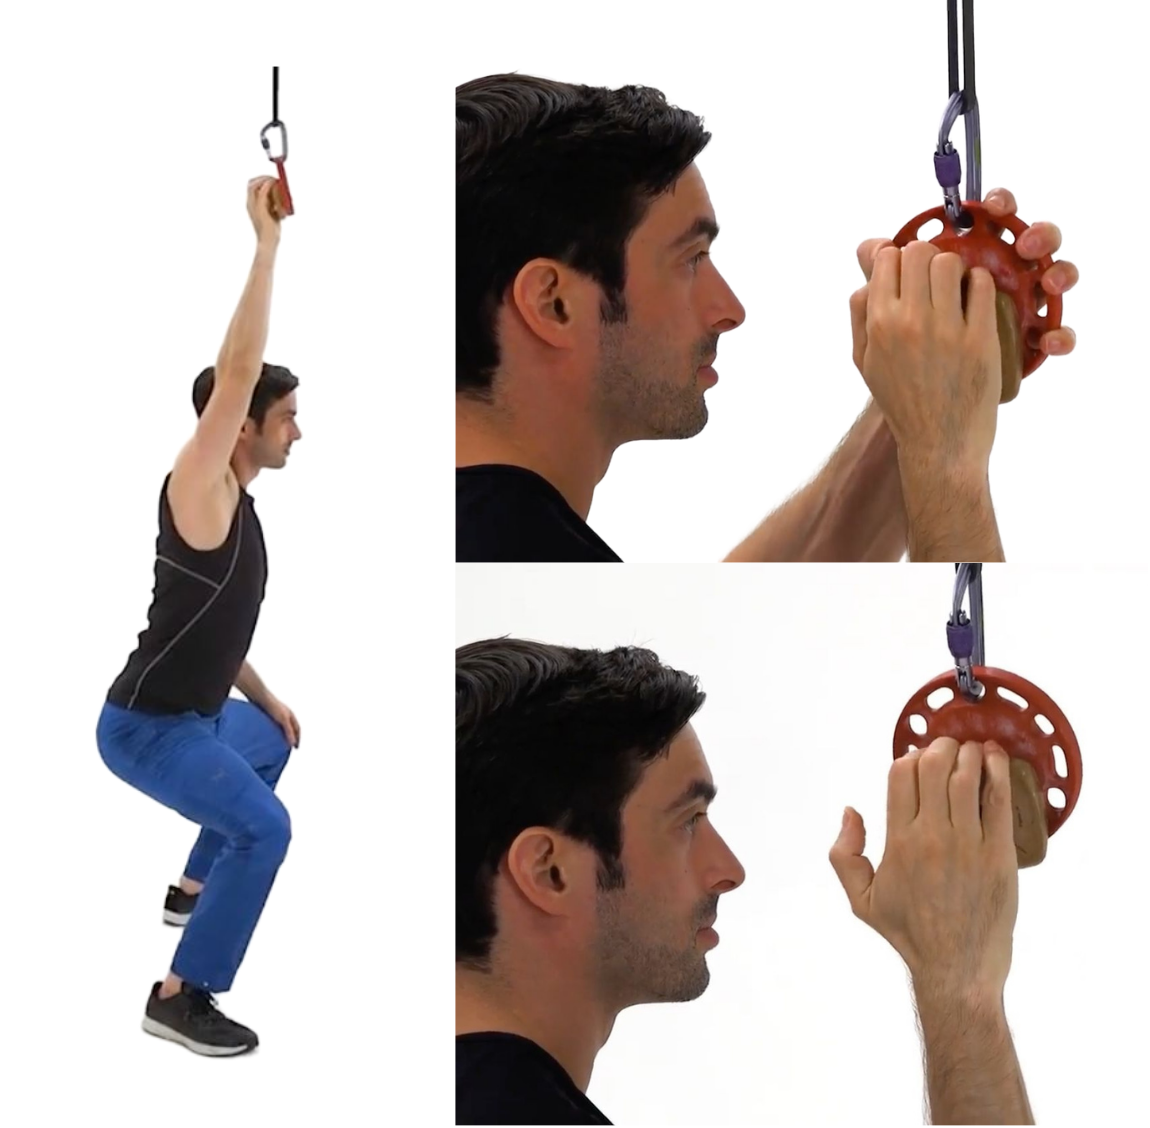
This is the opposite. The muscle produces force while it shortens, which here means curling your fingers down toward your palm against resistance.
Equipment: portable fingerboard and either a cable or a strong resistance band anchored overhead.
Movement: Connect the portable fingerboard to the cable or band and make sure it’s secure. Squat down into a crouch with your arm straightened overhead. Lower your elbow to shoulder height, squeeze your fingers down toward your palm, then straighten them while keeping a neutral wrist position.
Tip: Place the emphasis on curling your fingers, which is what produces the concentric force on the finger flexor tendons.


How Much And How Often
There is no single perfect set-and-rep prescription for an injured finger. In pulley rehabilitation, research has not established one protocol as clearly superior, so the priority is choosing a tolerable starting point and progressing the load over time.
Think beyond simply adding weight. You can progress by reducing assistance, using a smaller edge, changing from an open hand toward a half crimp, adding fingers to a pocket, increasing time under tension, or moving from isometric holds into controlled eccentric and concentric work. The best next step is the smallest change that challenges the finger without creating an excessive symptom response.
In rehabilitation, loading is often guided by pain response rather than a fixed percentage. A no-pain exercise creates 0/10 pain. A low-pain exercise produces up to 3/10 pain that settles within three minutes. Work through the no-pain stages first, then gradually introduce low-pain loading as tolerated.3
| Stage | Protocol | Grips |
|---|---|---|
| No pain, stage 1 | 7 seconds on, 3 seconds off. 3 sets, 7 reps, 3 min rest between sets, 3x per week | Open hand |
| No pain, stage 2 | Same parameters | Open hand, half crimp |
| Low pain, stage 1 | 7 seconds on, 3 seconds off. 1 set, 4 reps, 3 min rest between sets, 2x per week | Open hand, half crimp, three-finger pocket |
| Low pain, stage 2 | Same parameters | Adds two-finger pocket |
If you’re training rather than rehabilitating, there’s one analysis worth knowing about. Researchers looked at climbers’ self-logged training data over four to sixteen weeks. Climbing on its own produced no significant change in finger strength. Max hangs produced a small gain that did reach statistical significance. Low-intensity hangs with the feet on the ground produced a slightly smaller gain that did not reach significance on its own, although it also wasn’t significantly different from the max hang result. Climbers who did both saw the largest change.6 Keep in mind this was self-reported training data rather than a controlled trial. But it’s a reasonable argument for using more than one of these programs rather than picking just one.
Whichever route you take, be conservative. Every set should feel like you could do more, and you shouldn’t. Give your fingers a rest day afterward, and if you’re doing finger work and climbing on the same day, do the finger work first.
Warm up before any of it. A warm-up of 100 individual climbing moves of increasing intensity increases the amount of physiologic bowstringing at the A2 pulley, and after 100 moves the bowstringing plateaus.7 Off the wall, that’s 100 half-crimp pulls with your feet on the ground, 20 at a time, with tendon glides in between each set. For more on warming the fingers, see Improve Your Finger Circulation For Climbing.
Need More Guidance for a Pulley Injury?
These programs can be helpful for gradually reloading an injured finger, but your starting point should match the diagnosis, irritability, and stage of recovery. Choose the variation that allows comfortable loading, such as less bodyweight, a larger edge, a more open grip, shorter holds, or a portable option.
If your pain is directly over a pulley, particularly after a pop, notable swelling, visible bowstringing, or sudden loss of strength, have it assessed before progressing. For a more structured step-by-step plan, see the Rock Rehab Protocol: Pulley Sprain, which includes guidance on injury grading, early unloading, taping and splinting, progressive loading, and return to climbing.
Get The Programs
All three programs are available as free downloadable home exercise programs. Each one covers setup, movement and coaching cues for every exercise in that program.
- Stationary Fingerboard Hangs: two-arm hangs with weight removed, at body weight, and with weight added, plus the one-arm unweighted hang.
- Stationary Fingerboard No-Hang Protocol: quantifying maximal pull force with a scale, and no-hang repeaters across four grip positions.
- Portable Fingerboard Exercises: isometrics, eccentrics and concentrics with a portable finger block.
Where To Go From Here
These programs were built in partnership with MedBridge, whose home exercise program builder is what medical providers use to assign and track programs like these with their patients.
If you treat climbers and want the full framework behind these programs, that’s covered in The Athlete Movement System: Rock Climbing, my course with MedBridge, and in the Rock Rehab: Fingers course.

Author Bio
Jared Vagy is a doctor of physical therapy who specializes in treating climbing injuries. He is the author of the Amazon #1 best-seller Climb Injury-Free, teaches Climbing Injury Professional Education for Medical Providers, and is the developer of the Rock Rehab Protocols. He has published numerous articles on injury prevention and lectures internationally. Dr. Vagy is on the teaching faculty at the University of Southern California, one of the top doctor of physical therapy programs in the USA. He is a board-certified orthopedic clinical specialist. He is passionate about climbing and enjoys working with climbers of all ability levels, ranging from novice climbers to the top professional climbers in the world.
For more education, check out the Instagram page @theclimbingdoctor.

References
- Vigouroux L, Quaine F, Labarre-Vila A, Moutet F. Estimation of finger muscle tendon tensions and pulley forces during specific sport-climbing grip techniques. J Biomech. 2006;39(14):2583-2592. PubMed
- Vigouroux L, Quaine F, Paclet F, Colloud F, Moutet F. Middle and ring fingers are more exposed to pulley rupture than index and little during sport-climbing: a biomechanical explanation. Clin Biomech. 2008;23(5):562-570. PubMed
- Cooper C, LaStayo P. A potential classification schema and management approach for individuals with A2 flexor pulley strain. J Hand Ther. 2019. ScienceDirect
- Vagy J. The Resilient Climber: Strength, Mobility, and Injury Prevention. Essex, CT: FalconGuides; 2026.
- Draper N, Giles D, Taylor N, et al. Performance assessment for rock climbers: the International Rock-Climbing Research Association sport-specific test battery. Int J Sports Physiol Perform. 2021;16(9):1242-1252. PubMed
- Gilmore NK, Klimek P, Abrahamsson E, Baar K. Effects of different loading programs on finger strength in rock climbers. Sports Med Open. 2024;10(1):125. Full text
- Schweizer A. Biomechanical properties of the crimp grip position in rock climbers. J Biomech. 2001;34(2):217-223. PubMed
- Disclaimer – The content here is designed for information & education purposes only and the content is not intended for medical advice.
Related Posts