Hangboarding Protocols For Beginners
When should you start hangboarding? After climbing for a year? Once you can climb V6? Never? These are all common opinions in the climbing community, but why is that? The root of each of these arguments each seem to stem from the belief that hangboarding will cause injuries in newer climbers. I disagree with this because no matter what level of climber you are, hangboarding will create overload in order to facilitate growth and strength. This is true regardless of whether or not you have climbed your whole life or just started this year. The only difference is your starting point.
This is why hangboarding can be a safe and effective way to improve finger strength and resistance to injury for all climbers, especially new climbers or those trying to return to sports following a pulley or lumbrical injury. In this article, we’ll explore what’s really going on in your hands while you hang, where the risk of injury comes in, and how to safely train your fingers.
Anatomy of the wrist and hand
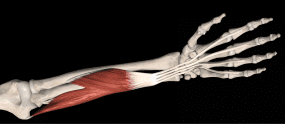
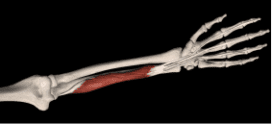
Finger flexor muscles:
The main muscles that are responsible for bending your fingers to hold a crimp or ball up a fist don’t actually start in your hand; they start in your forearm and then have tendons that go to each of your fingers. This is important because the two major injuries occurring from hangboarding have to do with those tendons. These are flexor tendon pulleys and lumbrical injuries.
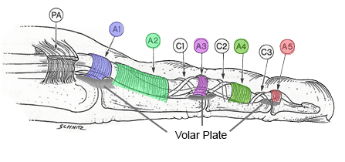
Pulleys of the flexor tendons
Your finger flexor pulleys are basically a set of ligaments that wrap around your tendons to keep them pinned down against your finger bones. Without them, you’d see the tendons pop up like a taut bowstring every time you tried to use your fingers. If these tendons become overloaded too quickly or too frequently without enough time to fully heal, they can become partially damaged and cause pain or even rupture completely. The A2 pulley is the most likely one to get injured while climbing.
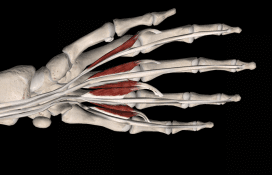
Lumbricals
Your lumbricals are muscles that reside in your hand that begin on the flexor tendons in your palm and attach onto the extensor tendon mechanism in the first knuckle of each finger. They aren’t your primary gripping muscles, but they do assist with it and can cause pain when injured. They are most often injured when climbing or training on pockets (holds that fit 3 or fewer fingers). This is because the straightening of one finger while bending the one next to it can create a shearing force like tearing paper if they are not properly trained for the load.
Benefits of hangboarding
There is a risk-reward relationship with any type of training. Finger strength is an important aspect of climbing, but it is not the only one. Because of this, it is important to know that if you are a new climber, most of your improvements will come from being on the wall. Climbing challenges a number of different skills at once, such as coordination, technique, strength of most of the muscles in your body, and comfortability with different hold types, in addition to finger strength. That being said, hangboarding does have the benefit of increasing climbing specific grip strength in a controlled and measurable way. This increase in finger strength has been demonstrated in such as those by Hermans et al. who tested the effects of a 10 week hangboard protocol on finger strength.
One of (if not the main) principles for improvement in any facet of human movement is progressive overload. This is a series of training with a challenging load, adapting to said load, and increasing the load again and again to allow you to improve at a specific task. Hangboarding allows for this progressive overload in a specific, consistent, and regulated way. By doing this, you are applying overload to all of the finger, hand, and forearm tissues which will increase your strength and tissue tolerance. By stimulating growth in commonly injured tissues, you can also decrease your risk of injuries in those tissues if they are allowed to properly recover. If your pulleys are thicker and more robust, they are less likely to get hurt at a given load.
Because of this principle, I never understood why people would say that hangboarding early would make you more likely to be injured. So, I looked up some more information on it. A study by Sjoman et al. analyzing the prevalence of finger pain in climbers that hangboard and those that don’t found no significant difference between reports of finger pain with the exception of one group: Males who climb 7a (hard V6) or higher that have been climbing for less than 6 years. This group had a peak incidence in those between 3 and 5 years of climbing experience. While not an insignificant group, no other group saw this trend. So, it begs the questions: is it really the hangboarding? That is something more research would be needed to answer because there are more variables associated with hangboarding that could be the culprit for the rise of finger pain in this group like duration/frequency/intensity of hangboarding sessions in combination with climbing duration/frequency, training methods/types of grips used, and rest between sessions.
These variables are all things we’ll get into shortly. But, we know hangboarding has the benefit of increasing your strength on smaller edges. If you feel this area is holding you back, hangboarding can be a great way to address it. So, let’s talk about how to do it, be smart about it, and keep you climbing strong and pain free.
How to hangboard safely
What constitutes “safe” hangboarding training? Really, it just comes down to an understanding of what you’re hanging on (the board and the edge), how you’re hanging on it (the grip and the training method), and when to back off. Next, we’ll break down each section in more depth.
Types of boards
The Hangboard
The most common method of finger training you’ll see. You’ll find all kinds of variations, but nearly all of them will have a variety of edge sizes and hold types to allow you to train whatever you need. For beginner climbers, a pure hangboard can potentially be too much load because there is no way to train lower than bodyweight. If you can’t hang with good form on the edges available, using this alone (or with added weight) should be used as your finger tolerance increases.
- Pros: Varying edges and hold types for continued challenges. Hanging adds challenge to arm and shoulder muscles as well
- Cons: Can’t easily and objectively hang less than bodyweight
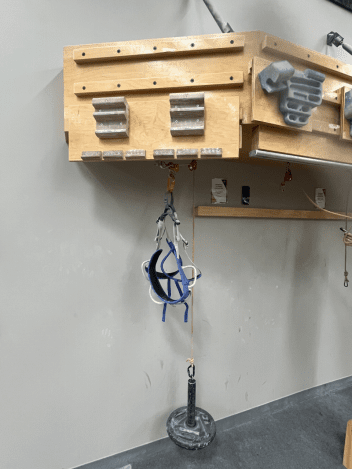
Hangboard with pulleys
Some climbing gyms have solved the “bodyweight or nothing” problem by adding a pulley system to their hanging setup. Using a pulley takes weight off and makes it easier to hang. It also has some objective numbers that you can use to track progress.This is helpful to add more control to building up to bodyweight hangs on progressively smaller holds.
- Pros: Allows you to hang at any weight that is safe and challenging for you
- Cons: A full pulley system is rare and may require a harness – but there is a solution
- Modification: Hang to tolerance with your feet still on the floor and weight your hands as much as possible. To make this more objective you could rate your effort on the Modified Borg RPE Scale (a 0-10 scale in terms of difficulty) or use a scale to see how much your hands lift you off the ground
The Finger Block / “No Hangs”
These are basically portable, single-arm hangboards. They often get the name “no hangs” because you’re training your fingers by lifting and not hanging. The benefits of this board are that it also allows you to train at your own pace as well as allowing you to see differences side to side.
- Pros: Portable, allow for consistent challenge at safe weight.
- Cons: Different challenges on the arm and shoulder compared to hanging. Requires good lifting form at higher loads to protect back
Pinch block
These are just finger blocks designed for training pinches, specifically, because most hangboards and finger blocks are difficult to train that grip on.
- Pros: Easiest and most effective way to train pinch grips off the wall
- Cons: It’s a niche piece of equipment that only has one function
Grip Types
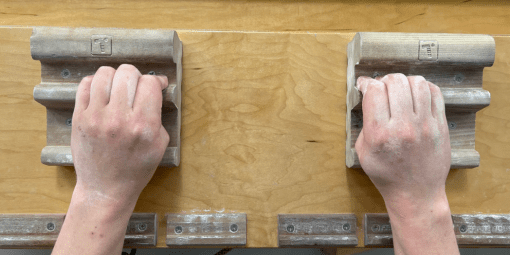
Half Crimp
The most versatile hold, it places higher demands on the finger pulleys (primarily A2).
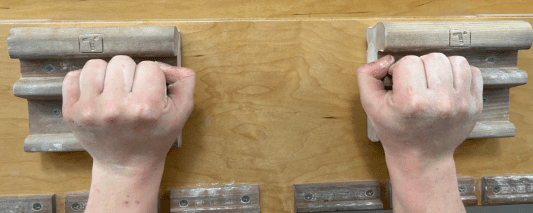
Full Crimp
Best for small edges, but puts highest demands on pulleys. The high finger position can also give you more leverage to pull outwards slightly on holds to help keep you close to the wall.
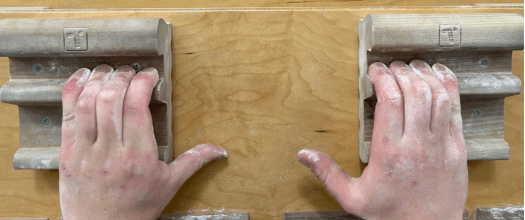
(Some of my fingers are half crimped because my pinky fingers are short)
Drag/Open Hand
Load primarily on finger flexor muscles – useful when pulling straight down on edges or moves near max wingspan to give you slightly more reach.
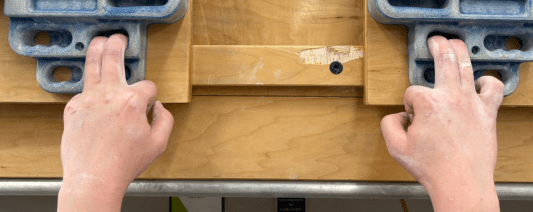
Pockets
When less than 4 fingers fit into a hold – higher demands on lumbricals.
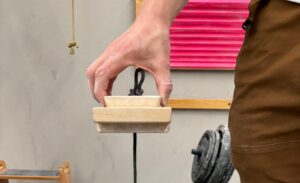
Pinches
Unique training since it is the only one requiring use of the thumb.
Training Methods
Endurance Hangs
- What are they: Hanging until fatigue
- Function: Endurance
- How to perform: These have a lot of variety. You could just grab a hold and hang (in good form) until you can’t anymore, but I like the Eric Hörst method (see attached video) because switching hands every few seconds is similar to how you climb. Time frame varies for this depending on your goals, but unless you plan on doing multi-pitch climbing, up 5 minutes per set will be plenty.
Video for Eric Hörst Method:
Repeaters
- What are they: Multiple periods of hanging followed by very short rest breaks
- Function: Power-endurance
- How to perform – Hangboard: Hold-rest-repeat for 1 minute. Do this 3 times total, resting 4-5 minutes between sets. Common variations are 6:4 (6 on, 4 off for 1 minute) or 7:3 repeaters
- How to perform – Finger/Pinch Blocks: Hold-rest-repeat for 1 minute. Rest 2 minutes before switching hands and repeating. Do this 3 times per hand
Triple hangs
- What are they: Like repeaters but with more weight and much longer rests
- Function: Strength and power-endurance (more strength, but less endurance than repeaters)
- How to perform: 7-10 seconds on 53-50 seconds off
Max hangs
- What are they: The most weight you can hold with good form for at least 5 seconds
- Function: Maximal Strength
- How to perform: 5-10 seconds of hanging followed by long rest (~5 min) 3 times once you build up to desired weight
- Notes: Drop when you form starts to fail to prevent injuries.
Contact strengthening (advanced) – rate of force development
- What are they: The most advanced form of finger training.
- Function: Rate of force development (how fast you can activate your strength)
- How to perform: Variable but one method is to jump and briefly hold a hold before jumping down and trying again
- Notes: This is the most advanced form of finger training, because the loads of this training are higher than static hangs on the same edge. These are often done on campus boards. I recommend hangboard experience before beginning these.
Edge Size/Hold Types
Hangboards have many slots of varying depth. Usually they’re marked so you don’t have to bring a ruler to the gym, but the variety can make it hard to know where to start. Generally for training your fingers, I would recommend beginners start on a 20mm edge. Larger edges can often cover your DIP joint (the joint closest to your fingertips) which changes the mechanics of each grip. Smaller edges place a lot more load on your finger structures (the relationship between load and edge size is not linear). It’s important to know that this is a general tip. There are plenty of reasons to use a different edge, so if you have a reason, then go for it.
Frequency
So how often should you hangboard? For beginners, I’d recommend 1 to 2 times per week depending on your climbing frequency. That being said, the days you train your fingers matters. A finger loading workout is often more work than it feels like. Because the exercises are so targeted towards your fingers, a session of finger boarding is often comparable to a session on the wall (at least as far as your fingers are concerned). Because of this, it’s important to keep 2 things in mind:
- Make sure your fingers get a rest the next day (no climbing)
- Fingerboard before climbing (either the morning before or at the start of your climbing session that day)
When you train, you’re damaging tissue so that it can rebuild stronger. If you don’t give yourself time to rebuild, you increase your risk of getting injured.
When to back off
When I was just starting, I asked one of the strongest climbers at my gym if he had any advice to help me get better faster. He told me “don’t get hurt.” It’s really simple advice but so true. Don’t forget that there is such a thing as overtraining. This happens when training intensity exceeds your ability to recover. It puts you at an increased risk of injury while decreasing performance. When it comes to overtraining your fingers, there are a few signs it’s time to back off. If you are feeling pain in your hand or fingers, this is a sign that something is likely being overloaded in a negative way.
A2 Pulley related pain:
- Grade 1: Mild- this would be characterized by low level pain that increases when you press on it. You may or may not feel slight pain when crimping on the wall.
- Grade 2: Moderate- this would cause a higher level of pain that you can feel while crimping and especially when squeezing it.
- Grade 3: Severe – this is typically characterized by extreme pain in the fingers, bruising, and often a feeling of something popping up from your skin as you bend your fingers (this would be the finger flexor tendons). These injuries are usually accompanied by a loud pop at the moment of injury.
What to do?
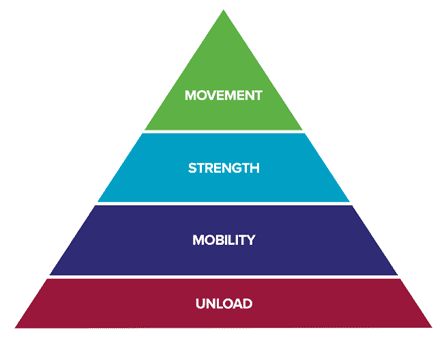
If you look at the climbing doctor’s rehabilitation pyramid, you will see it is broken up into 4 tiers:
- Unload (reduce tissue by resting or modifying exercise) – the base
- Mobility (range of motion)
- Strength (Increase muscle load tolerance)
- Movement (return to prior level of sport) – the peak
This is no different for finger injuries. To unload, cut back on hangboarding intensity and volume. The severity of your injury will determine how much and how long, but generally, if you can perform hangs or no hangs without finger pain then it is acceptable. If you notice any range of motion restrictions, the next step is to correct those. Your end goal is to be able to fully bend and straighten your finger without pain even when you apply slight extra pressure. Once you can do this, we can work towards restrengthening. This is when you can return to hangboarding or begin to increase intensity again. For this process, you’ll want to start at a low and pain-free weight before building up slowly. Once you can reach your previous baseline without pain, you are cleared to continue climbing normal and strengthen past this point. For more detailed information on pulley rehab, see the climbing doctor’s article about it here.
Lumbrical pain presents itself after climbing on pockets or when a finger slips off a hold unexpectedly. This pain is usually less defined than pulley pain and is typically felt in the palm and worsens when climbing and pockets and even large slopers in some people. Treatment for this is similar to pulley injuries in that it follows the progression of unloading, mobility, strength and movement. To facilitate unloading, many climbers “buddy tape” their affected fingers by taping them together to prevent the fingers from separating and further shearing the lumbricals and avoid pockets for a few weeks depending on the severity of their injury. To facilitate mobility, you can practice “antagonist lumbrical stretches” by extending one finger while flexing the one next to it. While doing these, it is important to note that the goal is to feel tension without pain while working toward complete, pain-free range. Once you can do this, you may begin light strengthening by gently loading your fingers at a comfortable level in a pocket position and slowly building up from there. The final step is to remove the buddy tape when climbing and focus on static and controlled loading on holds that previously recreated your pain.
*Disclaimer: If you have tried rehab on your own and notice your finger pain is not improving or is getting worse: see a licensed physical therapist [KM1] or occupational therapist (preferably a hand specialist) as they will be able to more accurately diagnose and treat you based on your specific needs. Physical therapists with some experience climbing may be preferred as these injuries are fairly specific to the sport. If you don’t have one near you, there are PTs that do appointments remotely.
The Protocol:
Now, what you all have been waiting for: the actual protocol. The reason it was important to go over all the terminology, the anatomy, etc. is because there is no one size fits all protocol. Everyone is starting at a different point, enjoys different styles of climbing, and has different goals. To feel comfortable on the hangboard, you’ll have to try different things and experiment to find what fits you the best. So this protocol is just a framework for you to create the training plan that works best for you.
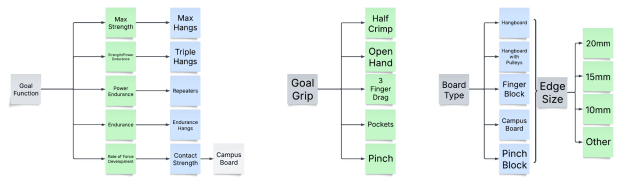
- Step 1: Choose your goal and training method that goes with it
- Step 2: Choose the type of grip you want to train
- Half crimp and 3 finger drag are likely the most bang for your buck as they are the most versatile grip types.
- Step 3: Choose the board and edge size you’d like to work on
- Step 4: Find your working weight for the exercise (this is the most weight you can hold throughout the exercise without form breaking down)
- Build up slowly using a finger block or a pulley system
- Step 5: Rest for at least 5 minutes, try the last weight you could successfully hang, rest again, try again.
- Step 6: Congratulate yourself because you just completed your first finger board session. Rest at least 48 hours before your next fingerboarding session.
- You can use your max hang as a jumping off point for working weights
Author Bio
Kieran Mahoney is a Doctor of Physical Therapy student at the University of Elon in Burlington, North Carolina. He has been climbing for about 2 and a half years (at the time of writing this article) with his primary focus on bouldering. After graduating, he plans on working with athletes of all sports, with a soft spot for treating climbers and adaptive sports athletes. His contact information is below for any questions you may have.
Email: kmahoney15@elon.edu
Instagram: kieranbclimbing
References
- Sjöman AE, Grønhaug G, Julin MV. A Finger in the Game: Sport-Specific Finger Strength Training and Onset of Injury. Wilderness & Environmental Medicine. 2023;34(4):435-441. doi:10.1016/j.wem.2023.06.004
- López-Rivera E, González-Badillo JJ. Comparison of the Effects of Three Hangboard Strength and Endurance Training Programs on Grip Endurance in Sport Climbers. J Hum Kinet. 2019;66:183-195. doi:10.2478/hukin-2018-0057
- Saul D, Steinmetz G, Lehmann W, Schilling AF. Determinants for success in climbing: A systematic review. Journal of Exercise Science & Fitness. 2019;17(3):91-100. doi:10.1016/j.jesf.2019.04.002
- Devise M, Lechaptois C, Berton E, Vigouroux L. Effects of Different Hangboard Training Intensities on Finger Grip Strength, Stamina, and Endurance. Front Sports Act Living. 2022;4:862782. doi:10.3389/fspor.2022.862782
- Vigouroux L, Devise M. Pull-Up Performance Is Affected Differently by the Muscle Contraction Regimens Practiced during Training among Climbers. Bioengineering (Basel). 2024;11(1):85. doi:10.3390/bioengineering11010085
- Saeterbakken AH, Stien N, Pedersen H, et al. The Connection Between Resistance Training, Climbing Performance, and Injury Prevention. Sports Med Open. 2024;10:10. doi:10.1186/s40798-024-00677-w
- Hermans E, Saeterbakken AH, Vereide V, Nord ISO, Stien N, Andersen V. The Effects of 10 Weeks Hangboard Training on Climbing Specific Maximal Strength, Explosive Strength, and Finger Endurance. Front Sports Act Living. 2022;4:888158. doi:10.3389/fspor.2022.888158
- Lutter C, Schweizer A, Schöffl V, Römer F, Bayer T. Lumbrical muscle tear: clinical presentation, imaging findings and outcome. J Hand Surg Eur Vol. 2018;43(7):767-775. doi:10.1177/1753193418765716
- Disclaimer – The content here is designed for information & education purposes only and the content is not intended for medical advice.
Related Posts