Pulley Injuries Explained – Part 2
This is part 2 of 2 in an article series on pulley injuries. Click this link to read part 1 of 2.
In Part 1 of this article, we discussed the anatomy of finger pulleys, the biomechanics behind our flexor tendon/pulley system, and the implications these factors have on our climbing. In Part 2, I’d like to shed some light on pulley injury specifics, including the injury grading system and what tissues/structures are affected, and then I will walk you through what conservative management of a pulley injury looks like. The good news for climbers today is that climbing-specific surgeons, like Dr. Volker Schöffl, now view surgery as a last resort for single pulley injuries, and only recommend it for multiple pulley ruptures.1 I will finish with some injury prevention strategies to keep you all climbing strong and healthy. Read on to learn more why you may not need surgery.!
Pulley Sprain vs. Pulley Rupture:
Let’s start by defining some terminology. Remember that our pulleys are ligaments. A sprain/strain describes a stretch or partial tear of a ligament (“strain” is usually reserved for injuries to a muscle or tendon, but some of the literature mentions a strain of the pulley). A pulley rupture is a complete tear of the ligament, where no part of the tissue remains in contact with the other side. Now that you have an understanding of the terminology, let’s discuss specifics.
Injury Specifics:
A pulley injury is graded on a scale from I-IV, with I being the least severe and IV being the most severe. Here is the breakdown:
- Grade I – pulley sprain
- Grade II – complete rupture of A4 or partial rupture of A2 or A3
- Grade III – complete rupture of A2 or A3
- Grade IV – multiple ruptures as in A2/A3, A2/A3/A4, OR single rupture A2/A3 WITH trauma to the lumbrical muscles or other ligaments.
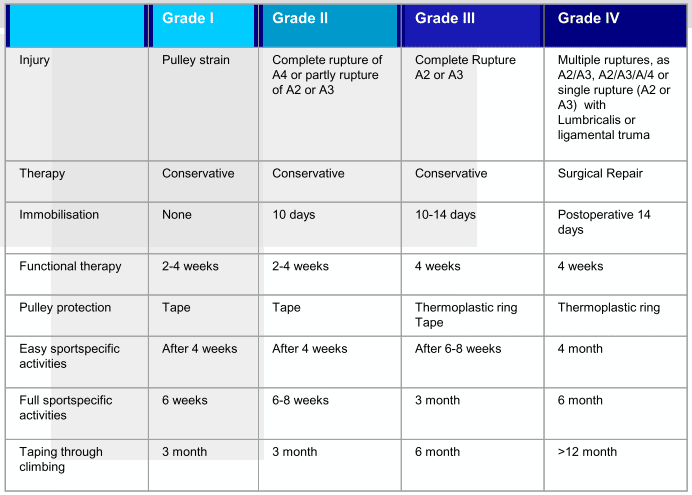
Schöffl & Schöffl, 2006
Injury Symptoms:
Many people who sustain a pulley injury will report hearing a loud “pop” at the time of injury. You may, however, not hear a sound at all. Other injury indicators might be localized pain at the site of the pulley with severe tenderness to the touch, and multiple pulley ruptures (and occasionally a single rupture) may present with “bowstringing” of the tendons. Here is a list of potential signs and symptoms:
- Most commonly occurs over the A2 pulley (ring finger most common)
- Tenderness to touch along pulley
- Swelling, redness and inflammation at the base of the finger
- Stiffness and/or pain with bending the fingers
- Painful to actively crimp and grip
Injury Implications:
The unfortunate and sobering part of injuring a pulley is that it is typically recommended that you take a break from climbing and allow time for your tissues to heal. Yes, that means limiting your climbing, but it can be a really good opportunity to focus your attention on other things. Being injured is never what we want, but often times it presents a beautiful moment to reflect and plan for the future. Whether it inspires you following the injury to start a training program or to train more intelligently moving forward, or maybe to completely spend time and energy on other parts of your life, injuries can be good teaching moments in our lives. If you’re currently dealing with an injury and looking for some strategies to handle the down time, feel free to reach out to me (mattdestefanopt@gmail.com). I’m happy to help.
Pulley injuries take a long time to fully heal, especially complete pulley ruptures, but at least there is evidence now supporting conservative management, such as physical therapy, so you don’t have to deal with surgery. Let’s briefly discuss typical rehabilitation timelines, and then I will share some figures created by Will Anglin depicting the general information in graphic form. You can also refer above to the table from the Schöffl & Schöffl article from 2006.2
Typical Injury Timelines:2–4
The most important part of rehabbing these injuries is to respect the injury, take the timelines seriously, and listen to your body. Everyone will have a different experience, but don’t do too much too soon, or you may set yourself back and have to start all over. Be sure to read the Rehab Protocol in the Treatment Section below for more detailed guidance.
Below I have explained the general timelines, and included graphic representations of the timelines courtesy of Will Anglin.
-
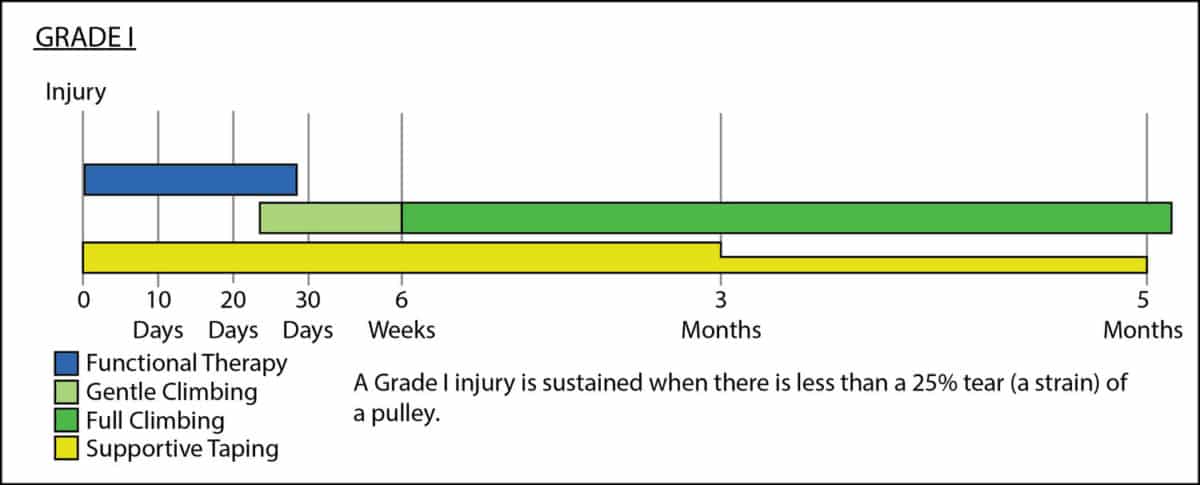
Grade I – Pulley Sprain
- 6 weeks is the recommended time to return to FULL climbing activities, but you’ll work your way up to that. No immobilization is necessary, and passive range of motion (ROM) exercises should be performed. You’ll want to protect the injury using tape (H-taping; taping technique described briefly below and in depth in a future article) and perform functional exercises at about the 2-4 week mark. After 4 weeks, you can start easy climbing to regain strength, coordination and body awareness, but don’t push it. At 6 weeks you can begin full climbing to regain full ability. You can wear tape for up to 3 months once you return back to climbing.
-
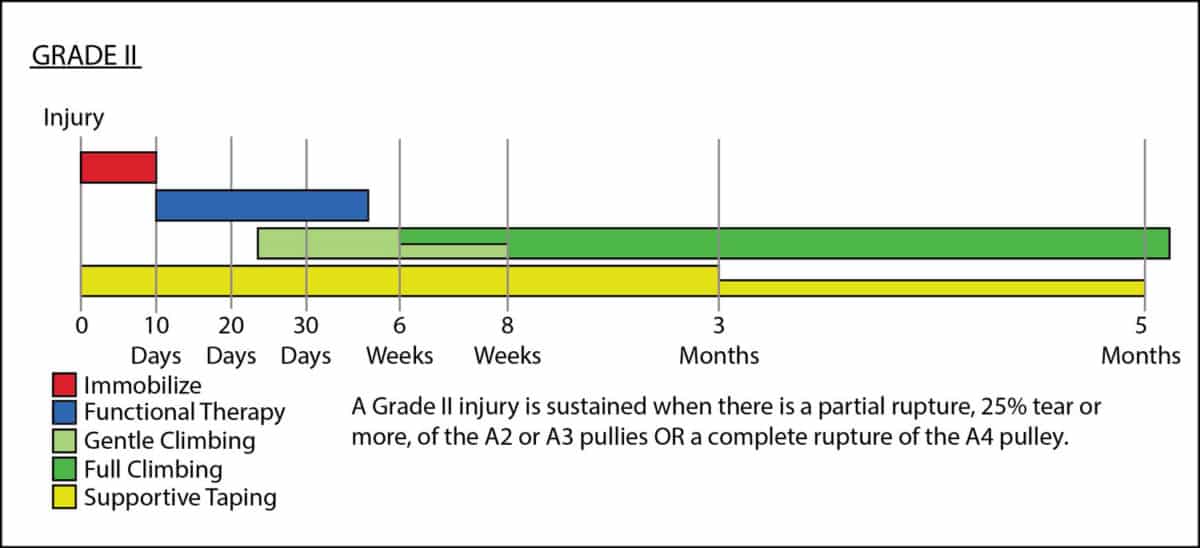
Grade II – Complete A4 rupture or Partial A2 or A3
- 6-8 weeks is the recommended time to return to FULL climbing activities, but again you’ll work your way up to that. Immobilization is necessary this time to protect the injured tissue, and 10 days is indicated. Passive ROM exercises after immobilization phase. You’ll again want to protect the injury using tape and perform functional exercises starting at the 2-4 week mark. After 4 weeks, you can start easy climbing to regain strength, coordination and body awareness. At 6-8 weeks you can begin full climbing to regain full ability. You should wear tape for up to 3 months once climbing again.
-
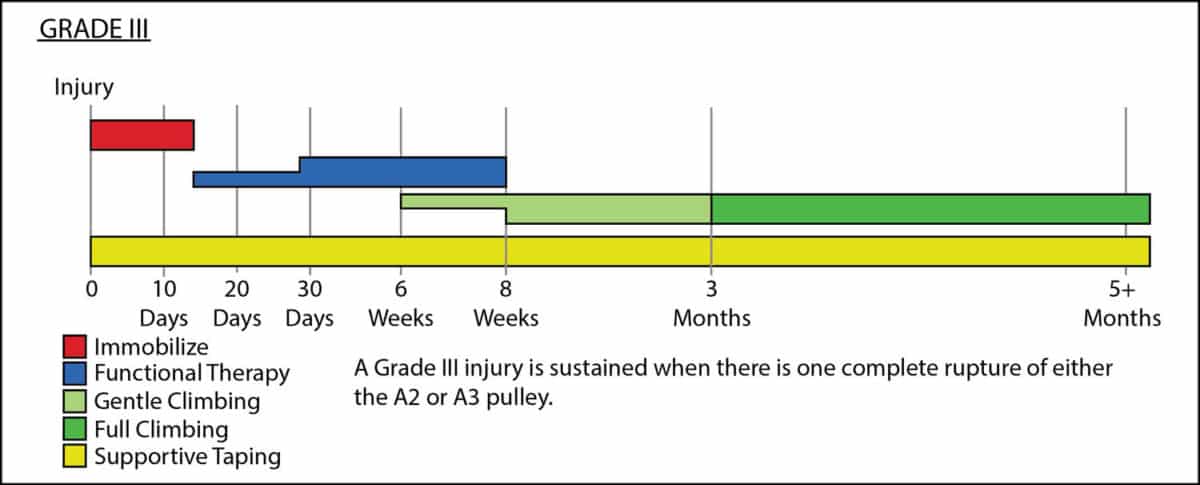
Grade III – Complete A2 or A3 rupture (Most common pulley injury – A2)
- 3 months are recommended for a return to FULL climbing activities due to the biomechanical implications of an A2/A3 pulley rupture. Immobilization for 10-14 days is necessary to protect the pulley and after the immobilization/splinting process, you will use a thermoplastic pulley ring provided by a doctor instead of tape (more on the ring later). Passive ROM exercises following immobilization. Functional exercises will begin at the full 4 week mark, and EASY climbing will commence after a 6-8 week period from injury onset. At 3 months you can begin full climbing activities, and you’ll wear the pulley ring (or tape) for roughly 6 months after climbing begins again.
-
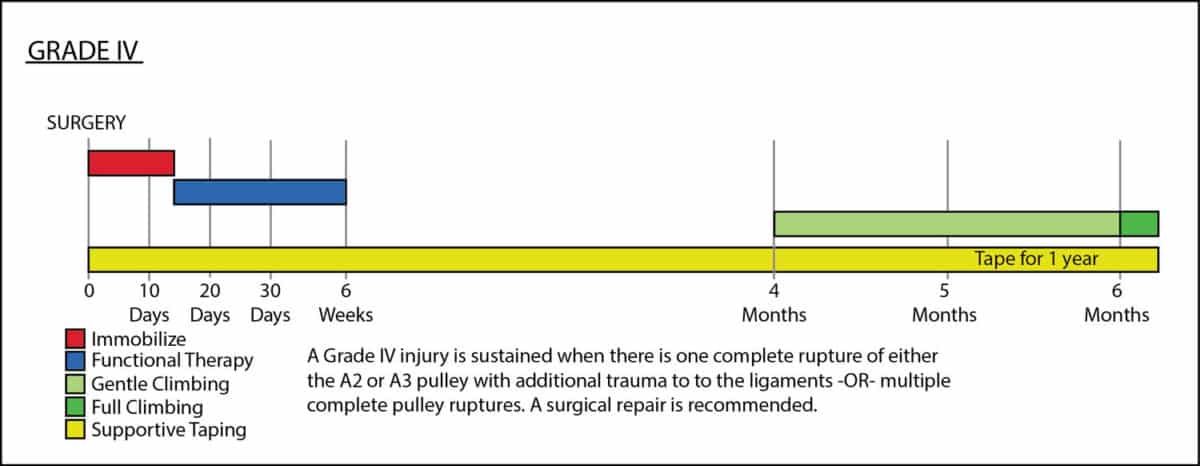
Grade IV (surgery indicated) – multiple ruptures as in A2/A3, A2/A3/A4, OR single rupture A2/A3 WITH trauma to the lumbrical muscles or other ligaments
- A full 6 months are required to return to FULL climbing due to the surgical implications necessary to treat a Grade IV pulley injury. Immobilization lasts for 14 days post operation. 4 weeks are required before initiation of functional exercises, but passive ROM exercises are suggested leading up to this point. A pulley ring will be utilized throughout this process. EASY climbing will have to wait a full 4 months and FULL climbing activities won’t start until roughly 6 months post surgery. The taping/pulley ring timeline may last for over a year post surgery.
**In following these graphic representations created by Will Anglin, I want to point out three things to assist you on your path:
- In the graphics he mentions supportive taping throughout the whole process, but I want to remind you the importance of using an actual Pulley Ring. Taping will help, but it will not be as rigid and supportive as a thermoplastic ring. If you have a Grade II-IV pulley injury, please seek out a clinician who can fit you with a pulley ring.
- During the “functional exercise” phase, it is highly recommended that you work alongside a physical therapist or other healthcare professional to ensure that you’re loading the tissues properly and not over doing it. Remember that everyone will have a unique timeline of their own, influenced by genetics, diet, stress, activity level etc., so guidance from a PT is very valuable. Make sure you check out the rehab protocol described below!
- In the representation of Grade IV recovery, you will notice a large gap from week 6 to 4 months. During this period, physical therapy and functional exercises should continue. Movement is key to your success, but only by following the guidelines expressed in this article or provided by your PT or surgeon.
Grade I
Grade II
Grade III
Grade IV
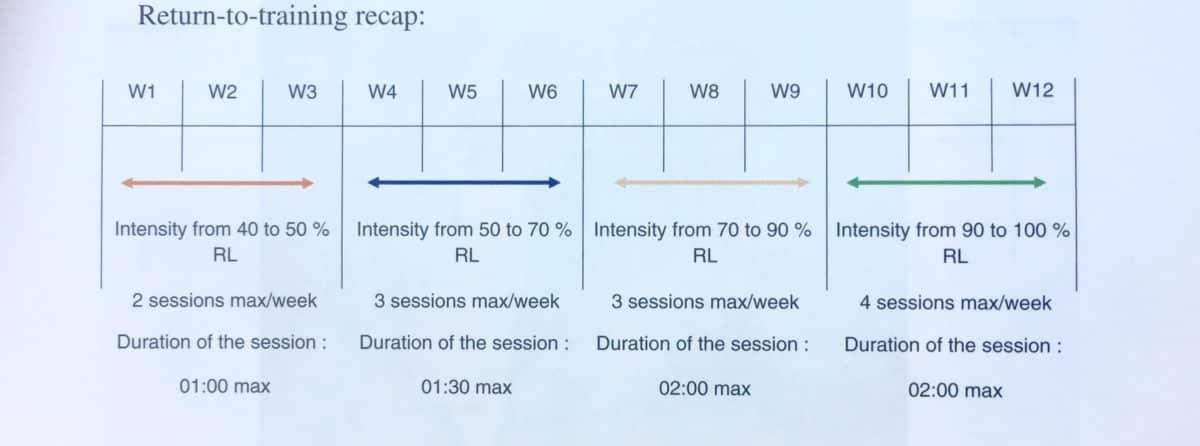
Here is another author’s take on return to sport timelines: Gnecchi and Moutet12
*Taken from their book titled, Hand and Finger Injuries in Rock Climbers.
**In the timelines, you’ll see a percentage of “RL” listed. This is the percentage of your redpoint level (RL).
Grade I-III Suggested Timeline
Grade IV Suggested Timeline
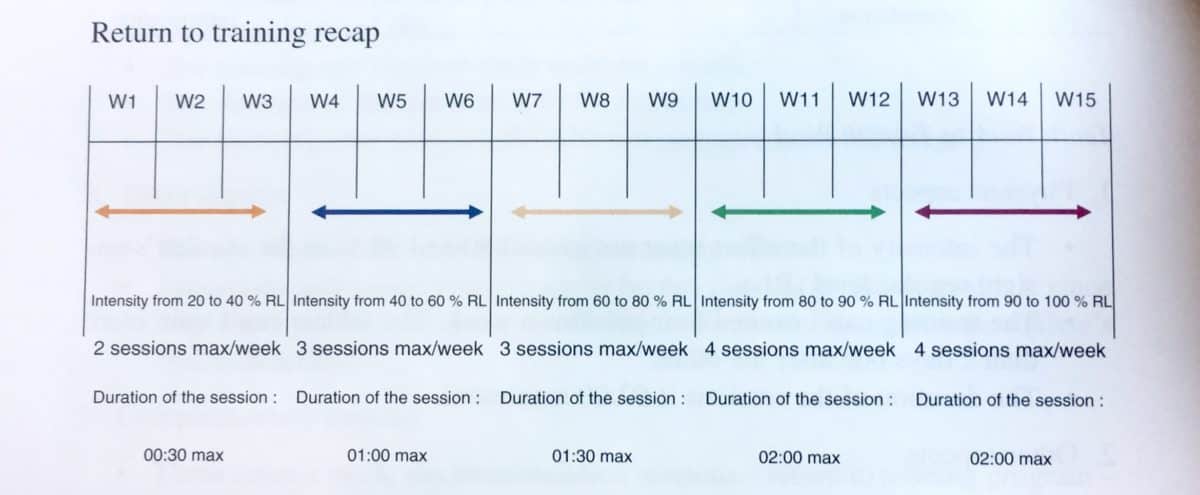
***Another brief caveat about these suggested timelines. They are guidelines to give you an idea of what to do and what to expect. But two things to keep in mind:
-
Everyone is going to heal at a different pace, and
-
You really should seek specialized medical attention if you think you may have injured a pulley, especially if you suspect a full rupture.
Treatment:
Now that you have an idea regarding the typical timelines of these injuries, let’s dig deeper into the actual treatment strategies and interventions for pulley injuries.
Contrary to popular belief, only a Grade IV Pulley injury (multiple pulley ruptures) requires surgical repair. According to Dr. Schöffl and other clinicians, Grades I-III are now successfully managed with conservative care.2,3 What does this mean for you? It means you may not need surgery. Any chance to avoid surgery is beneficial. Some of the inherent risks following surgery include neurovascular impairment, infection, scar formation, graft failure (surgical revision necessary), synovitis (inflamed joints), stiffness, and tendon impingement.3,5 By avoiding these risks, and surgery in general, your chances of returning to climbing sooner are enhanced. Read on to see what conservative treatment looks like.
The Case For Conservative Treatment:
In a Grade IV pulley injury, there is extensive disruption to the finger flexor/pulley system, usually in the form of bowstringing that alters the mechanics of the finger to such an extent that surgery is required to reinstate the normal biomechanics. In Grades I-III, the system is only biomechanically altered to a minor degree, and that is why we can proceed without surgical intervention. But, even in Grade I-III injuries, the tendon does initially move away from the normal tracking close to the bone. The Schneeberger and Schweizer study3 showed that with conservative, non-surgical treatment, all injured fingers in the study regained the proper tendon tracking close to the bone, and reduced the tendon to bone distance by statistically significant amounts. This returned the fingers to ideal biomechanics and was achieved after an average 67 days post injury.
The single most important aspect to conservative management of an acute pulley injury (and post surgery) is to protect the pulley so that it can heal properly. Dr. Schöffl and Dr. Schweizer have both reported extensively in the literature on the importance and utility of using a pulley ring (thermoplastic ring) to protect the pulley during a course of rehabilitation.3,6 Unlike circumferential taping of the finger/pulley, a pulley ring is rigid and will not stretch as tape would. In addition, the pulley ring is placed over the distal portion of the proximal phalanx unlike H-taping described later. Below is an image of the pulley ring used in the Schneeberger study. You’ll notice concavities on the sides of the ring. This is to protect the nerves, arteries, and veins in your finger from being compressed (tape does not discriminate where it applies force, and neurovasculature may be impaired by taping). This protective method (ring/tape) is utilized both during and after the rehabilitation process to allow the pulley to heal with minimal stress to the tissue.
Below is an example of the process that a hand therapist will go through to fabricate the splint
Click here to read an article and see a video about the process
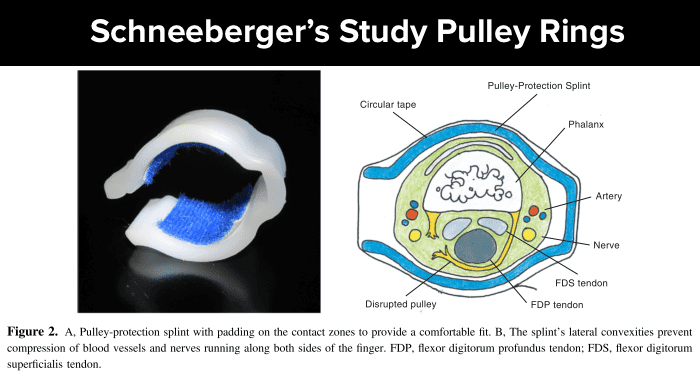
Dr. Schöffl made a post on his Instagram about custom colored pulley rings. So yea, it’s a thing. Check it out here.
Information about splinting and how to rehab pulley injuries are also included in the book Climb Injury-Free and the Rock Rehab Pulley Protocols
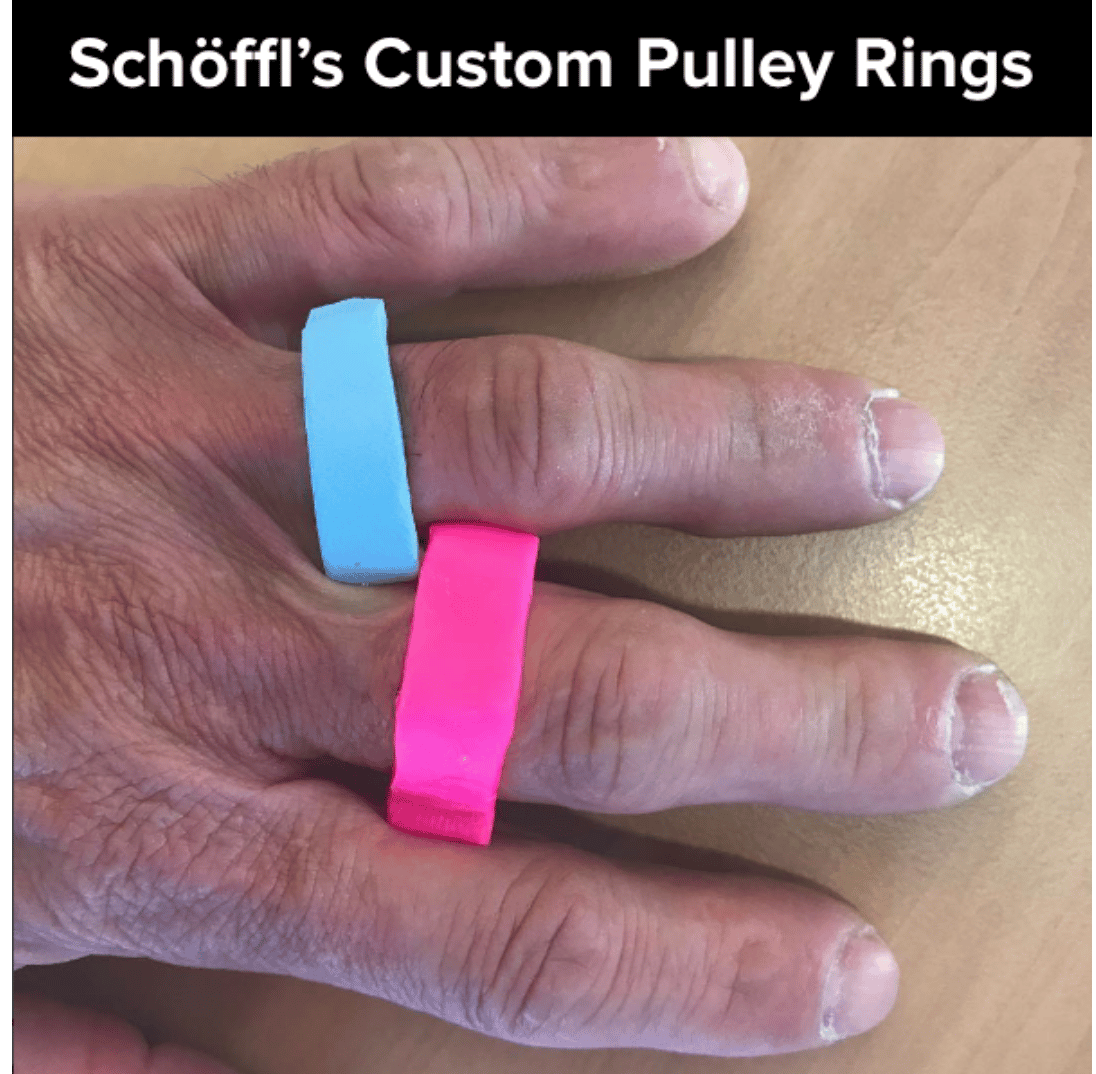
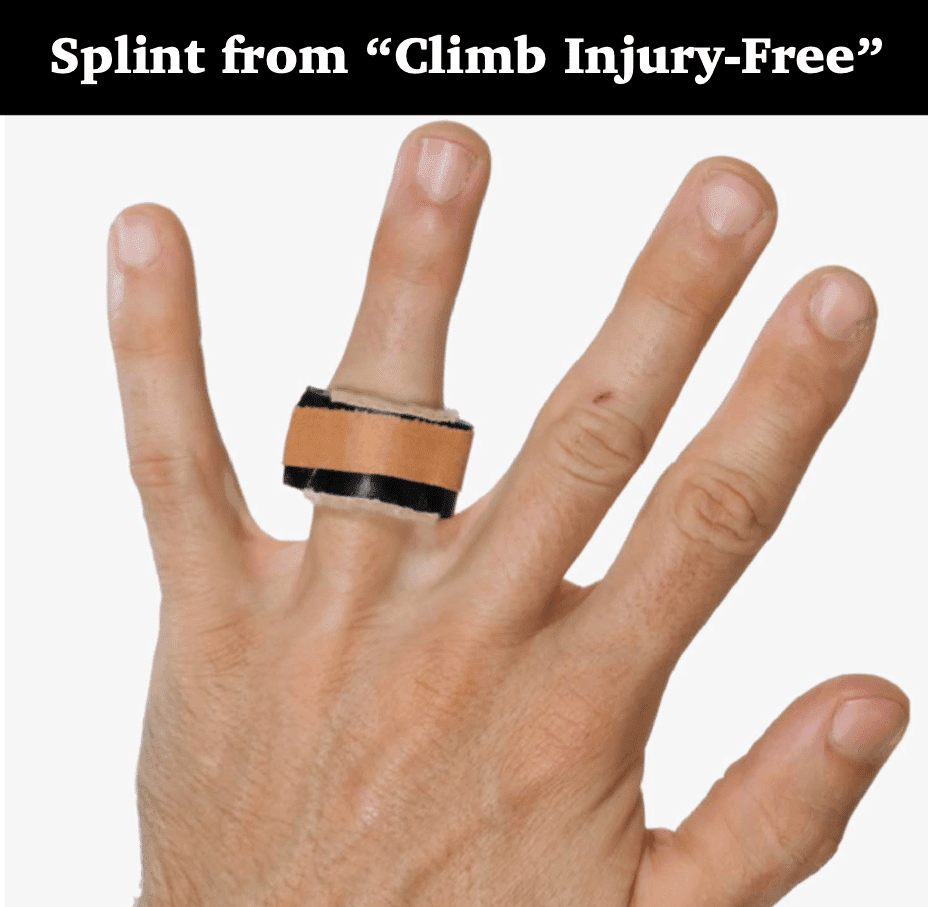
That’s essentially it. Rehab time is the main difference between the traditional method of surgically repairing ALL pulley injuries and now conservatively managing Grades I-III with the intentional use of a pulley ring. (Also, without surgery you have more freedom to use your finger earlier, but guidelines are still in place.) The literature shows that outcomes are excellent with conservative management, and most climbers return to their prior level of climbing.3 Remembering the timelines introduced above, this means that unless you have a major Grade IV injury and surgery, your rehab time should be shorter than a surgery rehab. If they treated ALL pulley injuries with surgery that would mean that any injury to the pulley would keep you from climbing for at least 6 months (and without actively using your finger for at least 45 days). Thanks to the diligent research endeavors by the names above, we now have the evidence and clinical expertise to get you back to climbing sooner.
A Brief Note on Taping Technique:
I will be writing a more in-depth article on finger taping in the next few weeks, but I want you to have accurate information now to properly protect your finger. Tape has been mentioned as a way to offload the force applied to the pulley, but remember that the pulley ring is the best method. Check out this video by Dr. Volker Schöffl showing you how to tape with H-taping. Dr. Isabella Schöffl shows that this method is most optimal for protecting the A2 pulley as it best limits the tendon-bone distance.7 Some important considerations pointed out in the video:
- Use broad tape initially so you can pull the strips in half, creating the “H” or “X”.
- Don’t pull the tape directly from the roll onto the finger. Tear the tape off first.
- Apply central pressure directly over the A3 pulley (PIP joint).
- Slightly flex the PIP to about 60˚ when placing the tape. This allows for better tendon-bone approximation.
- Tighten distal strips first, then proximal strips.
- When pulling the tape around the proximal and middle phalanx, you can pull it tighter than other taping techniques. (Just make sure you don’t lose circulation.)
- Cover your work with skinny tape at the end to avoid the tape unraveling.
Interventions And Prevention Strategies:
Throughout this article, the research authors and I have mentioned “functional therapy” or “functional exercise,” but what does that mean? This is termed to describe rehabilitation exercises that restore function to the injured area, structured in a way to effectively return you to optimal performance. When we rehabilitate an injury, we need to respect the proper healing times and we need the exercise progression to apply a therapeutic stress to the healing tissues. I have some helpful tips and exercises for you here, but I do highly recommend seeking the guidance of a physical therapist or another healthcare professional to help guide you through your process.
The Climbing Doctor’s Advice:
Doctor of Physical Therapy, Jared Vagy, has done an excellent job of laying out the framework of any injury through his Rock Rehab Pyramid. This framework gives you a process to follow as you deal with any injury, in a methodical manner to allow the tissue to heal properly and fully. The different stages, from beginning (bottom) to end (top), include:
- Pain, Inflammation, and Tissue Overload,
- Mobility,
- Strength, and
- Movement.
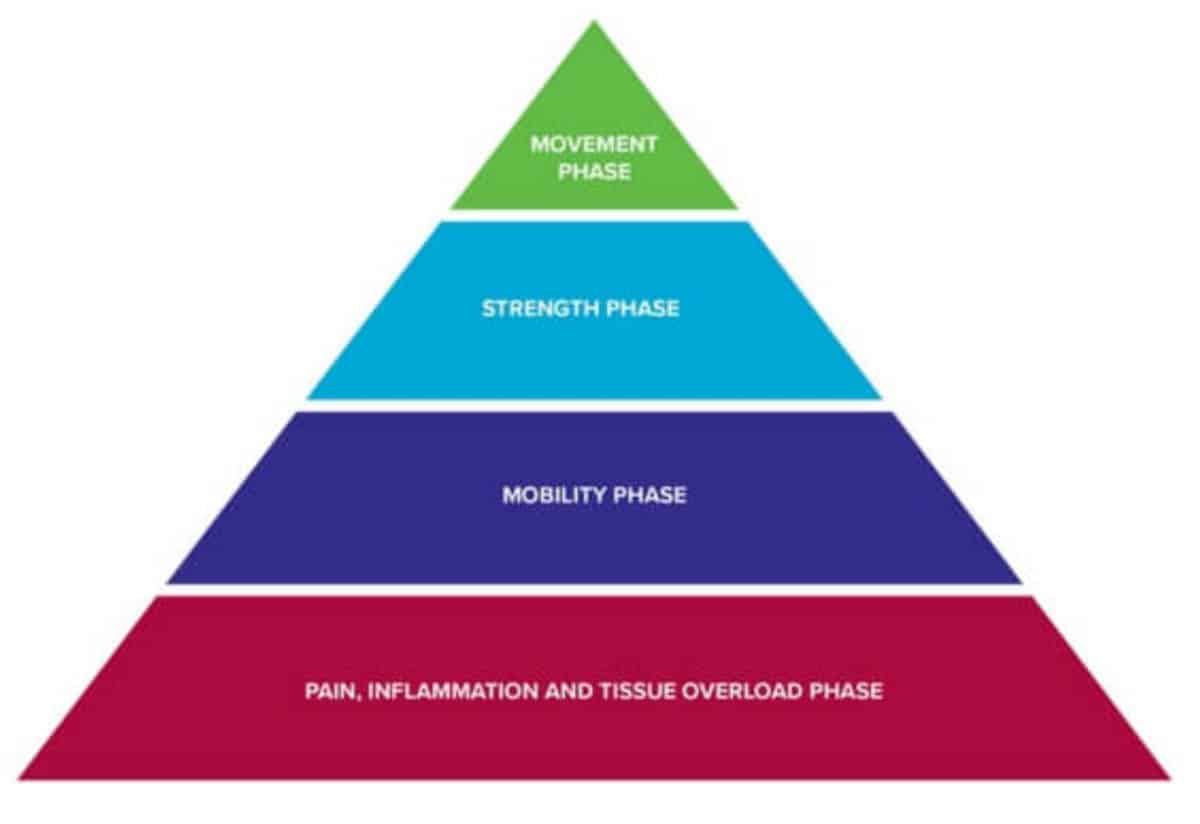
So what do each of these mean? Starting from the bottom of the pyramid, you’ll initially want to unload the affected tissue, then regain mobility in and around the injured tissue, and finally strengthen the tissue with a follow up level to utilize movement strategies to change your old movement patterns and create newer, healthier ones to avoid injury in the future. When performing functional exercises during the Rock Rehab Protocol, there will be multiple levels of each layer in the pyramid. In other words, there will be 3 unloading exercises/techniques, 3 mobility techniques, etc. Dr. Vagy goes into full detail in his new book titled Climb Injury-Free, but below is a little snapshot of things to do for pulley injuries.
Snapshot of Dr. Vagy’s protocol:
-
Unloading the tissue – H-Tape (Be sure to watch the video above from Dr. Schöffl himself, explaining the technique.)
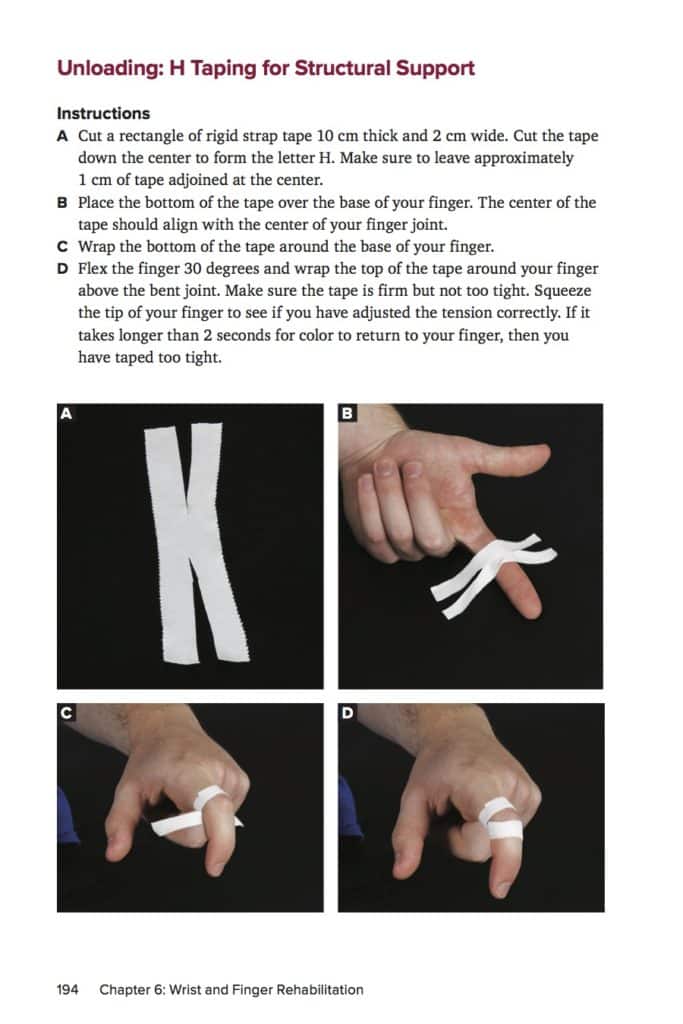
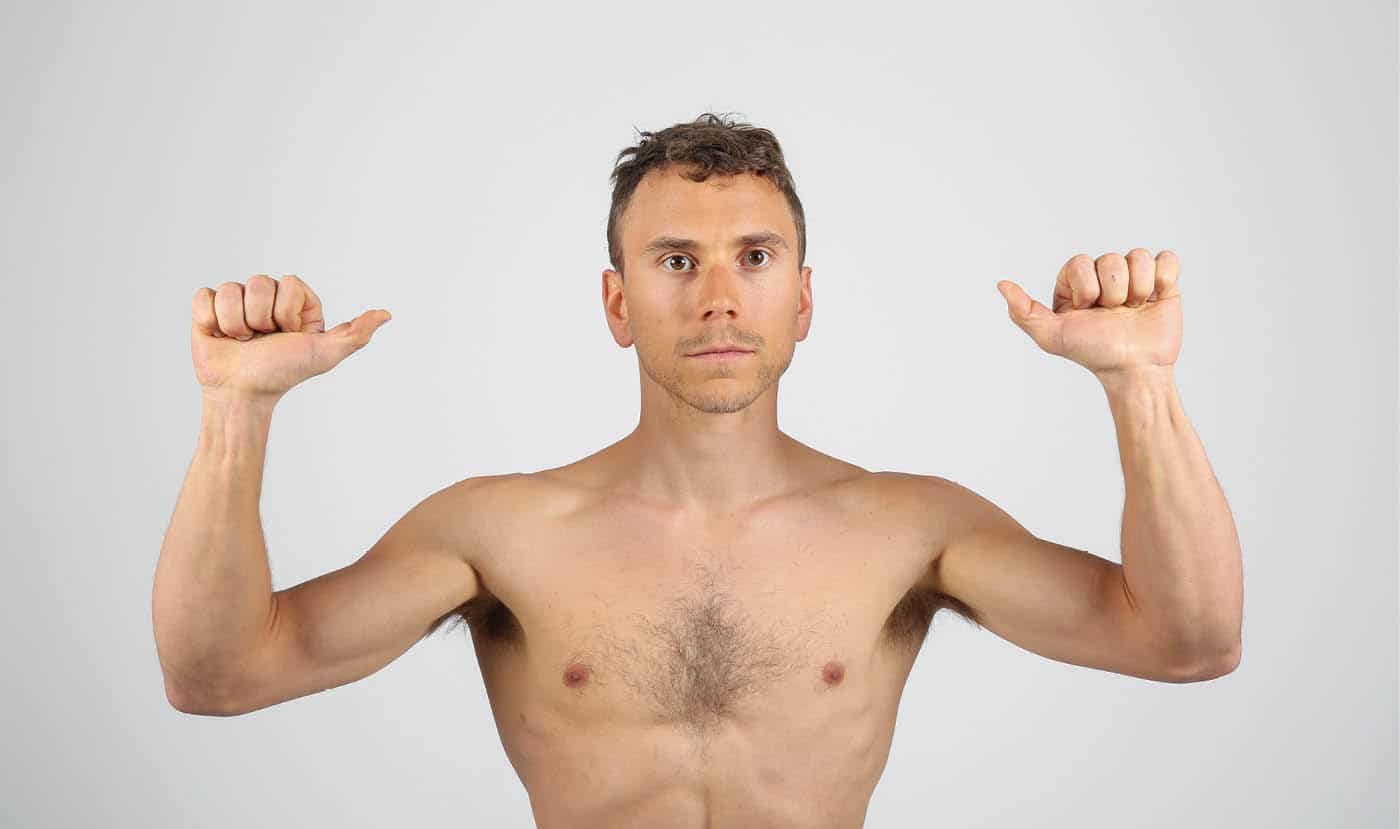
2. Mobility – Tendon Glides: Perform 3 sets of 10 reps, 2-3 times per day.
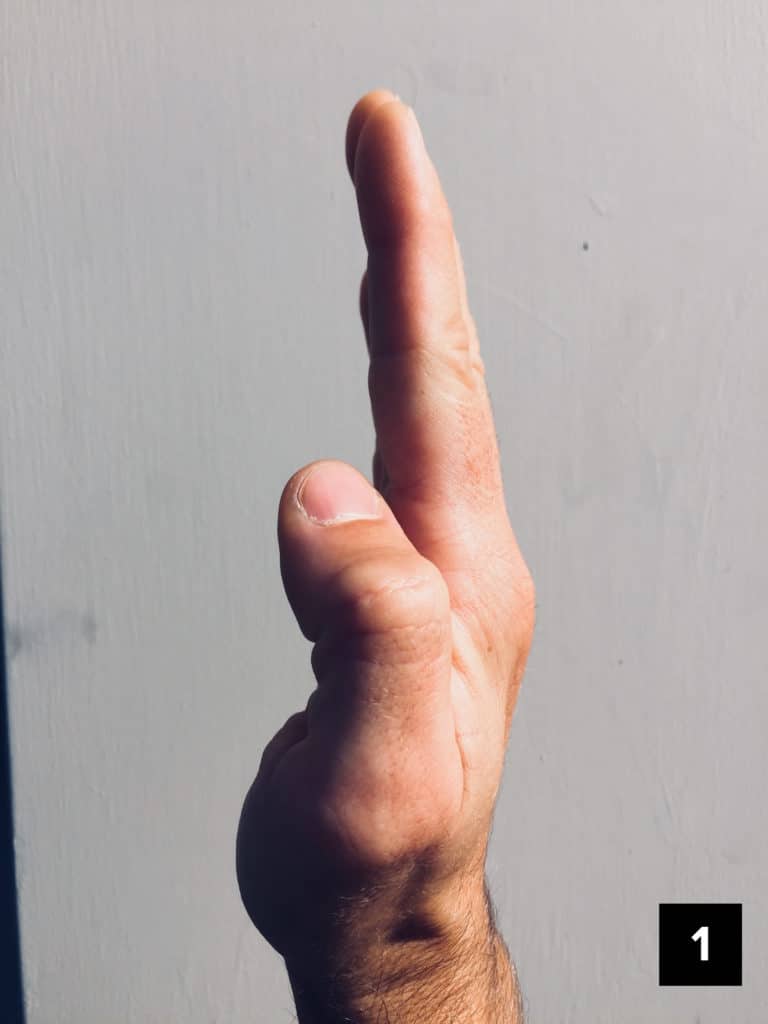
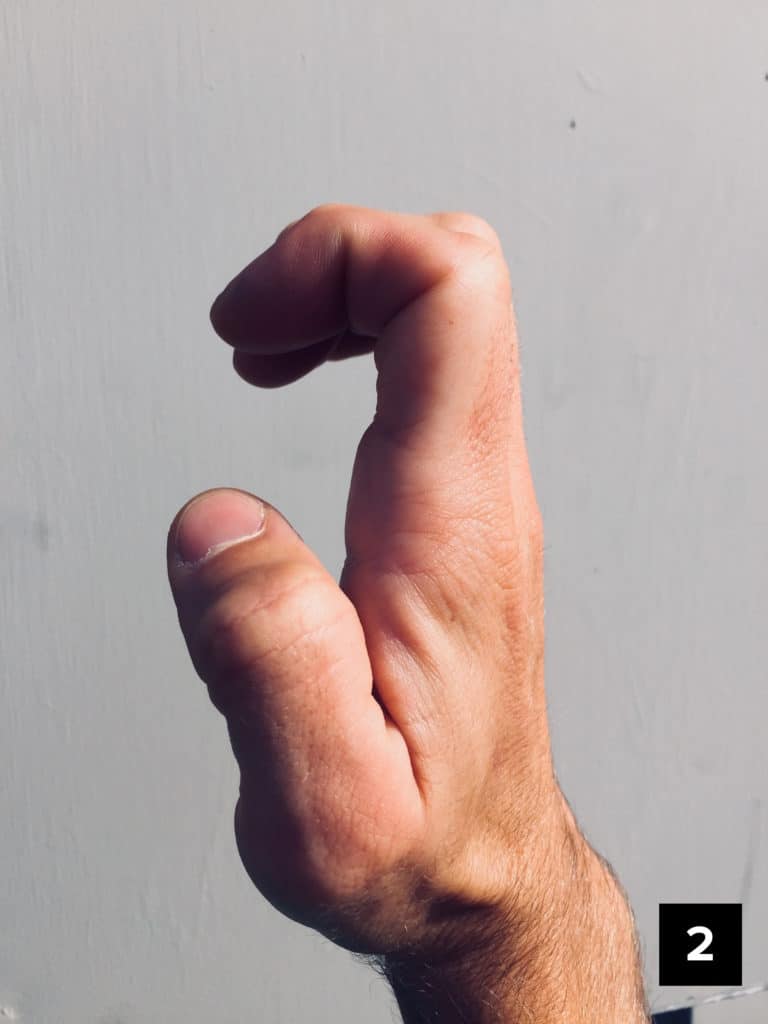
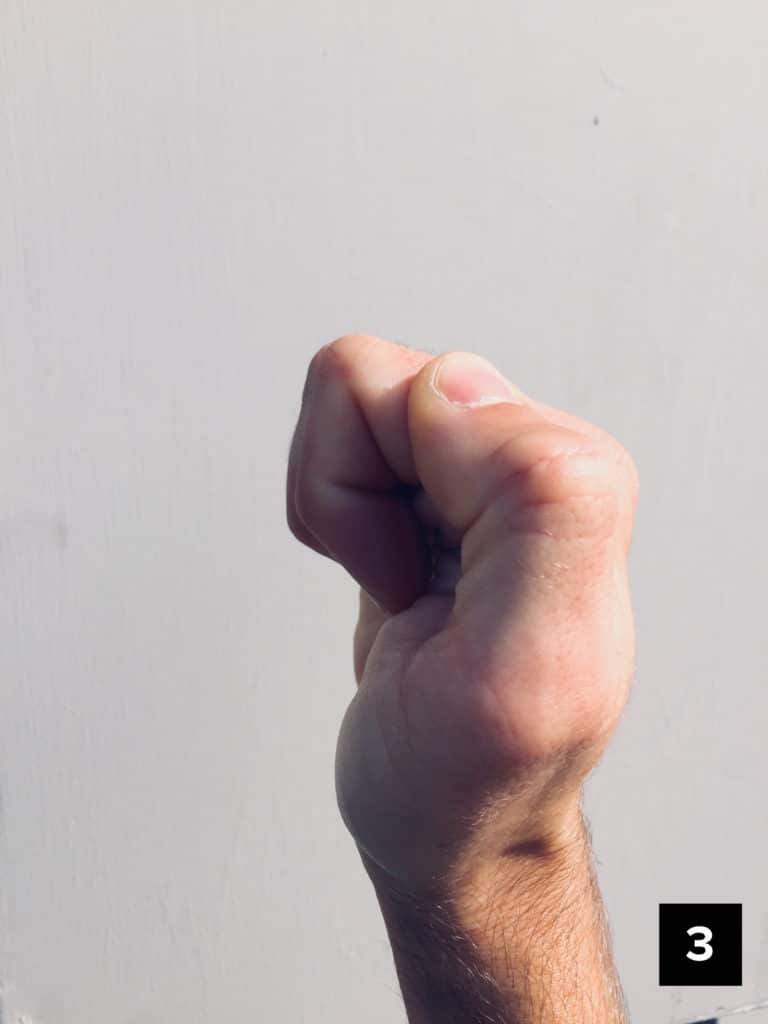
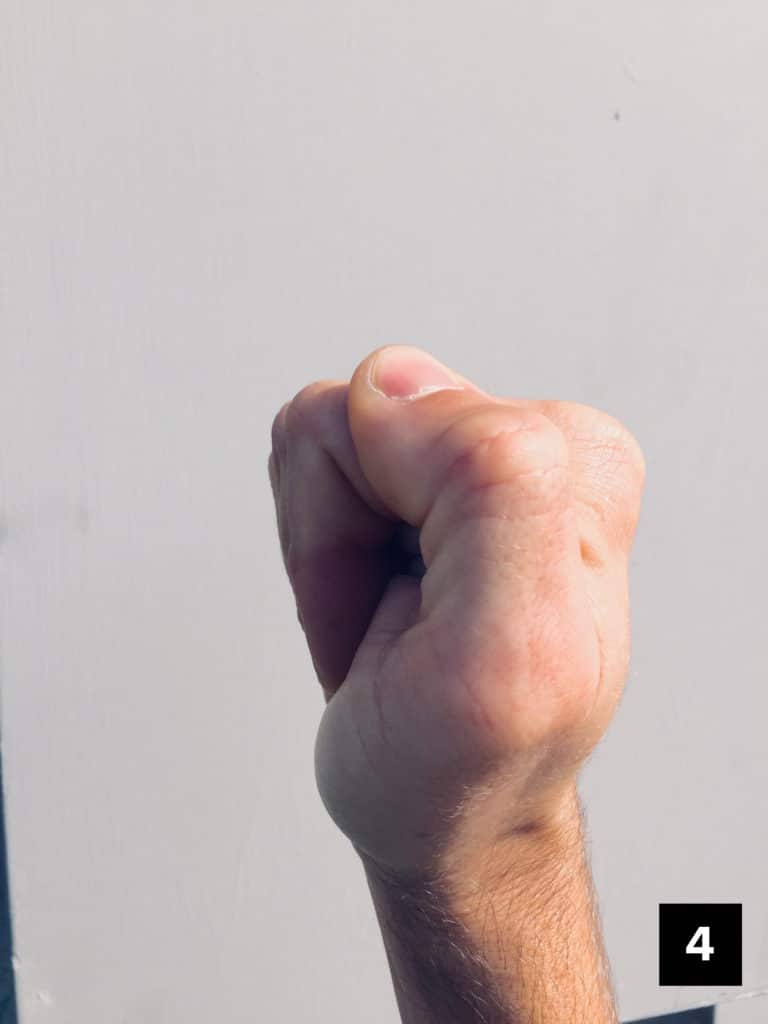
Variation: Think about doing these tendon glides in a more climbing-specific posture.
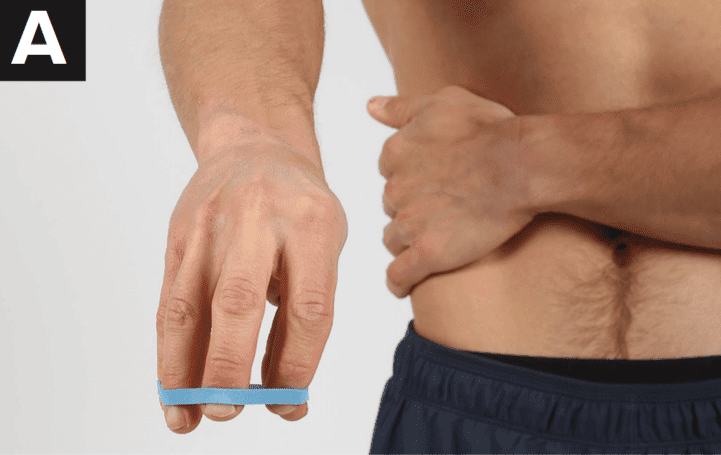
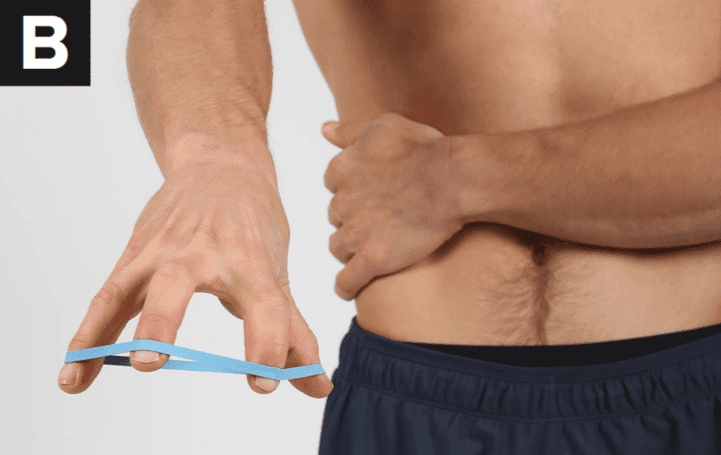
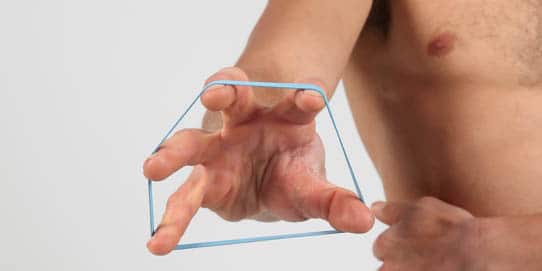
3. Strengthening – Rubber Band Finger Extensions (to strengthen the antagonist muscles and reduce the pressure on the healing pulley): Perform 3 sets of 15 reps with 5 second isometric holds; once per day.
4. Movement – Once you have unloaded the tissue, regained mobility, and strengthened the tissue, now it’s time to change old habits, and create healthy practices that will decrease the likelihood of future injury. Here is advice from Dr. Vagy:
- Instead of pulling hard from small edges, remember to push with your feet too.
- Instead of making dynamic moves from small edges, try to move more statically. Remember from Part 1, that when we move dynamically off of a crimp, the force on the pulley increases 62%! So try to move through small edges statically when you can. Obviously there is no way you can avoid dynamic moves from crimps forever, especially if you climb higher grades, but only do it when necessary.
- Instead of using a full crimp all the time, limit its use, and utilize a half crimp or open hand posture more frequently.
To learn more about Dr. Vagy’s protocols and his Rock Rehab Pyramid, check out this link to his book titled Climb Injury-Free.
Additionally, below is a video by The Climbing Doctor that outlines in detail how to recover from a pulley injury. The video presents an in-depth discussion of how to splint, mobilize, and strengthen the finger so that you can return to climbing at full strength.
Esther Smith’s Advice:
Doctor of Physical Therapy, Esther Smith, of Grassroots Physical Therapy in Salt Lake City has created an amazingly comprehensive protocol for treating pulley injuries. As the physical therapist for the Black Diamond pro climbing team, Dr. Smith has put together an article for you to view on the Black Diamond website, so be sure to go check it out here! Anyone with a finger injury may look at a hangboard and cringe, but Dr. Smith explains how the hangboard can be used as a tool to help heal fingers in the later stages of injury. I strongly encourage you to go read the article. Below is my synopsis of the protocol.
***As a general rule, unless your finger is bowstringing (Grade IV injury) then you can utilize this protocol. Be honest with the timeline. If your injury is less than 6 weeks old, make sure you abide by Phase 1. Go seek a PT or other medical professional if you injure your finger.
Timing:
Dr. Smith has specifically made the distinction between the two phases of the pulley injury with Phase 1 being the early acute phase, and Phase 2 being the later remodeling phase. Injury onset up to 6 weeks puts you in the acute phase, and anything over 6 weeks is considered the remodeling phase. The reason for the distinction is related to the nature of tissue healing. In the early days/weeks after a sprain injury, the ligament is regenerating in a more gross fashion with less specificity or organization. During this time period, the healing tissue is lacking strength and it is imperative that you do not overload it. Moving forward into the later stage of tissue remodeling, the tissue is gaining strength and must be loaded appropriately to ensure the collagen fibers achieve proper orientation and the ligament regains optimal strength. Phase 2 can also be utilized by someone with a long lasting finger injury that never quite healed properly and still gives you pain/discomfort. So long as you’re more than 6 weeks post injury and you don’t have any range of motion limitations, feel free to jump right into Phase 2. Read on for more in-depth guidance on how to proceed.
Phase 1 – Acute Phase: Pulley injury less than 6 weeks old
As mentioned above, this phase will focus on newer injuries and help to regain baseline range of motion, reduce swelling, and allow the initial injury to heal appropriately before engaging in finger loading of phase 2.
Inflammation Control – First 7-14 days, chill out that finger
Initially, you need to start on inflammation control and gentle movements like tendon glides, rice bucket, etc. (see below) but don’t touch a climbing hold for a couple of weeks. Allow your body to deal with the inflammation first. If you have stiffness in the finger, try to regain range of motion before you start training it in the protocol detailed below. Get the swelling out before doing your loading. Spiral taping to help push the swelling out, ice, acupuncture, contrast bath, etc. are good ways to control swelling,
Functional Exercise:
Watch this YouTube video of Esther Smith running Dan Mirsky through some exercises used for finger pulley injuries. These exercises are good options to initially get the finger moving without loading it to excess and to ensure that the finger doesn’t lose range of motion. They should also be used periodically to take inventory of the healing tissue and to gauge where you’re at in the process.
1. Gentle Circulatory Massage:
- Finger Massage with Roller: 1-5 min of massage, 1-2x/day
- You don’t want to develop scar tissue, so these help to increase blood flow, limit the inflammation, and move swelling out of the injured area to allow for optimal healing.
- If newly injured, stay away from that raw, painful zone and work around it, remembering to get all the way down into the palm of the hand.
2. Tendon Glides:
- 10-20 reps x 3 sets, 1-3x/day
- These movements get the tendon gliding through the pulley surrounding it, and help to avoid adhesions and scar tissue in the finger. They should be done without loading the fingers, but only moving through the full range of motion.
- These are also a great warm-up for the tissue even when uninjured. While you’re walking to the crag, warming up generally, or just staring down a climb, you can do these to keep the tissue moving smoothly.
3. Pen Rolling:
- 30-90 sec x 1-3 sets, 1-3x/day
- These movements are an advanced version of the tendon glides, and incorporate a more active, controlled range of motion. But again the fingers are not loaded.
- You’ll notice that your non-dominant hand may be more difficult to perform the pen rolls, so make sure to practice! Balance is one of the most important aspects of healthy climbing practices.
4. Gentle Active Range of Motion:
- These movements are used as you become more comfortable moving your finger. Again, they are movements that do not directly load the injured pulley. They allow the finger to move in its full range of motion and to strengthen the muscles and joints that support the finger flexors.
-
Rice Bucket (Dr. Smith recommends Wheat Berries for newer injuries – less resistance)
- Finger Extension, Flexion, and Hand Lateral Rotations:
- 20-30 sec each motion x 1-3 sets, 1-3x/day
- Precaution: Gently and smoothly stab into the rice to avoid pain. Progress to more robust movement as tolerated.
-
Finger extensions with putty:
- With some therapy putty, spread your fingers apart into extension to work the finger flexor antagonists. This will build a good foundational strength to support the rehab process moving forward.
-
Towel Gathering:
- Gentle towel gathering is a good way to get the finger flexors working without placing too much stress on the tissue early on. Remember to keep a neutral wrist when doing this exercise.
After performing the Phase 1 activities for a few weeks, you may be ready to start Phase 2, and begin loading the tissues again. A few things to keep in mind:
- Make sure you’ve achieved full range of motion in the affect finger joints before beginning the next phase. If you still haven’t regained full range of motion by 6 weeks, seek qualified care to check for underlying issues.
- Ensure that you no longer have pain with normal everyday movements. Direct pressure to the area may still be tender, but it shouldn’t hurt with basic movements.
If both of these precautions have been addressed, try starting the “Load Testing” part of Phase 2. Read on to learn about the next steps.
Phase 2 – Remodeling Phase: Pulley injury more than 6 weeks old (and chronic pulley/tendon injuries)
Phase 2 of the rehabilitation is designed to remodel the healing tissue in a structured manner to allow for optimal functioning of the tissue. When tendon and ligamentous tissue heals without a directed load, it lays down a matrix that is disorganized and irregular. When a directed load is applied to the healing tissue, that matrix is reorganized into a structured form that follows the load direction. To visualize the concept, think of this analogy. Imagine you have a bunch of individual strands of string and you’re holding the ends of every string in each hand. Without pulling your hands apart, the strings are bunched up and there is no order to the strings. Now if you pull your hands apart, every string becomes straight and taut, and there is an ordered matrix of consistent fibers. This is what we want for our healing tendons and ligaments. For optimal strength and performance of the tissue, there needs to be an ordered matrix, and to do that we need to apply a therapeutic load while our tissue heals. This is where Phase 2, The Remodeling Phase, comes in. Giving your healing process an agenda will allow you to optimize your recovery and get you back to sending your projects! Let’s take a look at the first part of the protocol, a process that Dr. Smith calls “Load Testing”.
Load Testing:
(The purpose of the Load Test is to find the proper therapeutic load necessary to remodel your tissue. It should reproduce your familiar pain, but only slightly. This way you know that it is targeting the correct tissues and creating a micro inflammatory response to promote tissue remodeling.)
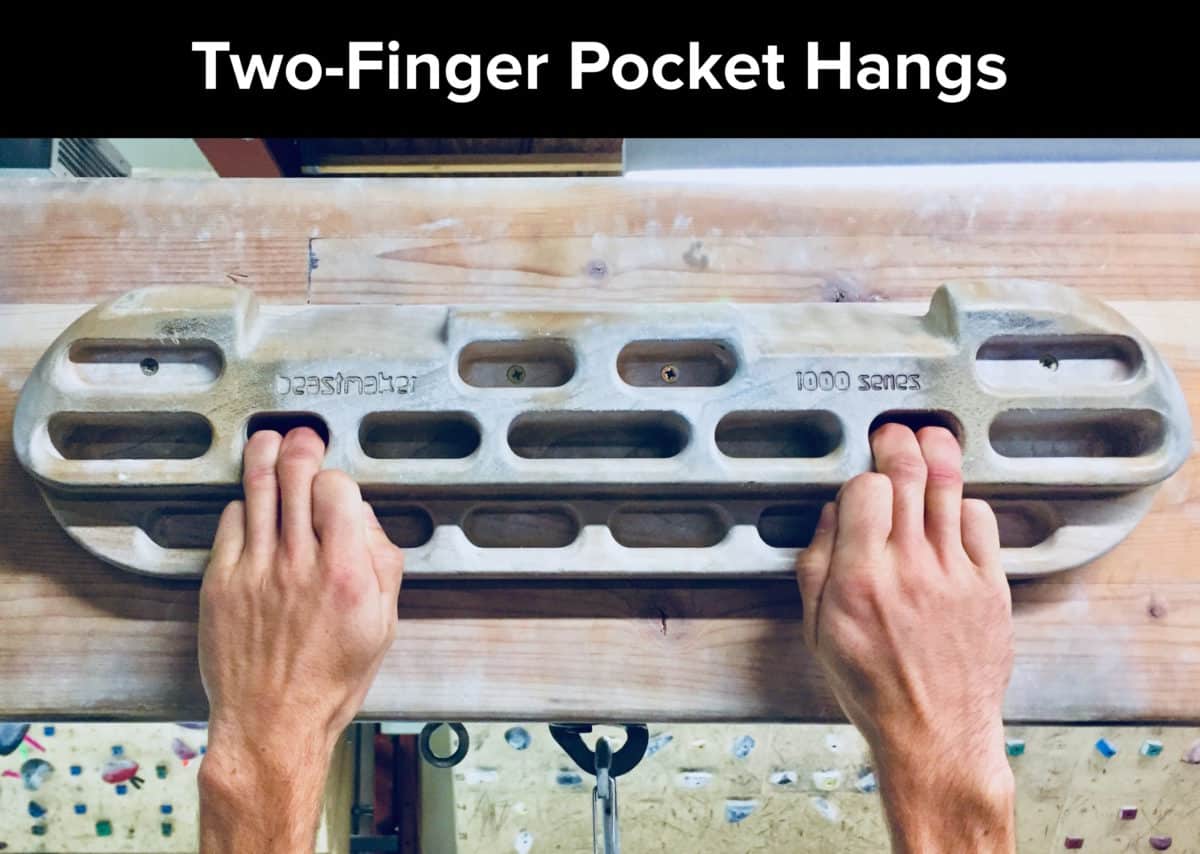
After warming up with some of the movements from Phase 1, find a two- or three-finger pocket that’s about two pads deep. If that grip doesn’t reproduce your familiar pain, try a different grip—maybe a pinch or even a fully open-hand four-finger crimp. Everyone responds differently to this process, so find what speaks to your body and go from there. Some climbers may benefit from testing all grip types, running through the full protocol with each one. If the two- or three-finger pocket doesn’t feel quite right, trust what your body’s telling you and adjust accordingly.)
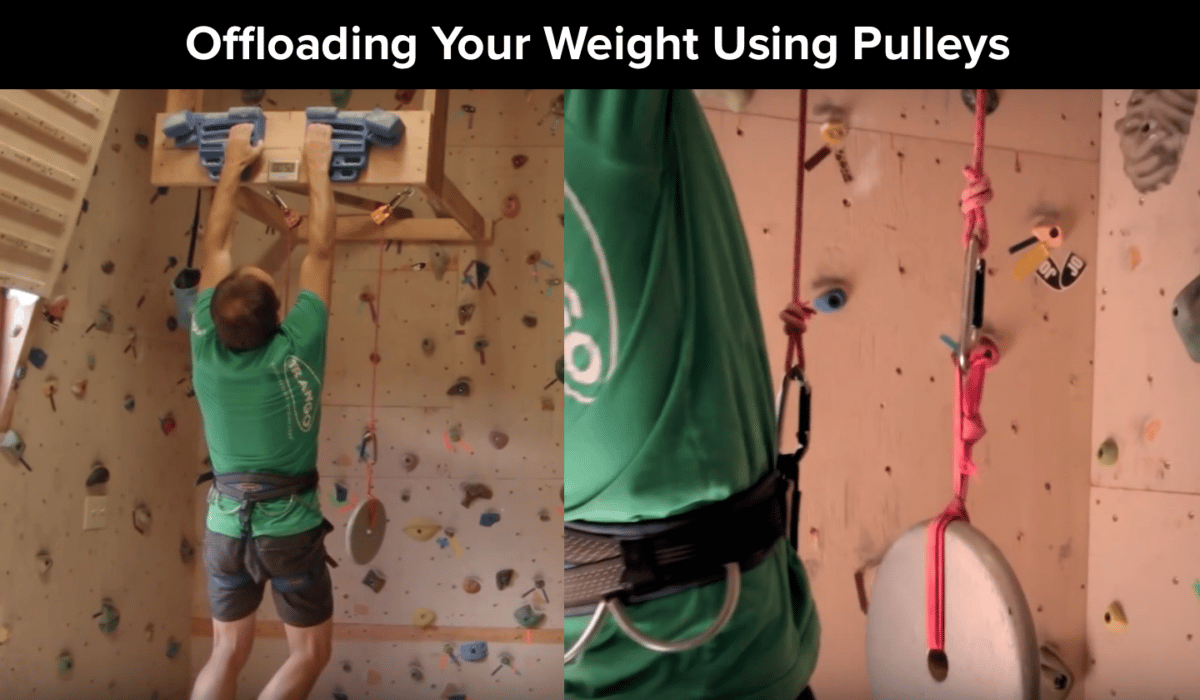
If using a two finger pocket, you will hang from the injured finger plus one adjacent finger, usually the ring and middle fingers. If using a three finger pocket, try to hang with two adjacent fingers supporting as well (although this won’t be possible for an index finger or pinkie finger injury). (Check out my other article explaining how to hang safely from pockets.) Start by slowly and gently hanging at body weight and see what it feels like. If at first you’re hanging at body weight and sense there’s no way you can grip without intense pain, then offload your body weight using pulleys. (Click here to watch a brief video clip of Mark Anderson demonstrating a hangboard pulley system.) Offload weight until you feel a MILD, familiar discomfort that reproduces your pain a little bit. Hang on the hangboard in this position for 10 seconds, for 3 reps, with 2-3 minutes in between each rep.
Note: It’s best to consult a doctor of physical therapy during this loading phase to safely gauge the appropriate intensity.
The reason for the pain is that you need to know you’re actually stressing the correct tissue and creating the micro inflammatory response mentioned above to remodel the collagen fibers. The only way to break up the old, irregularly structured collagen fibers and lay down new, regularly structured collagen fibers is through this micro inflammatory response followed by a therapeutic load. Dr. Smith brings up a very good point that “hurt does not equal harm”, and that the low grade pain indicates that you’re using the proper load. The proper amount of load will produce low-grade symptoms (she says a “strain or slight pain” during the hang.) Make sure that any discomfort/symptoms do not last longer than 10 minutes post-hang. If they do, you need to offload more weight.
Another consideration Dr. Smith makes is to make sure that the symptoms you feel are not caused by direct pressure from a hold, but from the actual tissue loading from the hang. Holding a jug might hurt because of the hold pressing against the injured tissue, and not because of the actual tissue being loaded. Also, if a two-finger pocket does not produce your familiar discomfort, you may need to find a hold that does, say a pinch grip, and run through the Load Test and Remodeling phase with this instead.
-
Load Test Recap: Complete this process before beginning the actual remodeling phase to determine what the necessary load is for your finger.
- Warm up with some movements from Phase 1.
- Find a two-finger pocket on the hangboard deep enough for about 2 pads.
- Find a load that reproduces a mild form of your discomfort (strain or slight pain). You might have to offload weight using a pulley system.
- Perform 3, 10-second hangs with 2-3 minutes rest in between reps.
- Make sure that the hang doesn’t produce symptoms that last any longer than 10 minutes post-hang.
- If you can do this successfully, use this load for your remodeling phase.
Remodeling – Protocol Initiation:
Now that you’ve done the Load Test, you’ll begin the actual protocol using this load/weight. Make sure that you are not fatigued when starting the remodeling hangs, as you need to be fresh to obtain maximum benefit and avoid further injury.
Using your newly found hanging weight, do 3-5 hangs for 10 seconds each, resting for 2-3 minutes in between each hang. Dr. Smith recommends doing your rehab and stretches in between hangs (dynamic stretches, no static holds.) She says to think, “actively mobilizing the tissue”. You can be doing tendon glides, pen rolling, or rice bucket in between sets.
Repeat this process 1-3 times per week, spreading your sessions out. Don’t do too much too soon and make sure you warm up first.
Progress this process over the course of 6-8 weeks, to continually apply the therapeutic load and orient the tissue in a structured manner, making the tendon stronger over time. Over the 6-8 weeks, return to the hangboard after 2 sessions or so (1 week) and reassess. If this load no longer produces your symptoms, add 2.5-5 lbs. This might mean removing 2.5-5 lb. of weight from the pulley weights or adding 2.5-5 lb. to your body weight (attached to a harness). Keep hanging with this new load until you no longer feel the familiar pain, and then you do it all over again, removing/adding 2.5-5 lbs. each time you reassess.
After about 2-3 weeks of successfully hanging with 15 lbs. above body weight in two-finger pockets, start experimenting with crimps. Once you begin experimenting with crimps, start the whole process over again, doing a new Load Test with a crimp, and finding your baseline familiar pain threshold. Begin with your Load Test amount and eventually start adding weight by 2.5-5 lb. increments (just as you did before), for several weeks until this hold no longer produces pain.
-
Remodeling Protocol Recap: Begin the following procedure after you have found a tolerant hanging load that mildly reproduces your symptoms (strain or slight pain) and does not result in lasting symptoms.
- Warm up first with Phase 1 exercises. **NOTE: Do not do any strenuous exercise (i.e. strenuous climbing) before or after your hangboard session to ensure that you are not fatigued.
- Find a two-finger pocket on the hangboard.
- Do 3-5 hangs for 10-seconds each, resting 2-3 minute in between each hang.
- You can do your rehab exercises while resting in between each hang.
- Repeat the process 1-3 times per week, spacing out each session.
- After 2 sessions or 1 week, reassess your hangs. If the current load no longer produces symptoms, add weight (or eliminate from pulley assistance) by 2.5-5 lbs.
- Continue hanging with the new load until THIS no longer produces symptoms.
- Repeat this cyclical process until you are able to hang on the hangboard with 15-30 lbs. above body weight over the course of 6-8 weeks.
- After you are able to successfully hang with 15 lbs above body weight, you can begin testing other holds like crimps.
- When increasing the load or testing other grips, Dr. Smith says to make sure you keep these parameters in mind:
- Familiar symptoms produced during the hang,
- Soreness lasting no more than 10 minutes following hangs, and
- No stiffness or motion loss ensues.
- Once you are able to climb/train with no residual symptoms, and/or you have achieved the two-finger pocket hangs with 20-30 lbs. over body weight with no symptoms, you’ve successfully reached your goal!
- Author’s note: for many of you, this may be the first time to engage in a training program. Not only have you healed your tissue, but also you’ve successfully completed a rigorous hangboard training program that will set you up for increased climbing performance moving forward! Now go reap the benefits of all your hard work with enhanced grip strength.
Can I Climb During The Process?
It is strongly advised that you do not engage in climbing until you have first regained full range of motion in each knuckle/joint and that you have initiated the Load Testing phase. If you do begin climbing, make sure you protect the pulley through the use of a pulley ring or by H-taping the finger. As described earlier in the article, a pulley ring will offer the most protection.
After you have initiated the Load Testing, start playing around on jugs but be careful. Jugs are the hold of choice because it puts limited biomechanical stress on the pulley, but it’s not ideal because it puts direct pressure on the pulley itself, which can be painful in its own right. Do an assessment on yourself by playing around on the wall. Do an easy, short, juggy traverse and see how it feels. Be honest with yourself and don’t push it. If that feels OK, then try to climb an easy, juggy route well below your previous climbing ability level. When you come down, assess your finger by doing your finger glides, etc. Do you have lasting pain after the route? Does your finger now have swelling? Check after each climb to take inventory. If you’re not able to climb pain-free or if you’re finger swelled up then stop climbing, or at least change the holds or the grade you’re playing around on. Listen to your body; you’ll know when something doesn’t feel right. Don’t cheat yourself. If you’re not able to climb without producing symptoms, then wait another week. You owe it to yourself to do things right.
During the rehab process, you are progressing yourself along the way by ramping up your climbing abilities but staying away from the holds upon which you have not yet tested the hangboard protocol. Your climbing should gradually improve until it matches your hanging tolerance during the protocol. If you haven’t tried the remodeling phase with a crimp, then don’t climb a route with a crimp. Don’t exceed what you’ve done on the hangboard by climbing at a higher level on the wall. Be patient.
During the initial Remodeling Phase (Phase 2), you can begin climbing under a few circumstances:
-
The climbs you choose are absolutely not causing pain,
-
You have H-tape or better yet a pulley ring protecting the pulley,
-
You are climbing well below your prior ability level, and
-
You only climb on holds that you are currently using for the protocol.
Dr. Smith’s Major Considerations To Keep In Mind:
- Respect what you’re feeling.
- Don’t mask what you’re feeling by excessively taking Ibuprofen (Ibuprofen is used so liberally these days that it has jokingly been called “Vitamin I”.) Feel what’s happening.
- Ibuprofen isn’t good in a chronic situation because it’s snuffing the inflammation when that’s what you want. You want a little bit to create that micro inflammatory response.
- Get full range of motion back before beginning the protocol. Mobility first.
- Be careful and controlled when you’re testing it. Test it once, wait about 5-10 minutes and see how you respond to it. Don’t jump in headfirst. People are probably more likely to jump into climbing more readily than they would try the loading procedure on a hangboard. Don’t be one of those people. The hangboard is a tool!
- Hang right. Check out Dr. Smith’s “Hang Right” Articles here: Part 1 and Part 2.
- Be delicate and detailed with your protocol and training. Take the time during rehab to be deliberate and stop and take inventory throughout the process. Be careful with the progression toward climbing, because when we’re pumped and adrenaline is pumping, we tend to revert to old patterns and behaviors. This is when we’re vulnerable to not paying attention and making things worse.
- Remember: There’s no rush! Do it right the first time.
- Ultimately it comes down to the severity of the injury. Get checked out by an appropriate provider for an accurate diagnosis. (Ultrasound diagnostics.)
- Nutrition: turmeric, black cherry, holy basil, staying hydrated, Omega 3’s and 6’s, Bone broth, and other things that will help with tissue regeneration.
- If your finger is not any better in 14 days, and certainly not able to be loaded, go seek attention.
What Next?
Now that you have learned about pulley injuries and what you can do to heal them, I want to shift gears and briefly discuss what may have lead to your injury. Accidents happen to the best of us, but often times injuries occur due to poor mechanics, imbalances in posture, inefficient climbing technique, and an overall lack of mobility. When looking at finger injuries, we must not only focus on the finger, but also how the whole body is functioning. Poor shoulder mechanics can lead to an excessive burden on the fingers. Improper and inefficient footwork can place an increased load on the fingers or subject them to unnecessary risk of a blown foot. When looking into why you’ve been injured, it is unlikely that one finger was weak, but that the fingers as a system were the weak link in the entire body system. Remember, the hangboard is a tool and it doesn’t have to be an intimidating one. Even light hangboard work over a long period of time will have beneficial effects to help prevent injuries while climbing. Here are some thoughtful concepts to think about moving forward to avoid finger injuries:
-
Focus on footwork!
-
Climb with hips into the wall to avoid over-gripping.
-
Focus upstream at forearm muscle imbalances, shoulder mobility, and thoracic mobility.
-
Start a hangboard routine today to get ahead of the curve. Here’s a helpful video by Eric Hörst of TrainingforClimbing.com. NOTE: Coach Hörst does not demonstrate offloading your weight using pulleys, but remember that it is a perfectly good option to do so when starting out.
Recap:
Now you have the information necessary to understand your pulley injury, how to identify it, what to do initially, and how to make sure you get back to climbing strong again. The hangboard is your friend later on in the rehab process, and can be used as a preventative measure as well. Remember to listen to your body throughout the process and you should be back to climbing strong when you are through. Happy climbing.
-Matt
Author Bio:
Matt is Doctor of Physical Therapy who recently graduated from the University of Colorado’s Anschutz Medical Campus. While going to school, he lived in Boulder, CO to be closer to his playground. In his final semester of the DPT program he conducted an independent study researching climbing injuries and injury prevention techniques to provide to his clients. His main interests are in sports medicine physical therapy and injury prevention revolving around the climbing athlete. Before starting school, Matt lived in San Diego, CA and worked at Mesa Rim Climbing and Fitness. He plans to one day return to San Diego and work alongside Mesa Rim to give back to the community he loves.
Matt predominantly climbs sport at the 5.12c/d level, and has recently taken up the craft of trad climbing. He has been climbing since 2008. Matt empowers people to take their health into their own hands, and guide them toward a stronger, injury-free climbing lifestyle. He currently teaches injury prevention classes at local climbing gyms, and also provides content about the topic on his Instagram (@theclimbingpt).
When Matt isn’t climbing, you can find him adventuring somewhere in the wild. He is also an avid biker. He rides BMX, downhill mountain biking, and has completed a tour cycling trip around New Zealand. He connects with anyone in the extreme sports realm as a healthcare provider who has the capacity to understand their sport and assist them with their unique needs.
Follow Matt:
Instagram: @theclimbingpt and @basebklyn1
Contact Matt:
Email: mattdestefanopt@gmail.com
References:
- Schoffl VR, EINWAG F, STRECKER W, Schoffl I. Strength Measurement and Clinical Outcome after Pulley Ruptures in Climbers. Med Sci Sport Exerc. 2006;38(4):637-643. doi:10.1249/01.mss.0000210199.87328.6a.
- Sch?ffl VR, Sch?ffl I. Injuries to the Finger Flexor Pulley System in Rock Climbers: Current Concepts. J Hand Surg Am. 2006;31(4):647-654. doi:10.1016/j.jhsa.2006.02.011.
- Schneeberger M, Schweizer A. Pulley Ruptures in Rock Climbers: Outcome of Conservative Treatment With the Pulley-Protection Splint-A Series of 47 Cases. Wilderness Environ Med. 2016;27(2):211-218. doi:10.1016/j.wem.2015.12.017.
- Gnecchi S, Moutet F. Hand and Finger Injuries in Rock Climbers. Cham: Springer International Publishing; 2015. doi:10.1007/978-3-319-16790-9.
- Zafonte B, Rendulic D, Szabo RM. Flexor Pulley System: Anatomy, Injury, and Management CME INFORMATION AND DISCLOSURES. J Hand Surg Am. 2014;39:2525-2532. doi:10.1016/j.jhsa.2014.06.005.
- Hochholzer T, Schoeffl V, Zapf J. One Move Too Many — : How to Understand the Injuries and Overuse Syndroms of Rock Climbing. Lochner; 2003.
- Schoffl I, Einwag F, Strecker W, Hennig F, Schoffl V. Impact of taping after finger flexor tendon pulley ruptures in rock climbers. J Appl Biomech. 2007;23(1):52-62.
- Disclaimer – The content here is designed for information & education purposes only and the content is not intended for medical advice.


Thank you for all of your efforts putting this together. Saving this page for later!
Thank you people for right down this! So much useful articles and materials. I’m with a pulley injure myself and this article will help me a lot!
Bone broth.. loved the article untill then.
Hi Alex,
I’m sorry that this turned you off, but remember that this is someone else’s advice not necessarily mine. With that said, everyone is going to have different responses to different nutritional supplements, and for a lot of people, bone broth proves very beneficial. The main idea is to try different things for your body, and experiment with what will give you the best results.
Sincerely,
Matt
Excellent post !!!
Great post. Wonderful information and really very much useful. Thanks for sharing and keep updating.
Oracle Rac Training
Inspiring writings and I greatly admired what you have to say , I hope you continue to provide new ideas for us all and greetings success always for you..Keep update more information..
Thank you very much. I hope to continue producing more articles into the future to help people with any issues they may have.
Great article but I’m hoping you can get a little more specific on how to differentiate between a grade 1 and grade 2 pulley injury. What are the specific symptoms for each?
Answered by Jared Vagy DPT:
Hey Dan,
The true way is to diagnose with Ultrasound. But you can use clinical criteria to differentiate mild versus moderate versus severe injuries and then use those results to follow a specific protocol. Cooper et al, published on this in The Journal of Hand Therapy. See below for a table showing how to diagnose and classify:
https://pin.it/4y6zNJD
Hello ,
Thanks for this very helpful article. I have a A2 pulley injury and a hand specialist here in Greece is saying that I should go for surgery. He says according to palpation and MRI scan that it’s a full rupture but he didn’t say anything about grades 1 to 4. But according to the symptoms it seems to me that I’m maximum grade 3. I still have full range of motion but impossible to crimp or put strength on the finger. He wants to operate super fast and talks about two to 3 months before being back climbing. How can I be sure that surgery is needed or not ?
Hi Leo,
Based on the most recent literature (Lutter et al. 2020) a grade 2 or 3 pulley injury in isolation is recommended for conservative rehabilitation and not surgery. I would recommend sending the article below to your surgeon to see if they are aware of the most current evidence. It is possible they are observing multiple pulley ruptures, a FLIP phenomenon, obvious clinical bowstringing, or a contracture, so you will want to have the discussion with them after they read the article cited below to see if conservative care would be the most appropriate first step.
Lutter, C., Tischer, T., & Schöffl, V. R. (2021). Olympic competition climbing: the beginning of a new era—a narrative review. British Journal of Sports Medicine, 55(15), 857-864.
[…] These are good warm ups for the hips and lower extremity to wake up the neuromuscular system to ensure you have proper form on the wall. Keeping your hips into the wall will help avoid upper extremity injuries. Check out this article on finger injuries. […]
[…] Pulley Injuries Explained – Part 2 […]
Great Article! Well-organized and very informative. Thank you!
Thank you for the fantastic article. As a clinician I wonder how you could differentiate between grades 1-3 and thus inform timeline decision making. Any insight there?
Also, does immobilize mean use a splint? Would taping to the adjacent finger work? Or just not use the digit?
Thanks again, I know this article will help many climbers.
Hi Nathan,
See below for a description of two research studies that describe how to differentiate Grade I-IV pulley injuries with US diagnostic imaging. And how to clinically determine if a sprain is Mild, Moderate or Severe.
https://www.pinterest.com/pin/578853358356324847/
Immobilizing is typically done for short durations with extension splinting. With buddy taping, you can still flex and extend the digits, which can lead to bowstringing.
-Jared Vagy
🙏🙏🙏
Hi Matt!
Thank you for this great article! I can’t seem to find anything about the A1 pulley. Is it not common/possible to sprain/rupture the A1? How could we protect this part since it’s more towards the palm of the hand? Thanks again for posting this article!
Edgar
The A1 pulley is rarely torn or ruptured because it is more flexible than the A2 and A4 but it involved in another climbing condition called “stenosing tenosynovitis” or trigger finger. If the A1 is injured, it is best to see a medical provider to properly diagnose since pain location alone is not the only indicator.
Would you recommend ice? Sorry if I missed this in the article somewhere…! Thanks
Answered by Jared Vagy DPT:
Hi Georgina,
Ice is a complex discussion in itself and is likely deserving of its won article. But in short, in the early stages of a low grade pulley injury, if inflammation is limiting the ability of the finger to achieve full passive and active range of motion, ice can be used (mostly an ice bath) to decrease the swelling, decrease pain, and improve functional range of motion to make it easy to progress through the mobility phases of rehabilitation. However, inflammation is there for a reason and the body is trying to heal the region, so over icing the finger (especially since it is far from the heart) my be detrimental, especially with climbers who have vascular conditions. So for this reason, I recommend contrast bathing (warm/cold) in the early stages of the injury for climbers who want to get back quicker to climbing if swelling is limiting them.
Incredible article, thank you. Not looking forward to taking time off but healing properly is too important.
Might be useful to add a section in this article that can assist in self diagnosing whether you have a sprain, partial rupture, or complete rupture. Something that accounts for pain level, mobility degree, and how much weight you can still suspend before experiencing pain.
I know a self diagnosis isn’t an end all and can sometimes be dangerously misleading, but it could at least help readers frame some sort of reference.
Thanks.
Hey Will,
I have included a hyperlink below that outlines the diagnostic process for pulley injuries.
Click here to access
Scroll down and you can find the information under “Step 1: Determine Your Injury”
Although each grade of injury is specifically linked with a protocol timeline in the link I sent, you can reference the diagnostic information under “Step 1: Determine Your Injury” for free and combine it with information from this article to get a bit more clear of an idea on how to gauge the timelines for rehabilitation.
-Jared Vagy
I have a grade III rupture of my A2 and following the advice here to recover. A couple notes on the pulley ring:
– You shouldn’t be wearing this 24/7. During the first two weeks you have to wear the splint all day long– the pulley ring is different, it’s only to protect you during physical activity where you might load your pulley.
– The pulley ring needs a layer of tape around it. I couldn’t tell from the pictures that there was tape around it to keep it tight. My doctor pointed out I was missing the tape and now I notice there’s tape in the picture. The diagram also says “circular tape” but its tiny, a callout in the text would be helpful.
I didn’t understand these points when I read the article, my doctor explained it to me after I’d already been using the ring incorrectly for a while.
Thank you for your insight on the use of wearing a pulley ring for recovery and the recommendations of the article. See below for a further clarification:
I understand that you have been recommended to wear the pulley ring only during physical activity. However, based on the best available evidence at this time, it is recommended to wear the splint for 6-8 weeks (depending on the grade of injury) throughout the day and night. The reason being that if a pulley is bowstringing greater than 2mm at rest in an US image, it reduces the formation of scar tissue to develop between the tendon and the bone
Here are the studies:
-“Schneeberger, M., & Schweizer, A. (2016). Pulley ruptures in rock climbers: outcome of conservative treatment with the pulley-protection splint—a series of 47 cases. Wilderness & environmental medicine, 27(2), 211-218.”
-Lutter, C., Tischer, T., & Schöffl, V. R. (2021). Olympic competition climbing: the beginning of a new era—a narrative review. British Journal of Sports Medicine, 55(15), 857-864.
Based on the best available
In regard to the layer of tape, see the video below that outlines how to fabricate the splint. I have added a link to the video in the article. However, I now 3D print these:
-https://theclimbingdoctor.com/pulleyprotection/
Thanks for the feedback on the article and I hope the above help clarify
could the pain/swelling being more localized on the side (middle finger, middle knuckle, pain touching the side of the ring finger) indicate anything different?
Is it fair to assume that if pain started slowly and got worse over time, it may be a sprain rather than a rupture? (no imagining available to be sure)?
If pain is in or around the knuckle joint, a diagnosis of capsulitis/synovitis should be ruled out. But it is important to note that many pulley injuries including ruptures occur to the lateral (side) aspect of the pulley so it is not uncommon to see pain on the side of the finger after a pulley injury.
Thanks for the great material. I am a little confused about a few things:
For Grade 1 Pulley sprain you mention first Passive ROM exercises and then functional exercises at about the 2-4 week mark.
In the article I don’t find a definition of ROM exercises and I am wondering if tendon glides and rubber band finger extensions are to be considered Passive ROM or functional exercises.
Also, how does the pyramid fit with the gand chart for Grade 1 injury?
Thanks a lot and sorry for the many questions
Passive range of motion: Passively moving the fingers. For example, gently bending the finger and straightening them with your other hand.
Active range of motion: Actively moving the fingers: For example, performing tendon glides, or actively bending your fingers into a fist and straightening them.
Rubber-band finger extensions are considered light strengthening exercises, although they can likely be implemented in the later active range of motion phase as long as they are not painful.
The pyramid provides a rehabilitation framework and step-by-step progressions for each stage of the process. To understand this in more detail, watch the embedded video titled “How to Rehab a Climbing Pulley Injury” as this breaks down each step of the process in detail. For further details, I recommend checking out the book “Climb Injury-Free.”
Thanks a lot for the articles.
Is it normal for the finger to swell even after a month, when doing pull-ups?
If the entire finger swells over a month after a pulley injury, you may want to investigate if the finger also has tenosynovitis, which is very common with a pulley injury because the tendon bowstringing causes friction on the tendon sheath of the remaining pulleys. If tenosynovitis is confirmed (an ultrasound showing 2mm of a halo effect around the tendon is the gold standard) then 2 weeks of rest followed by edema reducing exercises is recommend. We are actually working on a research study for this condition right now since it is common after a pulley injury but is not talked about much. If edema is not reduced, a hand orthopedist may be recommended to determine if there are additional ways to reduce edema. An article example is below of what those next steps may be:
https://www.sciencedirect.com/science/article/abs/pii/S2468122919300842
This article has been tons of help, but I have a couple of questions.
I completely ruptured my a4 pulley a little over 6 weeks ago on one of the charts that shows right around the time to come back to full sport-specific climbing. I have been climbing 2 times a week and have slowly brought the grades up, but I’m still feeling quite a bit of pain on anything small than a 25mm hold even at lower grades. I have been told a little bit of pain is ok from a PT, but how long should I expect this to continue? also when I apply pressure on the fingertip and feel the pulley this is still noticeable bowstringing compared to the same finger on the none injured hand is this something that I should be worried about?
Any recommendations would be greatly appreciated.
First and foremost, since there are many case by case scenarios, I recommend that you consult with you physical therapist.
However, for more specific guidelines, including when you can initiate “no pain” and “low pain” hangs, I encourage you to read the post below. Best of luck!
https://theclimbingdoctor.com/how-to-rehab-a-climbing-pulley-injury/
Great article. One of the most annoying setbacks I’ve had to date. I had a pulley sprain (I think) on both A2 middle finger pulleys last year end of December and it’s still giving me issues. Tissue most likely hasn’t healed properly even tho I was doing minor loading using finger blocks, finger extensor exercises and icing.
Finally I went to a therapist who got me to stop doing all finger strengthening exercises and just focus on climbing by using h-tape (by that point I was able to climb V1 and V2 without pain – injury happened when crimping hard on a V5 problem). That worked and I got better and could even start pushing a bit.
Last workout I tried a different bouldering gym with quite hard problems where I couldn’t warm up as I usually could and I felt pain in my pulley’s almost right away even at lowest grades at that gym (grades went from V3 and upwards, where V3 was the easiest). 2 days later and I can feel that my fingers are a bit painful and probably a bit inflated (not visible visually).
Usually I feel pain in my pulleys a tiny bit every thing I’m going through my warmup but it eventually goes away in a few mins and I can start pushing a bit more. Is that normal? After warming up a bit I do a overhang v2 problem that usually puts a lot of blood in my forearms and somehow pulley pain goes away…
I purchased yy-vertical mono finger trainer so I can slowly and gradually load the injured fingers and hopefully recover soon. It’s quite annoying that even 6 months alter I am still dealing with this, even when I took all actions to recover.
Hey Filip,
Glad you enjoy the article. Hang in there. It sounds like you have gone through a lot with your finger injuries. One of the keys after the injury occurs is it is truly an A2 pulley injury and there is bowstringing – then to use a pulley protection splint to improve the tendon bone distance the first 6-8 weeks after a rupture. So good to know for the future if you missed that step. The best care for after injury is a progressive load protocol that starts with “no pain” loading and then after 6 weeks or so (depending on the grade) progresses to allowing a low level of pain. See the link in the comment I made to Dillon to see if those timetables help you.
One other component is to make sure you are dealing with a pulley injury and not tenosynovitis. Since those are managed differently. I have linked and article below for your reference on tenosynovitis just so it is on your radar.
https://theclimbingdoctor.com/rock-climbing-finger-tenosynovitis/#:~:text=Tenosynovitis%20occurs%20with%20repetitive%20use,up%20to%202%2D3%20weeks.
According do my physiotherapist, it is a sprain that we’re dealing with.
Part that confuses me is that some doctors recommend loading through climbing, some through hangboarding and some through using a grip trainer with weight plates attached to it. Furthermore, according to the Remodeling phase as described by Dr. Smith, it recommends hanging on a hangboard with only 2 fingers until we can do it with up to 30lbs – since i;ve been climbing only a year before my injury, I couldn’t hang on my two middle fingers (both hands) even then haha.
So there seem to be many ways to go about it and since it’s already been 6 months post injury, I am not sure what to do anymore….
gotta say that your tip with the tape cut into an H has ended my suffering – I was pulling on a huge rock (not a rock climber but a rock mover) and I heard a POP – middle finger swelled and couldn’t bend it and pain all night while sleeping – pain would simmer down during the day when using the hand – this went on for 2 – 3 weeks and then I discovered your help page and installed the tape per your instructions and sleep that night was possible – tape has been a healer for sure and now finger is barely sore, no swelling , sleep all night – what a great find your site was , can’t thank you enough
Sonny