Thoracic Mobility For Climbers
Rationale:
In order to climb at your highest level and pain-free, you must have adequate mobility throughout your body. This article speaks specifically to mobility in the thoracic spine. The thoracic spine is the group of spinal segments below your neck and above your low back.
Thoracic spine mobility is important for overall health for three reasons:
- Reduces stress on your neck
- Reduces stress on the your back
- Reduces stress on your shoulder
By performing thoracic mobility exercises, you can reduce the stress on other areas of the body, and decrease your risk for injury.
The “Stiff Link” Model

Figure 1
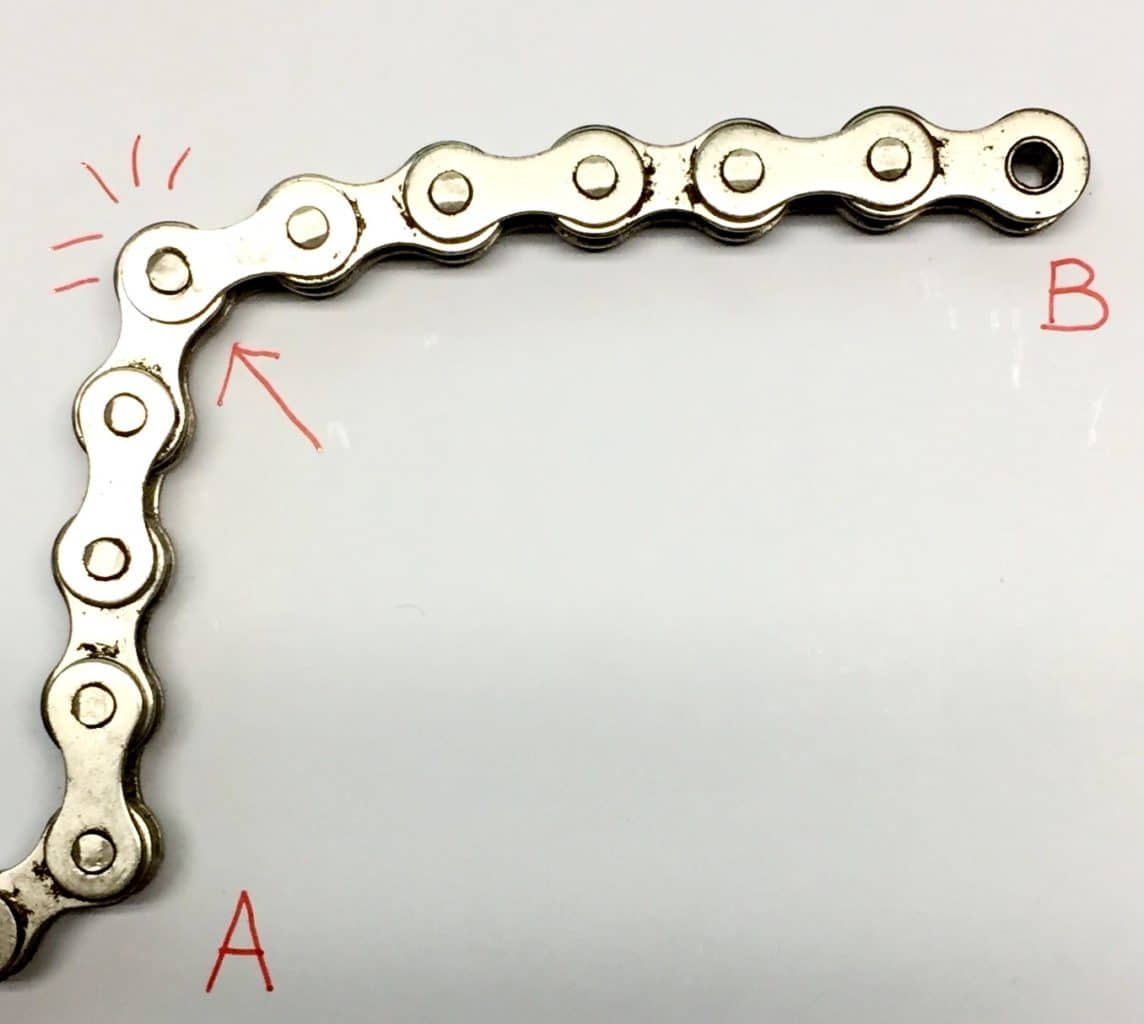
Figure 2
Imagine a chain curving naturally from point A to point B (Fig 1). When there is adequate mobility in each link, a smooth curve results. Now imagine that the links are stiff (Fig 2). When the chain bends from point A to point B, it is not able to curve smoothly. Instead, the more mobile joints (the arrow in figure 2) have to move more than normal and work harder to make up for the lack of mobility in other links. Now imagine that these chain links are segments of your spine. If one segment of your spine is stiff, then the mobility has to come from a different segment of the spine (the arrow in figure 2). This excessive motion can lead to wear and tear over time.
Belayer’s Neck and Low Back Discomfort
While belaying, your entire spine needs to be mobile so that you can comfortably look upward. If the thoracic spine is not mobile and it does not extend back enough, the neck and low back have to work harder to make up for it. This may lead to discomfort.
Shoulder Discomfort
When you raise arms overhead, the thoracic spine needs to extend back . If the thoracic spine is stiff or hunched forward, it increases the stress on the shoulders when you reach up for holds. Additionally, if your spine is stiff into rotation, then when you reach behind to stem in a dihedral, your shoulder has to move more than it should to make up for the lack of spinal rotation. This may also lead to shoulder discomfort.
Objective
In this article, you will learn the dynamics of the thoracic spine, and gain a general understanding of how to mobilize it. You will learn several exercises that can improve your thoracic spine mobility. Try to perform these exercises 2-3 times per week to prevent injuries. They can also be used as warm-ups or cool-downs to your climbing sessions. By investing in your health with these exercises, not only will you have less injuries but your climbing will also improve. If you are having difficulty integrating these exercises into your regular routine, try to attend weekly yoga classes. Yoga classes will usually cover most of the movements described in this article. Whatever your activities of choice (yoga, pilates, etc.), get out there, and keep moving!
“Motion is lotion” // “Movement is medicine”
Anatomy
The thorax consists of a generally rigid segment of the spine, due to the rib cage. This rigidity is necessary for:
- A stable base for muscles to control head and neck movements
- Protection of the internal organs
- A mechanical structure for breathing
Naturally, there is decreased thoracic spine motion compared to the cervical and lumbar spine.7 However, the available movement in the thoracic spine, although limited, must be maintained and optimized to live a healthy, pain-free, and active life.
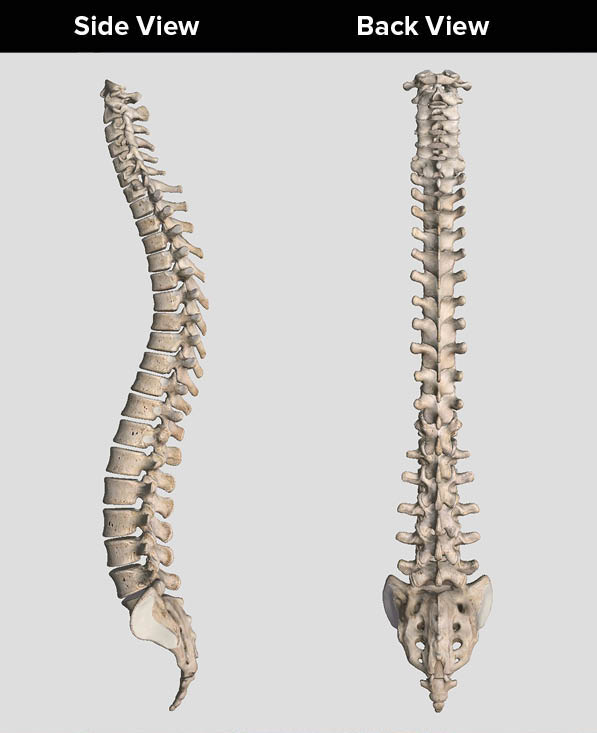
Thoracic Spine
- 12 vertebrae
- Upper thoracic spine: less mobility
- Lower thoracic spine: more mobility
- 12 ribs
- 7 true
- 3 false
- 2 floating
Movements of Thoracic Spine
- Total range of motion*
- Flexion (forward bend) – 30-40˚
- Extension (back bend) – 20-25˚
- Rotation – 30-35˚ to each side7
*There is a lack of reliable data in the literature regarding the three-dimensional movement of the thoracic spine, so these values are based on visual observations.6
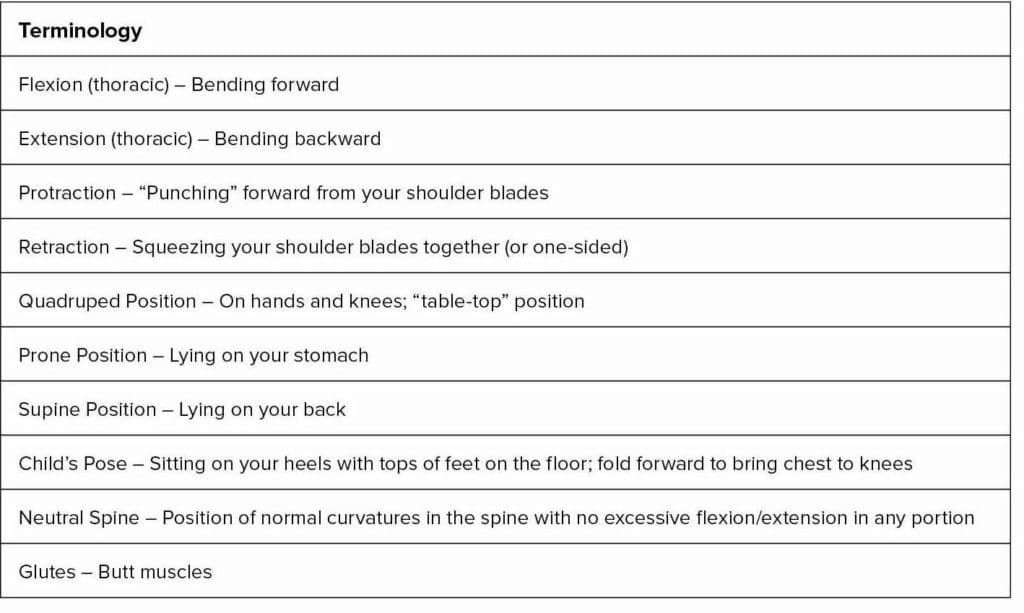
Summary of Primary Muscles in the Thoracic Spine
- Flexion (forward bend): Rectus abdominus
- Extension (back bend): Erector spinae group, trapezius and rhomboids
- Rotation: Externa oblique, internal oblique, trapezius and rhomboids
A Note on Synergistic Muscle Activation
A muscle synergy is when two or more muscles work together to create the same motion. When we rotate to the right, the left external oblique muscle contracts synergistically with the right internal oblique muscle. Because the muscles attach in the front of the body, this synergy creates trunk flexion (forward bend) as well as rotation. An example of this movement is bringing your left shoulder toward your right hip. To then neutralize the flexion (forward bend) movement and create a pure rotational motion, the trunk extensors in the back of the body must also contract. The co-contraction of the rotational muscles in the front of the body (internal and external oblique) combined with the rotational muscles in the back of the body (latissimus dorsi and iliocostalis) allow us to rotate our spine perfectly on an axis.5, 9
The above information is very detailed muscle activation patterning, but this article is not intended to teach you how to isolate any one of these muscles when exercising. It is purely for your understanding of the underlying concepts that make us move. With that said, the synergistic component of this section will come into play as you train your body for increased thoracic mobility. When performing thoracic spinal twists, you aren’t going to work one muscle. You will work many. Some of these muscles will be secondary or even tertiary movers. An example would be recruitment of the rhomboids and the trapezius muscles to deepen your trunk rotation. I mention this often throughout the exercise section. Personally, when I am performing the rotational exercises in this article, I can feel my scapular muscles (middle trapezius, rhomboids, etc.) working to pull me into the deepest expression of the twist.
This type of muscle recruitment is hard to learn through reading text, but I hope this will be a good starting point for you to work from. With this information in hand, I recommend seeking out a local physical therapist, athletic trainer, personal trainer, etc. to help you fine tune the movements described. I will do my best to give you the most concise direction I can. Let’s get started!
If you are experiencing any pain with movement, especially movements described in this article, please see a medical professional that understands movement. Physical therapists are movement specialists. In the last two years, the laws have changed allowing people to directly seek a physical therapist instead of being required to go to their Primary Care Physician first. If you are experiencing any discomfort with movement, schedule an appointment with a Physical Therapist to analyze how you move and create a treatment plan.
Flexion
Generally as climbers, we tend to have rounded/forward shoulders, and a tendency for a thoracic flexion posture. As a result, I only included one exercise for flexion. This is to make sure that we are treating every movement direction for optimal thoracic mobility.
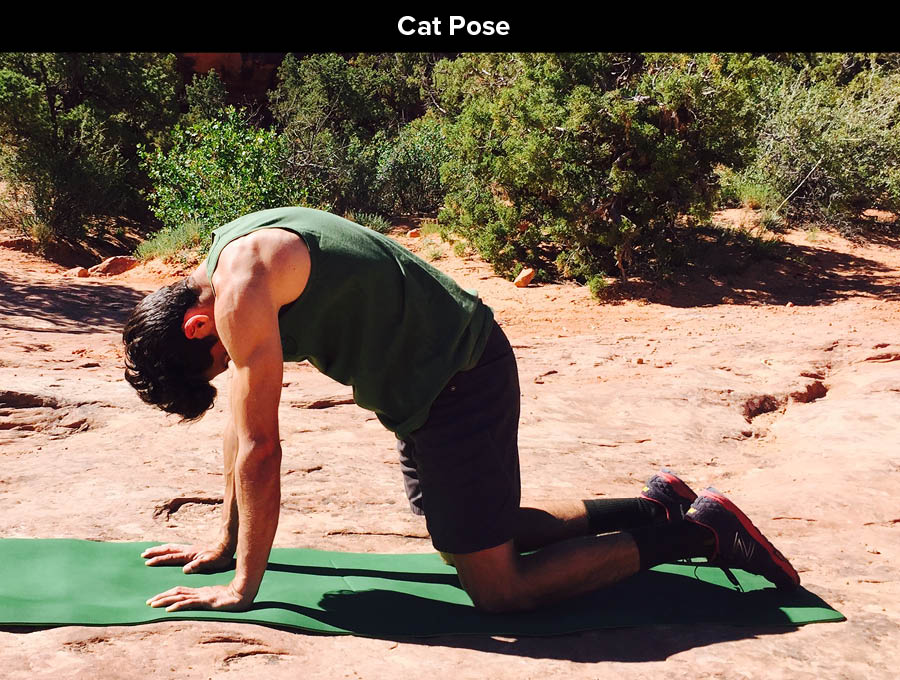
Cat Pose (Cat/Cow poses are done together in cycle, but the cat pose is for flexion)
Start in the quadruped/table top position. With elbows straight, push through your hands into the ground and arch your back toward the sky. Imagine a string is pulling you from the middle of your thoracic spine toward the sky. Fully protract your shoulder blades to ensure the full stretch (imagine punching from your shoulder blades). Cycle from cat to cow as one exercise (see next section for Cow).
– 10-20 reps, holding each position for 1-2 sec
Extension
Many people lack thoracic extension, and climbers are no different. When performing all extension exercises, make sure to focus the extension in your upper back (thoracic spine). Remember we only have about 20-25˚ of thoracic extension, so the movements are relatively small. If you feel like your low back is extending also, reverse out of the pose to a neutral lumbar spine, and engage your core. Some of these exercises utilize tucked knees to “lock” the lumbar spine and help isolate the thoracic spine. For an optimal stretch, engage the muscles that squeeze your shoulder blades together, and pull them back and down toward your butt.
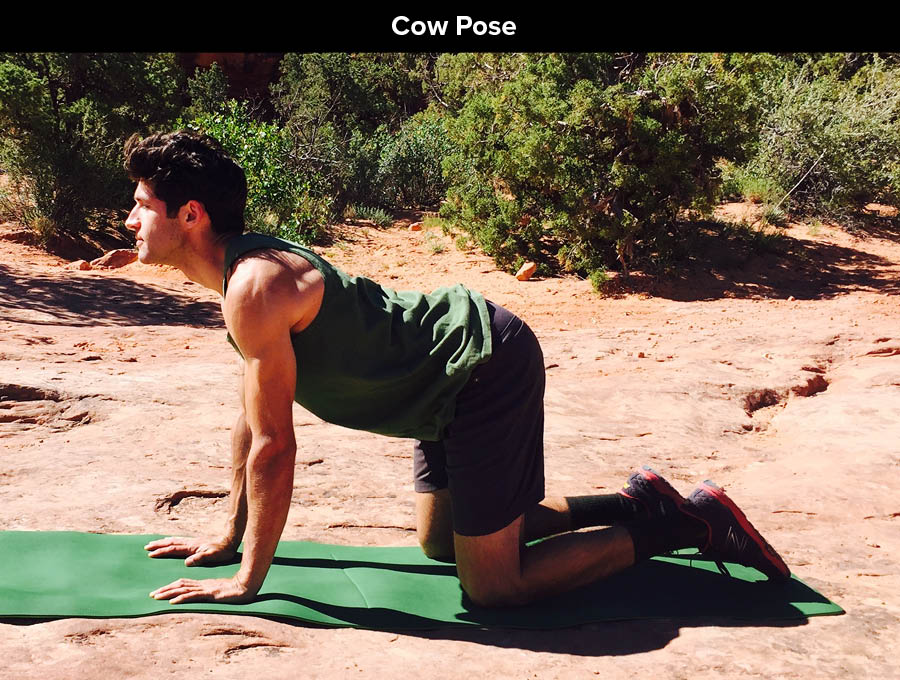
Cow Pose (Cat/Cow poses are done together in cycle, but the cow pose is for extension)
Start in the quadruped/table top position. With elbows straight, drop your chest down toward the ground, and expand across your collarbones. Stick your chest out in front and bring your head toward the sky. Squeeze your shoulder blades together for a maximum stretch. Engage your glutes to keep your lumbar spine from extending. Continue cycle to cat pose.
– 10-20 reps, holding each position for 1-2 sec
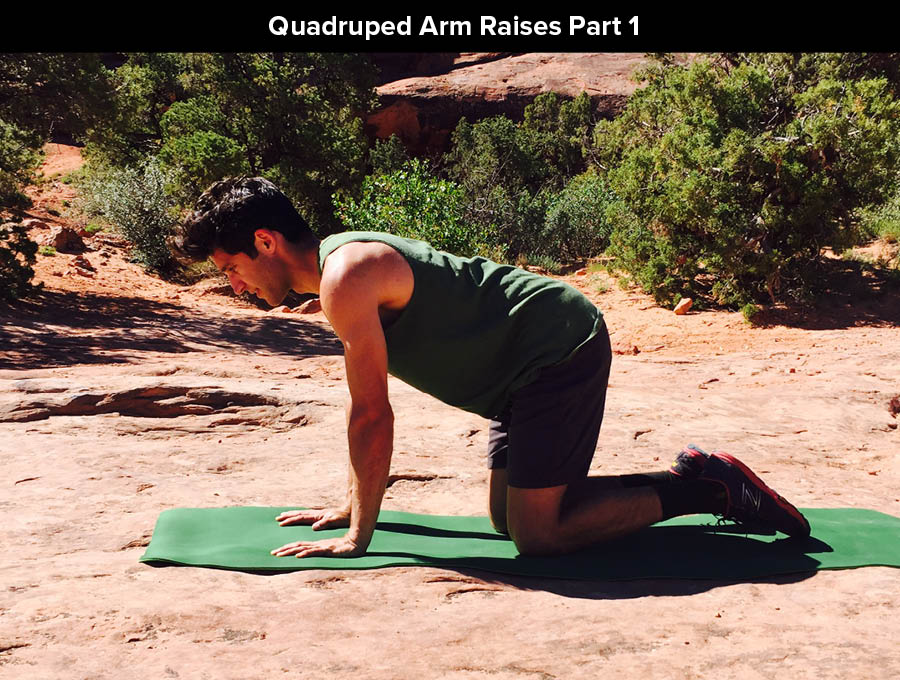
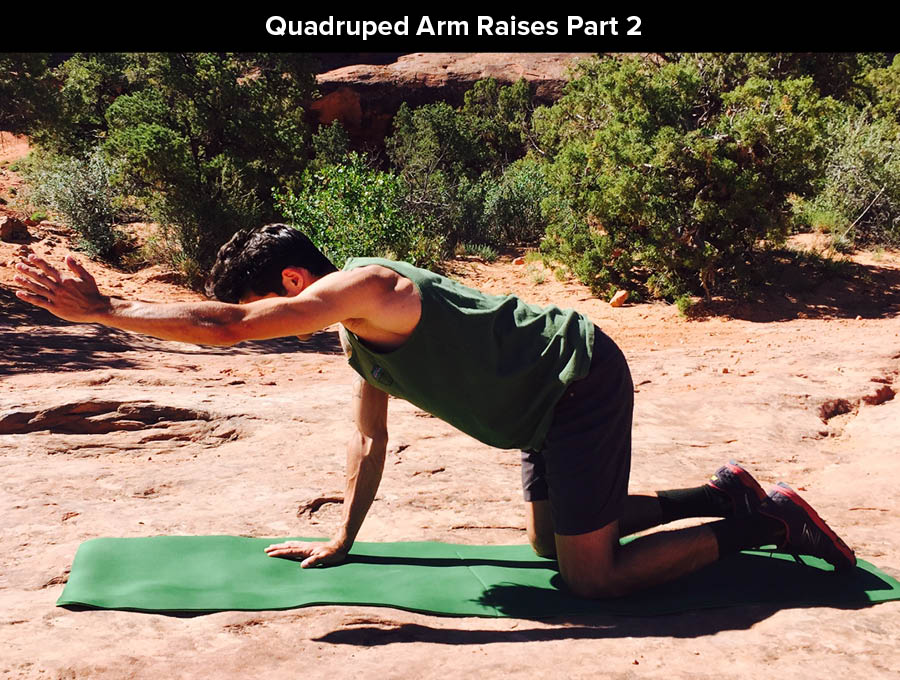
Quadruped Arm Raises
Start in the quadruped position. Engage your core/glutes and raise one arm out in front of you as high as you can without rotating your spine. Keep your neck straight and gaze toward the ground. Return to quadruped. Alternate arms.
– 10-20 reps on each side, holding for 1-2 sec
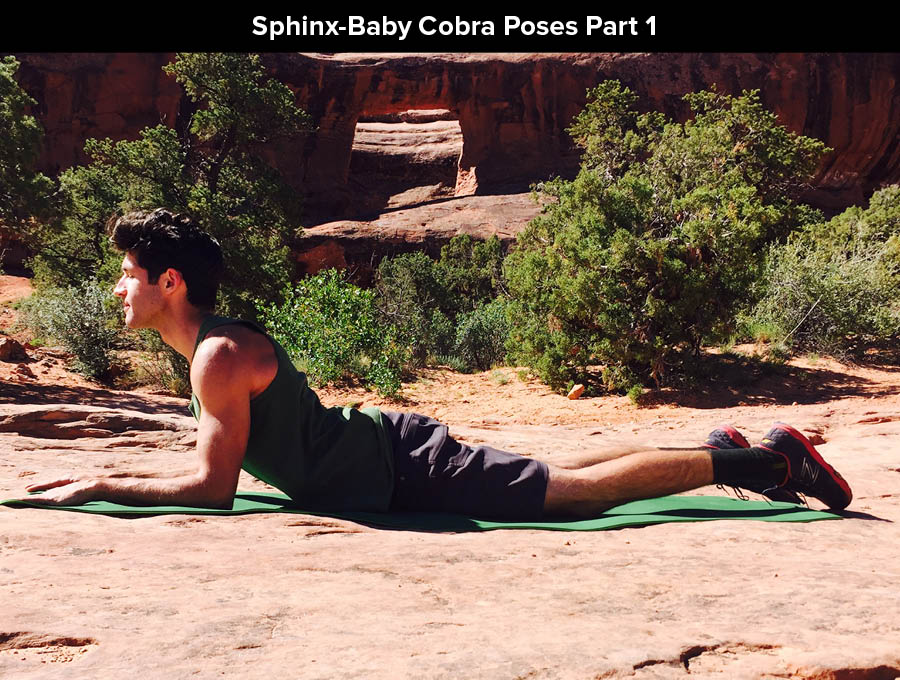
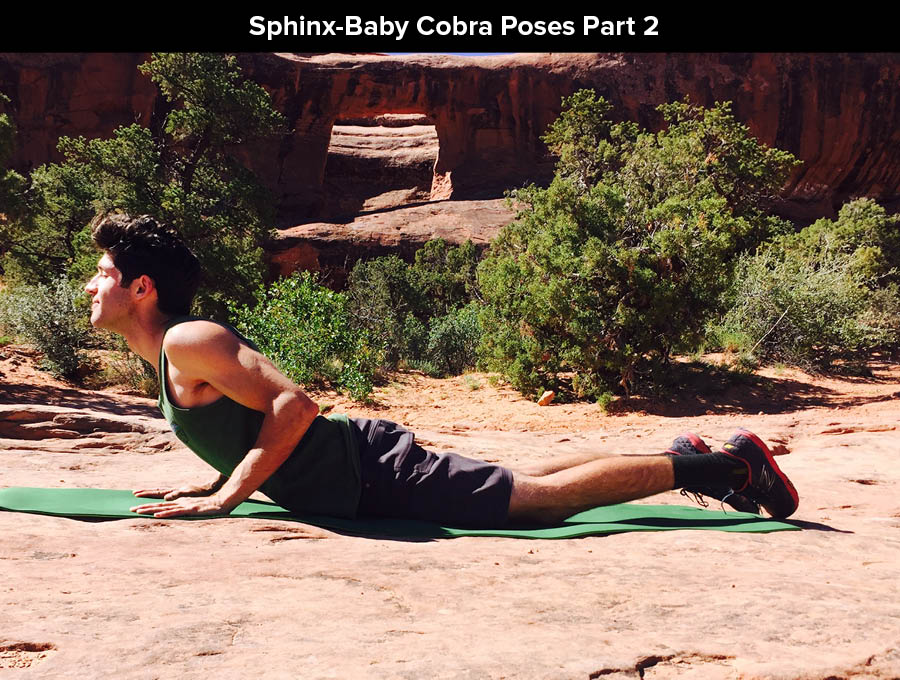
Sphinx Pose to Baby Cobra (Start with Sphinx and progress to Baby Cobra)
Sphinx – passive mobility
Start in the prone position, chest down on the mat. Place palms and forearms down in front with elbows at 90˚ (elbows directly under shoulders). Without extending into your low back, hold this position while squeezing your shoulder blades together and down your back.
– Hold position for 30 sec, and then progress to Baby Cobra
Baby Cobra – active mobility
Staying in prone, place palms at shoulder/nipple level. Extend your upper back by pulling your shoulder blades together and down your back, and engaging your other upper back muscles. Imagine you are dragging your palms toward your waist, focusing on your upper back muscles. This exercise comes from activating these muscles, not by pushing through your arms. Your arms are there for support in the pose. Engage your core and glutes to focus the extension in your thoracic spine, and not your lumbar spine. Return chest to mat, and repeat.
– 10-20 reps, holding 1-2 sec each
Standing Cactus
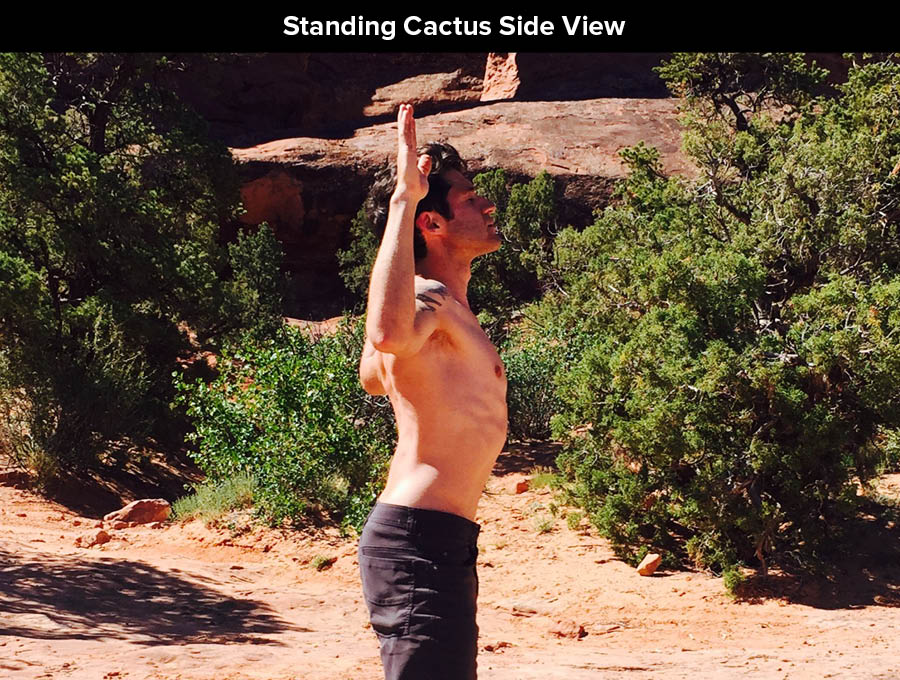
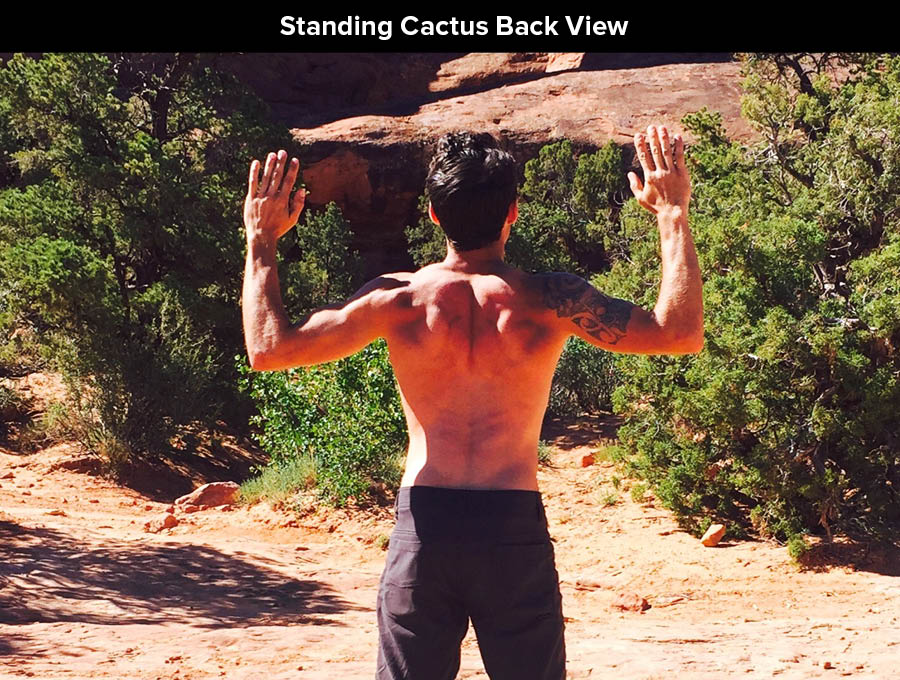
Stand with feet shoulder width apart, and your glutes engaged (this helps stabilize your lumbar spine to isolate the thoracic spine). Bring your arms out to the side like a cactus with shoulders and elbows at about 90˚. Perform a small back bend, but only in the upper back. Imagine a string is attached to your sternum, and it is lifting you up toward the sky. Expand across your collarbones, and squeeze your shoulder blades together and down your back to deepen the stretch. Return to neutral and repeat.
– 10-20 reps, holding 1-2 sec each
Thoracic Extension w Foam Roller: (If no foam roller, improvise with a rolled towel or coiled rope)
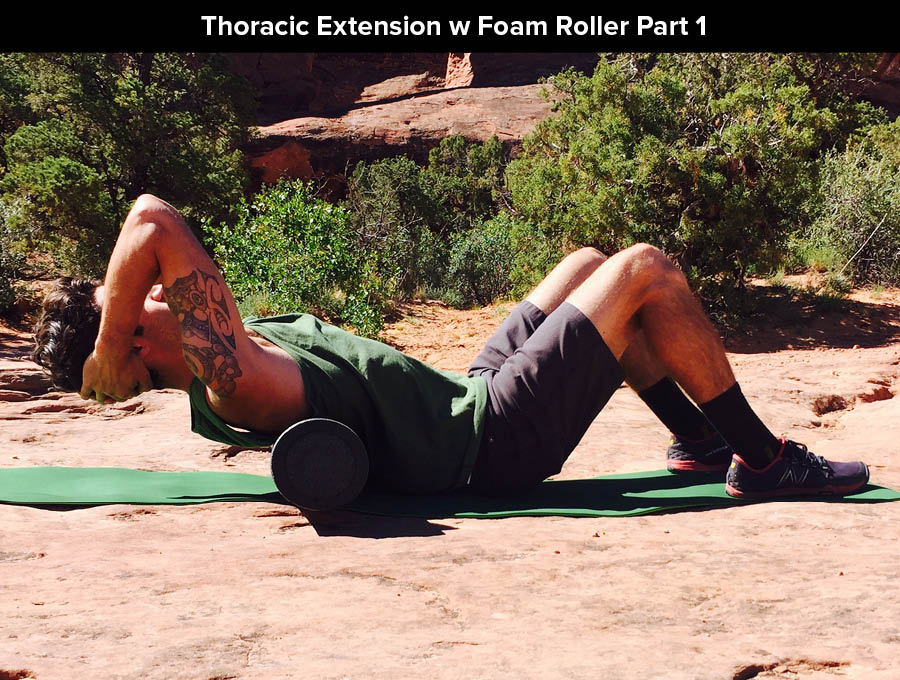
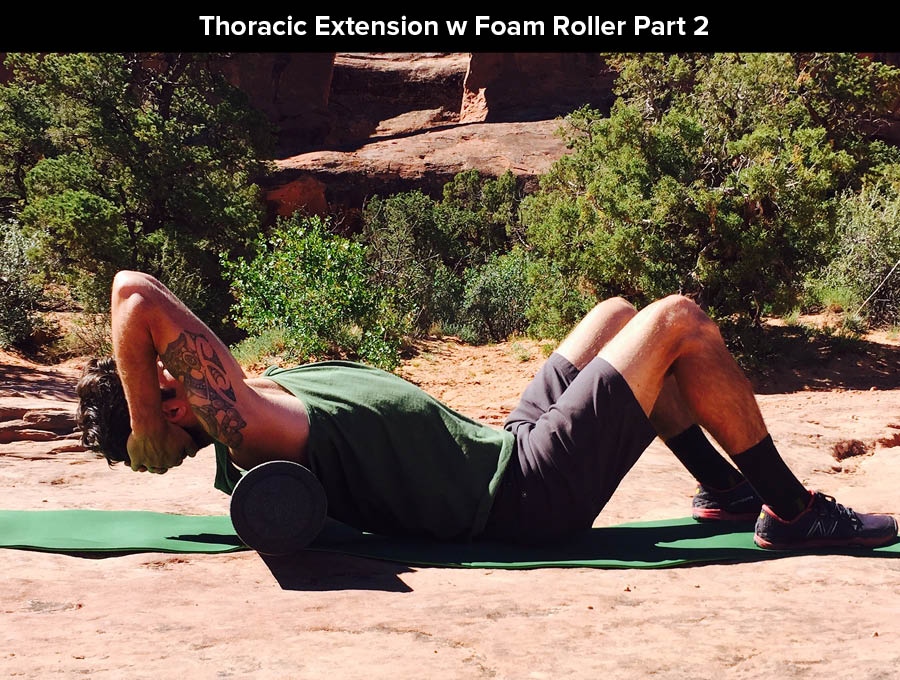
Start on the ground in a seated position with knees bent and feet flat. Place a foam roller perpendicular under your thoracic spine (upper back). Keep your hips on the ground throughout. Clasp your hands behind your neck, and bring your elbows toward each other (this isolates the movement to your spine). With hips on the ground, extend through your upper back using the foam roller as the fulcrum. Engage your upper back muscles to deepen the stretch. Return to neutral and repeat. Be sure to mobilize your whole thoracic spine. In the photos you’ll notice that I move the foam roller higher up my back as I go. Do roughly 10 reps for each position.
–10-20 reps per position, holding 1-2 sec each
Thoracic Extension w Foam Roller: (If no foam roller, improvise with a rolled towel or coiled rope)
Start on the ground in a seated position with knees bent and feet flat. Place a foam roller perpendicular under your thoracic spine (upper back). Keep your hips on the ground throughout. Clasp your hands behind your neck, and bring your elbows toward each other (this isolates the movement to your spine). With hips on the ground, extend through your upper back using the foam roller as the fulcrum. Engage your upper back muscles to deepen the stretch. Return to neutral and repeat. Be sure to mobilize your whole thoracic spine. In the photos you’ll notice that I move the foam roller higher up my back as I go. Do roughly 10 reps for each position.
– 10-20 reps per position, holding 1-2 sec each
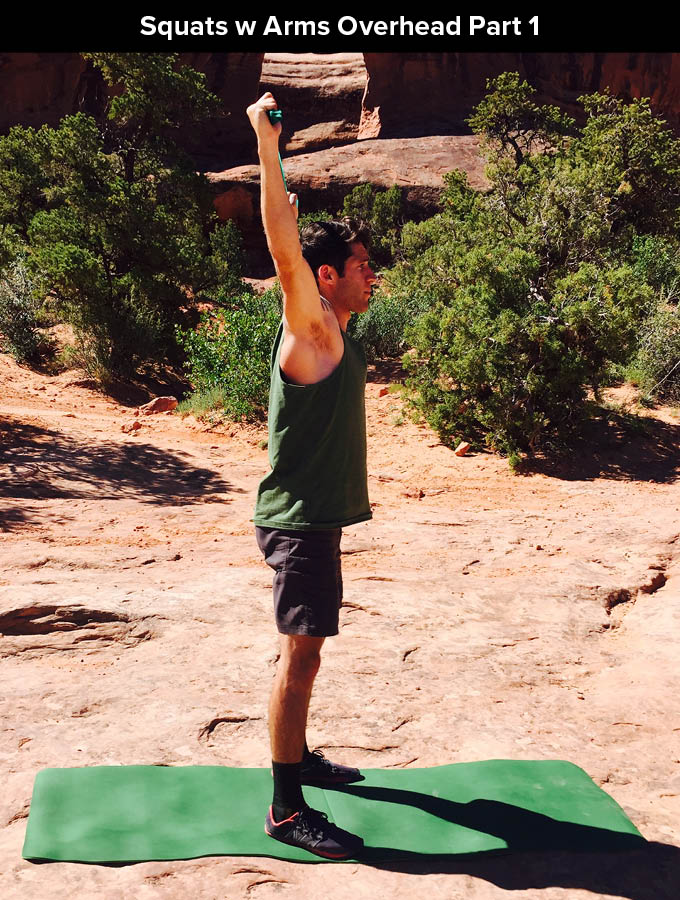
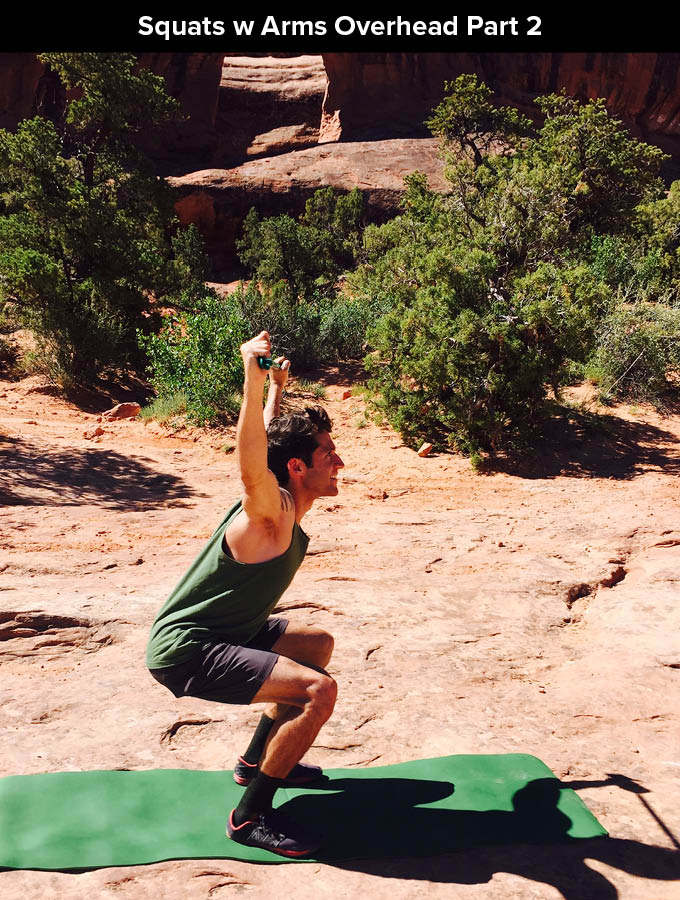
Squats with Arms Overhead: (Stretch a band overhead, use a span of rope or use a dowel)
Start standing in a comfortable squat position with arms overhead. Initially, hold the band wider than shoulder width. This will be easier. As you progress, narrow your grip for more intense thoracic extension. As you squat down, ensure that your arms stay overhead. If your arms creep forward, come out of your squat slightly to keep arms overhead. You may not have enough thoracic extension yet, but keep working on it! Squat down as far as you can without your arms coming forward, and ensure your knees do not move past your toes. Return to standing, and repeat.
– 10-20 reps, holding 1-2 sec each
– Progress to narrow grip as your extension improves.
Rotation
For shoulder health, we need to optimize thoracic rotation. This decreases the demand on shoulder range of motion, and allows more fluid movement (remember the “stiff link model” from above). Like with many of the extension exercises, engage the muscles that squeeze your shoulder blades together when performing the rotation exercises. This will provide optimal rotation in the trunk. Try to avoid twisting from the lumbar spine, and isolate the twist in the upper back (most movements are subtle motions when done correctly). To help isolate the movement, many of these exercises flex the hip to “lock” the lumbar spine.
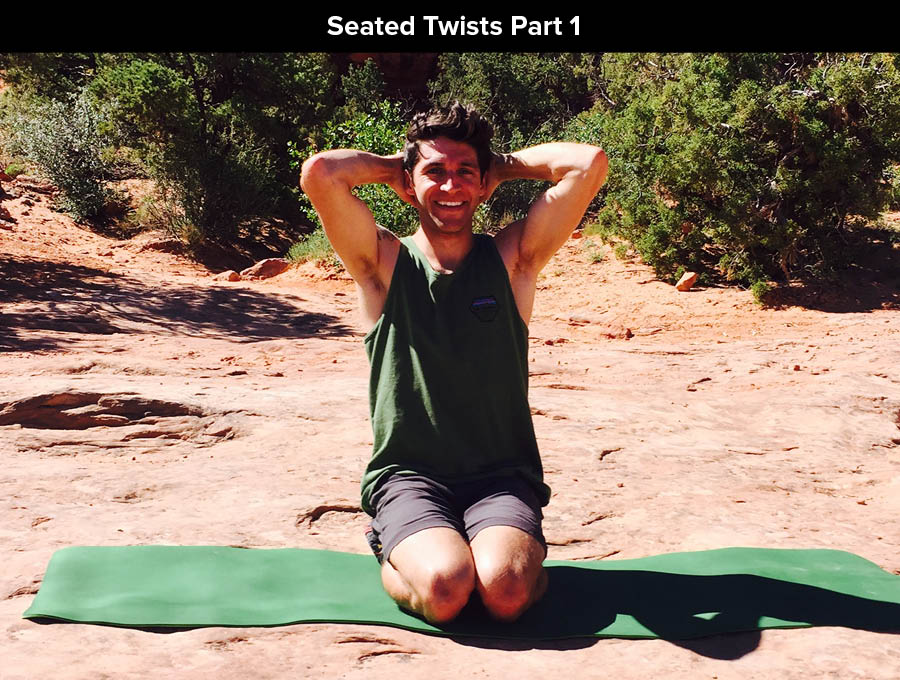
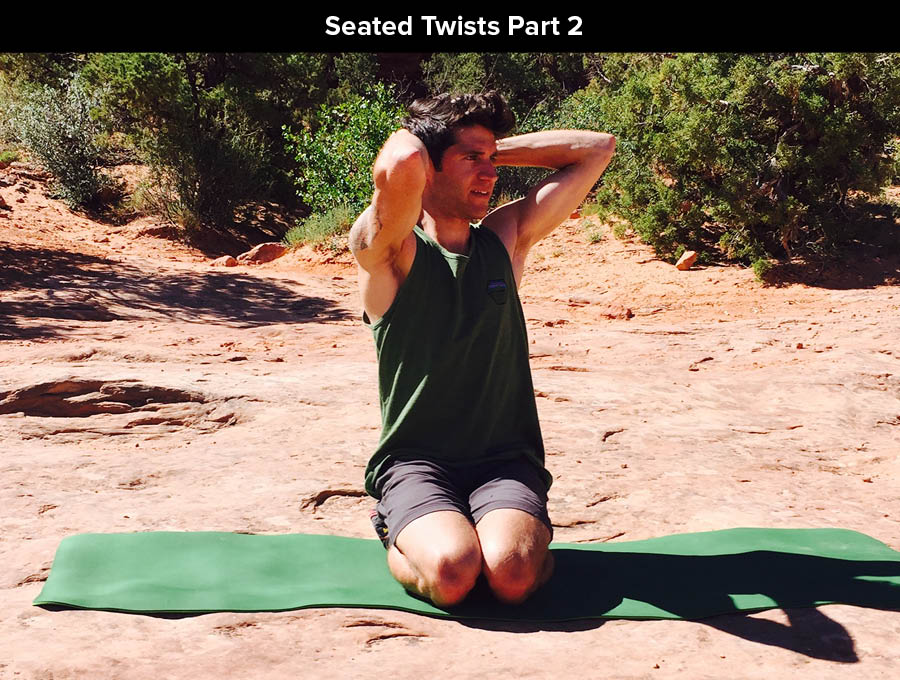
Seated Twists (This is a small movement when focused on the thoracic spine)
Kneel down on your mat and sit on your heels (this helps to avoid twisting from the low back). Place your hands behind your head and bring your elbows toward each other. Twist to one side, focusing the movement in the upper back. Engage your core to avoid twisting the low back. On the side you are twisting to, engage the muscles that squeeze your shoulder blades together. This will help deepen your stretch. Return to neutral and repeat to the other side.
– 10-20 reps each direction, holding 1-2 sec each
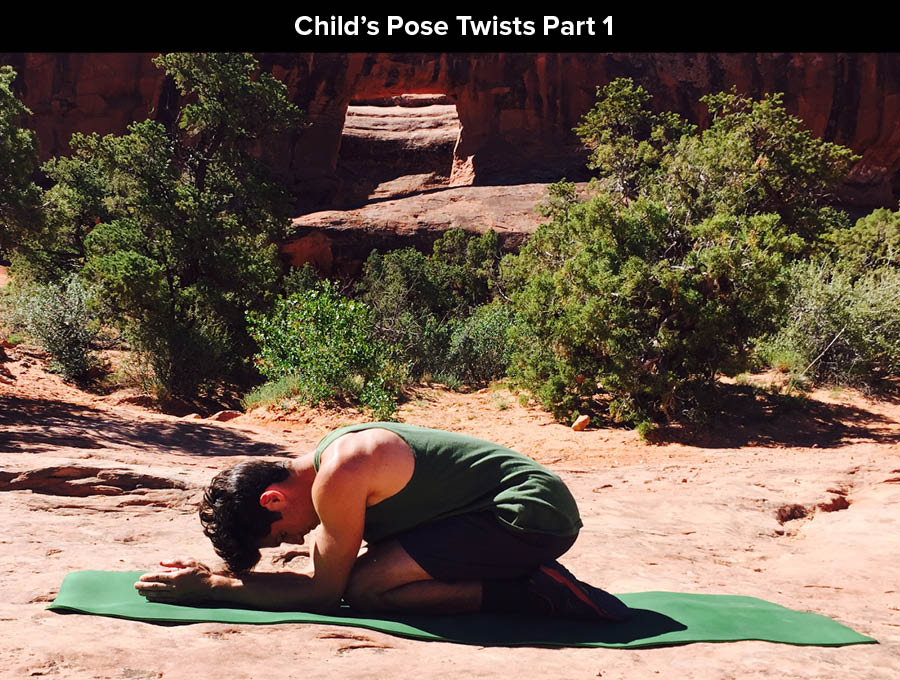
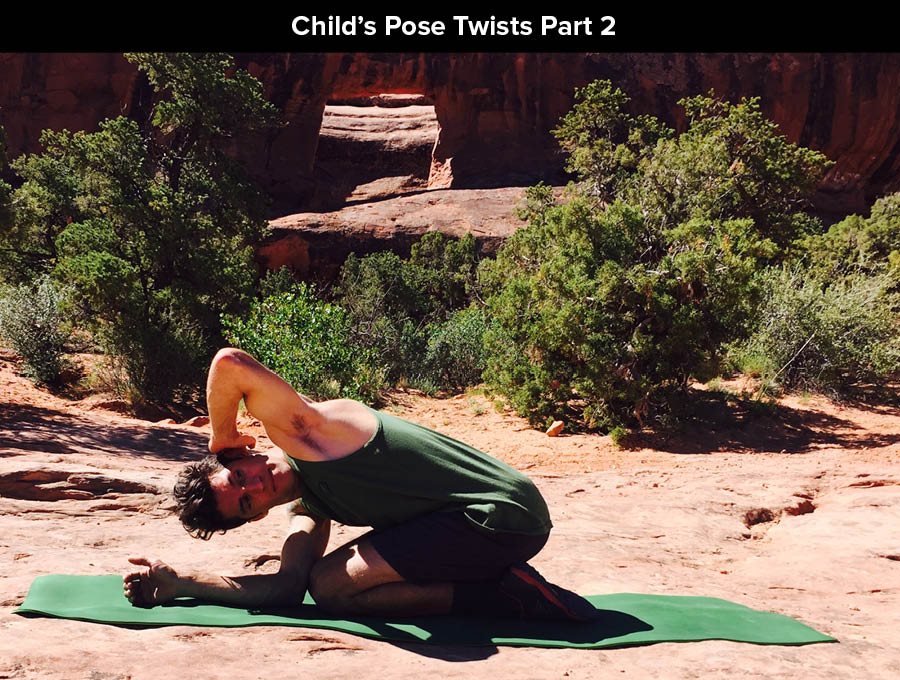
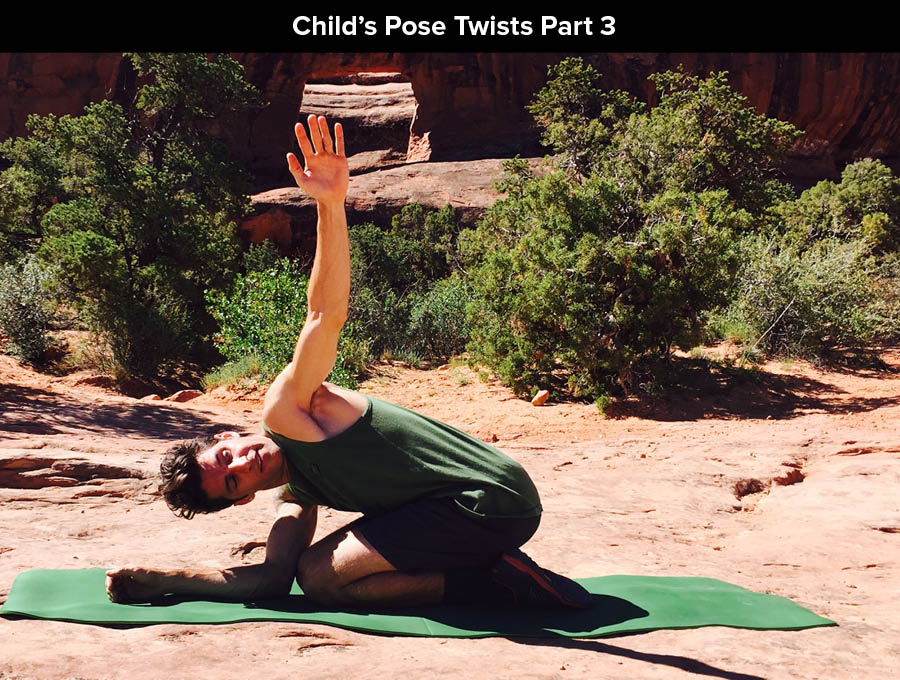
Child’s Pose Twists
Kneel down on your mat in child’s pose with knees and feet together. Start with one hand behind your head and twist toward the sky, maintaining your stomach-to-thighs position. On the side you are twisting to, engage the muscles that squeeze your shoulder blades together to deepen your stretch. The motion comes from your upper back, not your arm. (To progress the exercise, reach your hand toward the sky to intensify the stretch.) Return to neutral and repeat. Remember to twist both directions.
– 10-20 reps each direction, holding 1-2 sec each
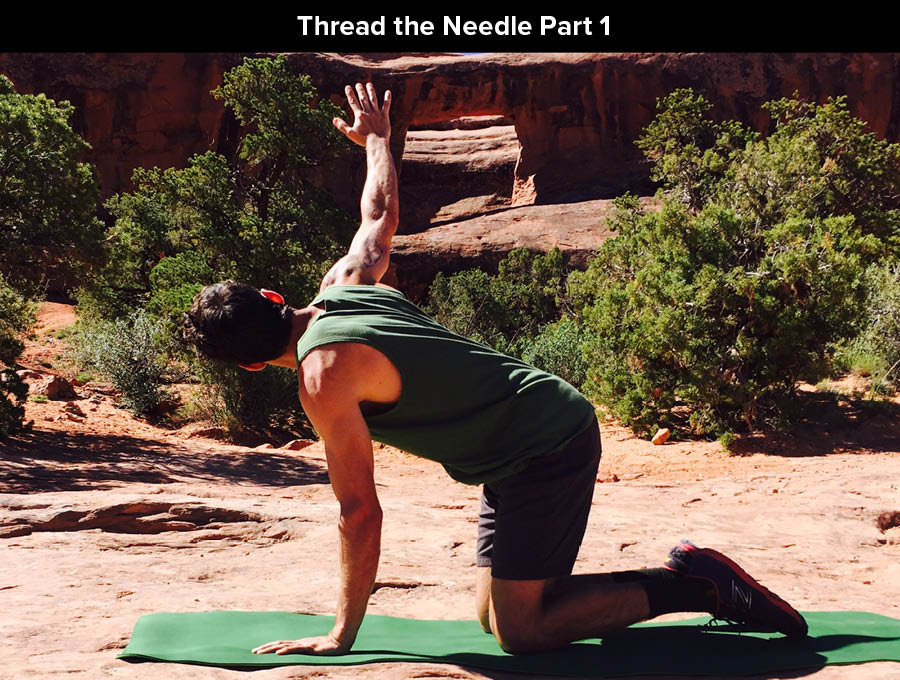
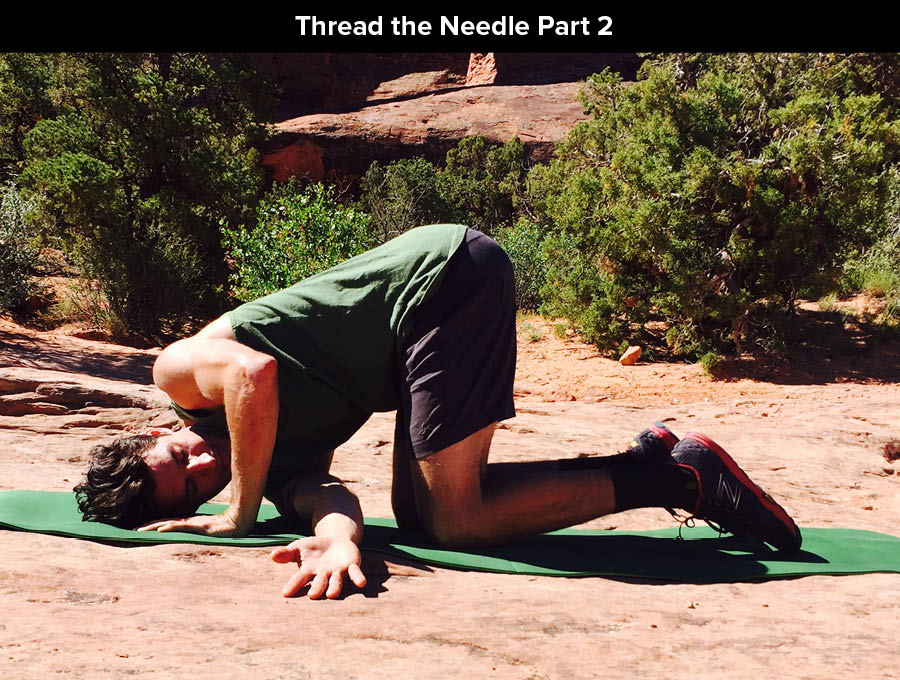
Thread the Needle
Start in the quadruped position with a neutral spine. Twisting from the upper back, reach a hand up toward the sky, and follow through the opposite direction to thread your hand through your other arm. If you are able, you can rest your shoulder on the mat, but only if you can keep your hips/pelvis in line. If your pelvis and low back twist to achieve the shoulder on the ground, unwind slightly. Return to neutral and repeat. Remember to twist both directions.
– 10-20 reps each direction, holding 1-2 sec each at end range of both movements
– When shoulder on the ground has been achieved, you can hold this position for 30 sec at a time for a passive mobility exercise.
Supine Twists
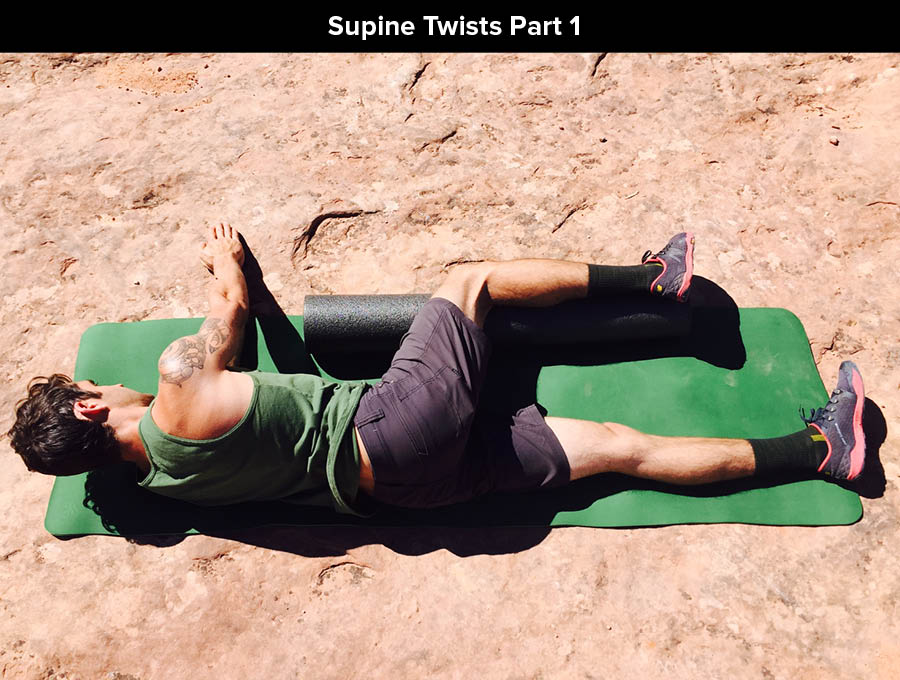
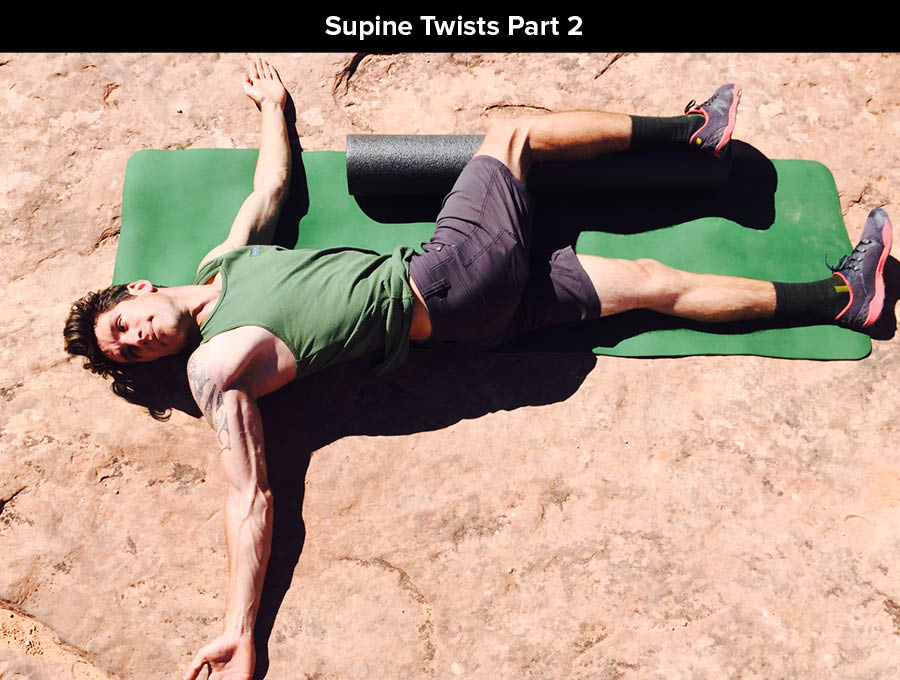
Lie down on your side with your back and grounded leg straight in line. The top leg should be flexed to 90˚ at the hip and knee and resting on a foam roller (this helps to “lock” the lumbar spine, and isolate the twist to the thoracic spine). Both arms are stretched out in front of you. As you twist to open your arms like a book, ensure that your top leg stays in contact with the foam roller, and that the roller does not roll with you. It should remain stationary. Like other rotational movements, use your upper back muscles to deepen the twist. Return your arms to touch and repeat. Remember to twist both directions.
– 10-20 reps each direction, holding 1-2 sec each
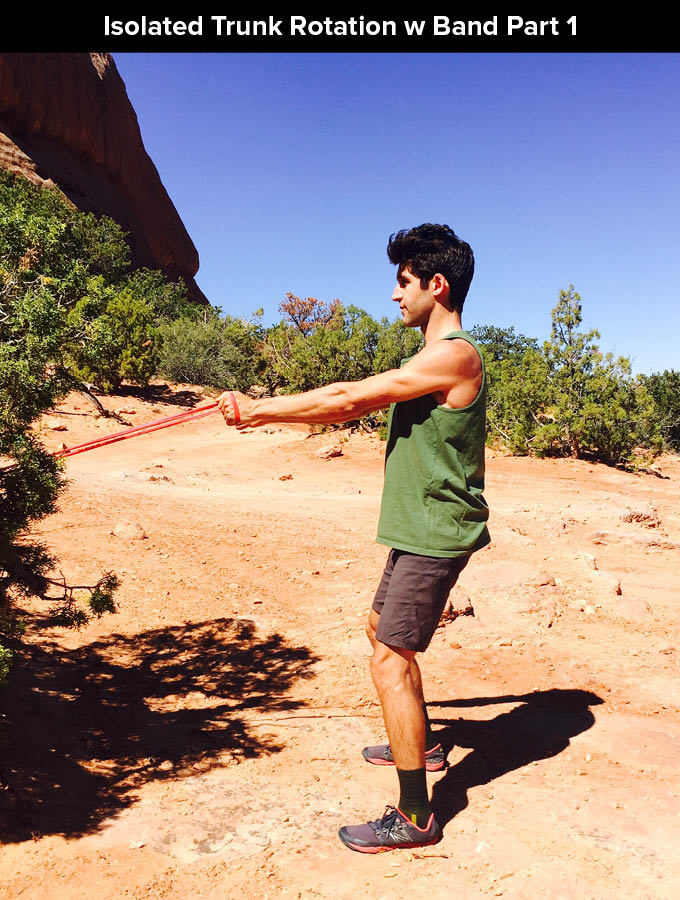
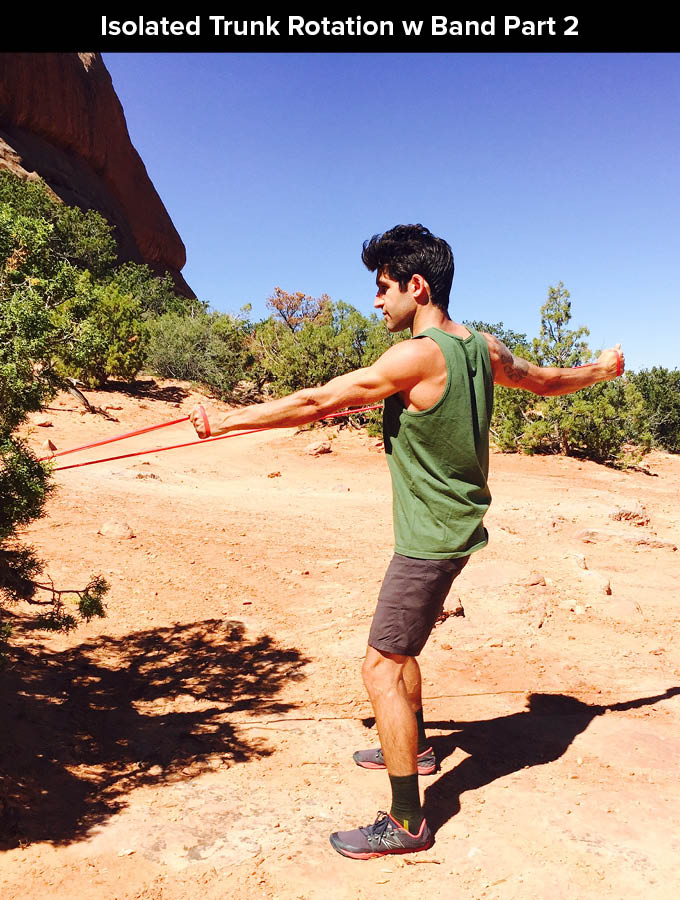
Isolated Trunk Rotation with Band (from ThePrehabGuys.com, @theprehabguys)
Anchor an elastic band at shoulder height, but if you’re in the desert, stomach height works too! (I recommend starting with a yellow TheraBand). With arms stretched in front, stand at a distance so that there is barely tension on the band, but not drooping. Wrap the band in each hand and rotate only from the trunk and shoulder to pull the band back (rotation should not come from the neck or low back/hips – if your low back/hips start twisting, engage your core and glutes to “lock” your lumbar spine and hips). Keep your elbow straight throughout. We’re not starting a lawn mower. Slowly and with control, unwind to allow the hands to meet. Repeat on the other side.
– 8-10 reps on each side (If you lose your form at rep 9, do sets of 8 – you always want form to be priority.)
– When the yellow TheraBand gets too easy (you can easily do 10 reps), progress to a red TheraBand
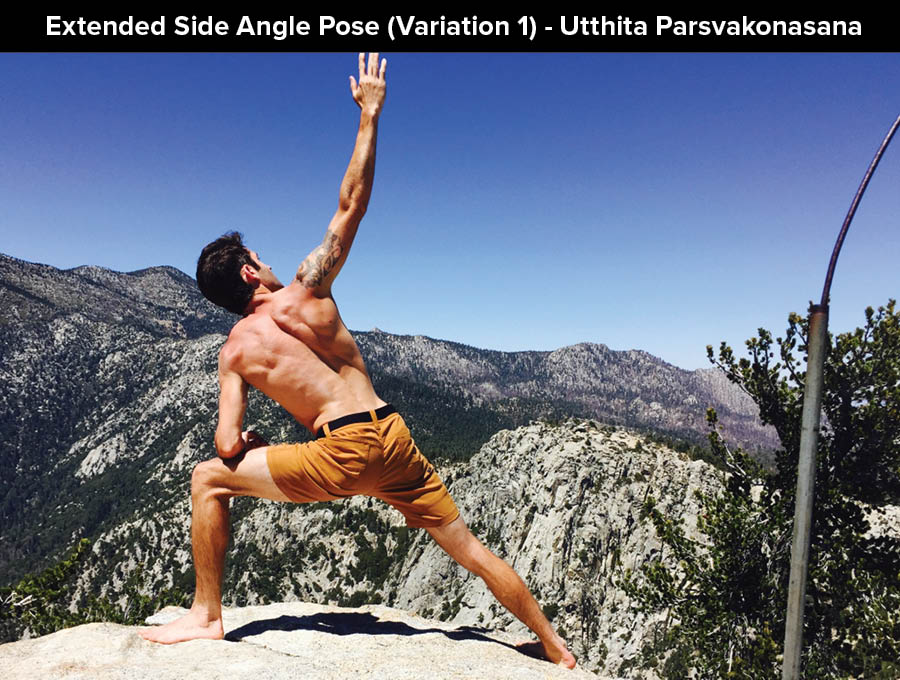
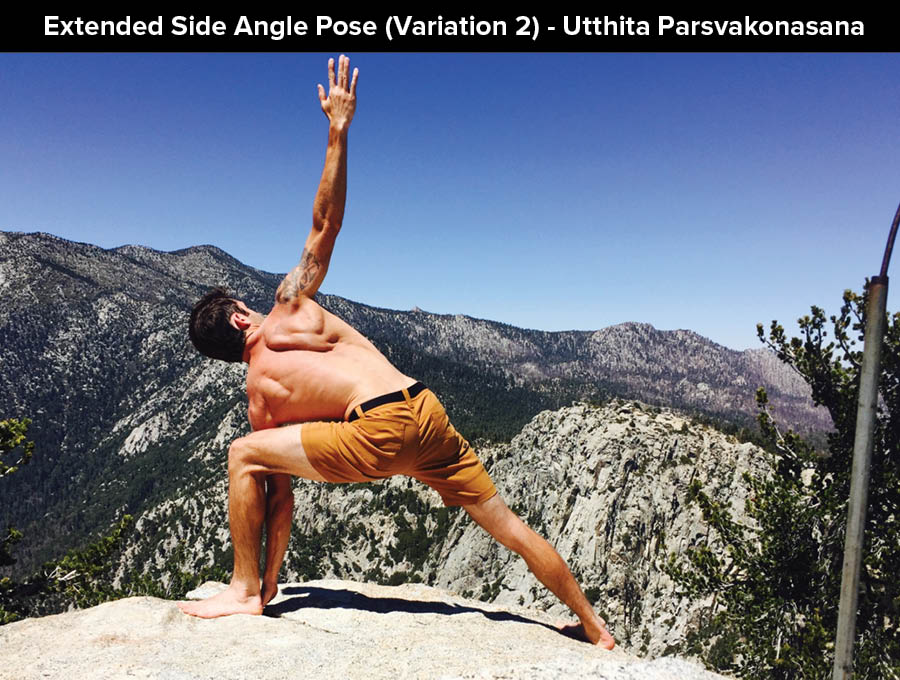
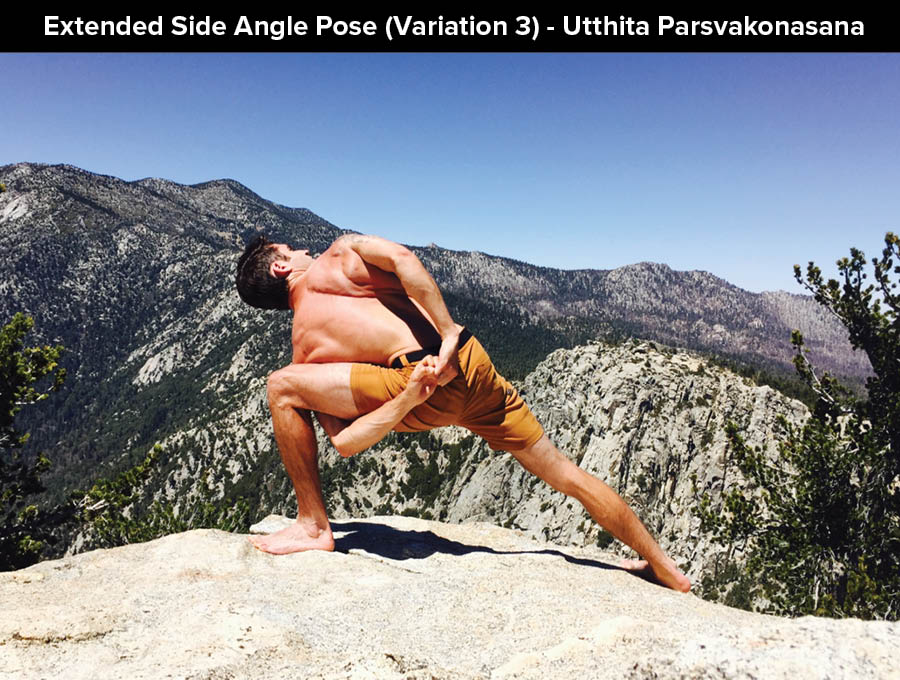
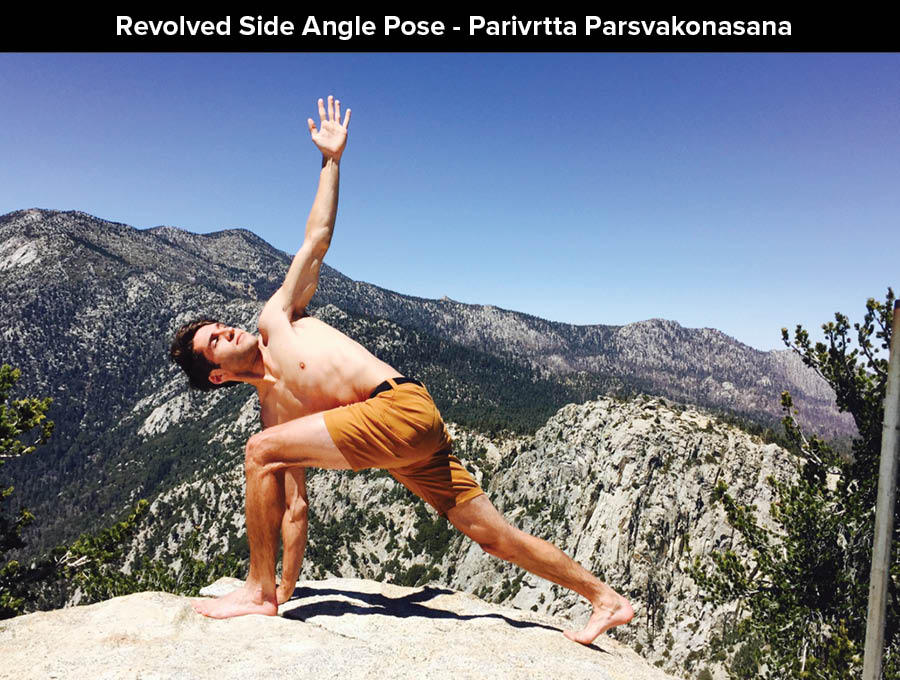
Yoga for Mobility
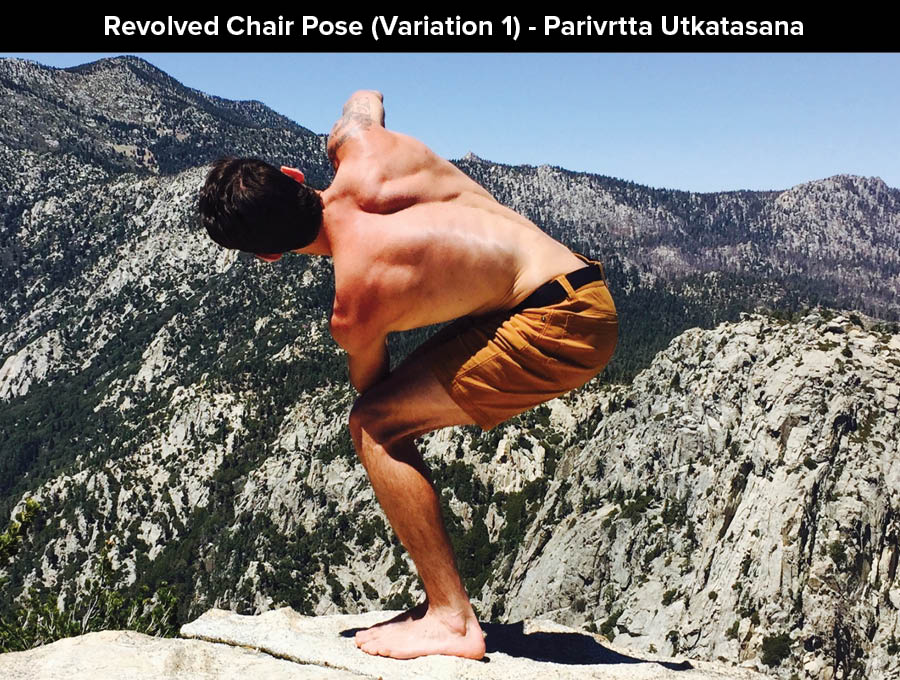
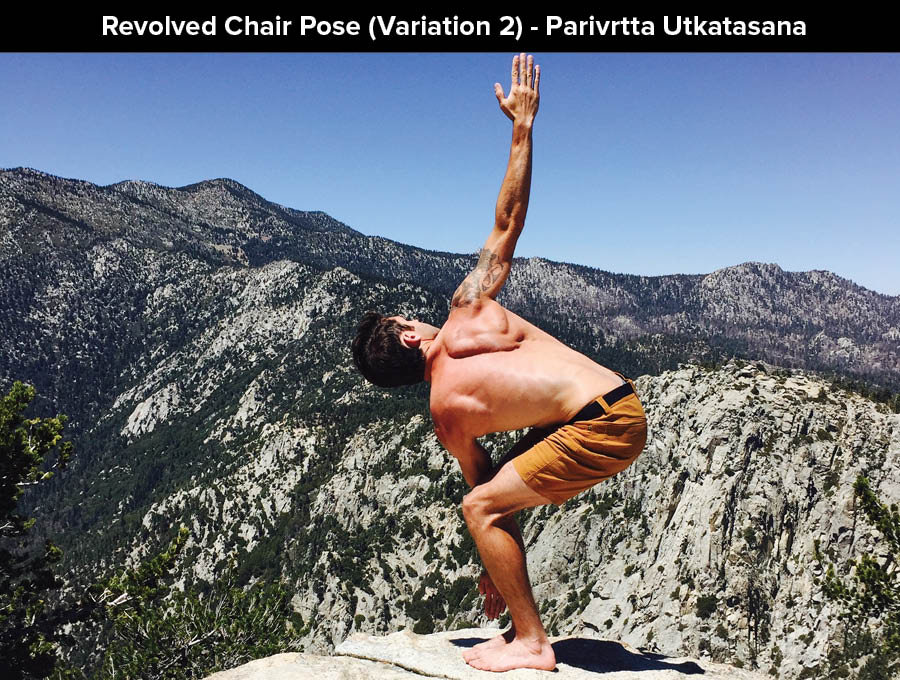
I have been practicing yoga for about nine years now, and I have reaped the benefits in many aspects of my life: from stress relief, to increased body awareness, all the way down to being able to high step with greater mobility or keeping your body close to the wall during delicate moves. I believe that a regular yoga practice not only improves your well being, but can also make you a better climber. (During my second clinical rotation in PT school, I had a clinic schedule that afforded me the time to practice yoga four times per week. I found that my increased flexibility and joint stability from consistent yoga allowed me to send my project, a 5.12c competition route at Ascent Studio in Fort Collins, CO). If you currently practice yoga, I have listed a few yoga poses for you that will increase your thoracic rotation based upon my own personal experiences. Everyone will have a different experience, but coupled with the exercises above, I think your overall climbing performance will improve.
For the most in-depth description and assistance with these poses, I recommend supporting your local yoga teacher and asking them for hands-on cueing.
Yoga Poses to Promote T-Spine Rotation


Author Bio
Matt is a Doctor of Physical Therapy student at the CU Anschutz Medical Campus. He lives in Boulder, CO to be closer to his playground. This is his final semester of the DPT program and he is undertaking an independent study researching climbing injuries and injury prevention techniques to provide to his clients. His main interests are in sports medicine physical therapy and injury prevention revolving around the climbing athlete. Before starting school, Matt lived in San Diego, CA and worked at Mesa Rim Climbing and Fitness. After graduating from his DPT program, he plans to return to San Diego and work alongside Mesa Rim to give back to the community he loves.
Matt predominantly climbs sport at the 5.12c/d level, and has recently taken up the craft of trad climbing. He has been climbing since 2008. Matt empowers people to take their health into their own hands, and guide them toward a stronger, injury-free climbing lifestyle. He currently teaches injury prevention classes at local climbing gyms, and also provides content about the topic on his Instagram (@theclimbingpt).
When Matt isn’t climbing, you can find him adventuring somewhere in the wild. He is also an avid biker. He rides BMX, downhill mountain biking, and has completed a tour cycling trip around New Zealand. He connects with anyone in the extreme sports realm as a healthcare provider who has the capacity to understand their sport and assist them with their unique needs.
Follow Matt:
Instagram: @theclimbingpt (https://www.instagram.com/theclimbingpt/) // @basebklyn1 (https://www.instagram.com/basebklyn1/)
Contact Matt:
Email: mattdestefanopt@gmail.com
References:
- Andersson EA, Grundström H, Thorstensson A. Diverging intramuscular activity patterns in back and abdominal muscles during trunk rotation. Spine. 2002;27(6):E152-60.
- Arjmand N, Shirazi-adl A, Parnianpour M. Trunk biomechanics during maximum isometric axial torque exertions in upright standing. Clin Biomech (Bristol, Avon). 2008;23(8):969-78.
- Bogduk N: Clinical Anatomy of the Lumbar Spine and Sacrum, ed 4, New York, 2005, Churchill Livingstone.
- Hoek van dijke GA, Snijders CJ, Stoeckart R, Stam HJ. A biomechanical model on muscle forces in the transfer of spinal load to the pelvis and legs. J Biomech. 1999;32(9):927-33.
- Macintosh JE, Bogduk N. The biomechanics of the lumbar multifidus. Clin Biomech (Bristol, Avon). 1986;1(4):205-13.
- Mannion AF, Knecht K, Balaban G, Dvorak J, Grob D. A new skin-surface device for measuring the curvature and global and segmental ranges of motion of the spine: reliability of measurements and comparison with data reviewed from the literature. Eur Spine J. 2004;13(2):122-36.
- Neumann, Donald A. Kinesiology Of the Musculoskeletal System: Foundations for Physical Rehabilitation. St. Louis: Mosby, 2002.
- Urquhart DM, Hodges PW. Differential activity of regions of transversus abdominis during trunk rotation. Eur Spine J. 2005;14(4):393-400.
- Wilke HJ, Wolf S, Claes LE, Arand M, Wiesend A. Stability increase of the lumbar spine with different muscle groups. A biomechanical in vitro study. Spine. 1995;20(2):192-8.
Photo Credit:
Yoga – Jenna Carpenter; Location – Idyllwild, CA
Exercises – Mitch Todd; Location – Moab, UT
- Disclaimer – The content here is designed for information & education purposes only and the content is not intended for medical advice.



[…] Full Article: The Climbing Doctor – Thoracic Mobility for Climbers […]
Indeed a very important and informative Matt! Many climbers do face these issues while climbing. Performing some of these may definitely help the rock climbers in pain free climbing apart from preventing injuries.
Thanks for sharing!
Here is some additional information on the muscles in the Thoracic Region:
Muscle Activation: (Only major muscles/prime movers are detailed)
Posterior Aspect – “Back” Muscles
Superficial Layer – Part of “Extrinsic” muscles of the back
Trapezius, latissimus dorsi, rhomboids, levator scapulae, and serratus anterior.
Bilateral activation of these muscles generally extends the adjacent region of the back.
Unilateral activation of these muscles laterally flexes and in most cases axially rotates the region.
Deep Layer – The “Intrinsic” muscles of the back
Three groups:
(1) Erector spinae group,
(2) Transversospinal group, and
(3) Short segmental group.
Erector spinae group: iliocostalis, longissimus, and spinalis
The longissimus is the most developed of the group and is visible in a muscular individual to create the obvious indented valley along the spine.7 This muscle group assists in extending the back when activated bilaterally, and lateral flexion and rotation to the same side when activated unilaterally.
Transversospinal group: semispinalis, multifidi, and rotatores
Although weak in force production, this muscle group assists in extending the back when activated bilaterally, and lateral flexion and rotation to the opposite side when activated unilaterally.
Short segmental group: interspinalis and intertransversarius
These short muscles may act more as proprioceptors than prime movers of the skeleton.3 Essentially, proprioception is the act of sending signals to the brain to let it know where our body is in space (or what position – imagine closing your eyes, relaxing your arm, and someone holds your hand and raises your arm overhead. You can’t see it moving, but still, you know it’s raising overhead. That is proprioception).
Anterior Aspect – “Abdominal” Muscles
Rectus abdominis, external oblique, internal oblique, and transversus abdominis.
Bilateral activation of these muscles will flex the spine (both lumbar and thoracic). The rectus abdominis (6 pack muscles) is the primary flexor of the spine, but when all muscles act simultaneously, they all flex the spine. Based on their muscle attachments, these muscles pull the bottom of the rib cage toward the pubic bone (think a crunch motion).
Unilateral activation of the external and internal obliques rotates the spine. The obliques are the most effective rotators of the trunk.1, 2, 4, 8 Activation of the external oblique rotates the spine to the opposite side – ex: when your right external oblique fires, you rotate left. Activation of the internal oblique rotates the spine to the same side – ex: when your right internal oblique fires, you rotate right.
The transversus abdominis has been shown to aid in axial rotation of the trunk, however its role is more acknowledged as providing a stable platform upon which the obliques can pull from.8 The transversis abdominis also acts to create intra-abdominal pressure while utilizing the valsalva maneuver during strenuous, abdominal-bracing activities.