Footwork Techniques to Prevent or Reduce Bunion Pain
You begin reading the route, noting all the tiny footholds you will have to balance on. You imagine placing your weight on those holds, and dread begins to set in as you prepare yourself for the ache that will come. As you begin the climb, you consciously guard against putting too much weight on the toes of your left foot, and before you know it, you slip…and there goes your flash. You wish you could climb without the fear of bunion pains and scale harder grades, without worrying about worsening your bunion condition.
Signs and Symptoms
Bunions (hallux valgus) are structural abnormalities usually of the big toe where it is deviated towards the other toes, and can lead to enlargement and swelling of the metatarsophalangeal (MTP) joint of the big toe, which is the joint between the toe and the main part of the foot, or development of a bump.


Bunions are developed gradually over years and the deformity can also increase in severity, which results in pain around the bump when wearing tight shoes or even when walking (Haddad, 2016) due to the inflammation of the joint sac, also known as the joint bursa.
The causes of a bunion are usually genetic or prolonged wearing of tight shoes that put pressure on the joint. Individuals with low arches or flat feet are also more prone to developing bunions due to the nature of the feet being overly pronated, where the arch of the foot tips inwards, placing additional pressure on the joint.
Symptoms may come about from daily activities such as walking because of the altered biomechanics of the toe joint as the big toe bears about 40% of one’s body weight when walking (Town Centre Foot & Ankle, n.d.). Due to the big toe deviating towards the second toe, the MTP joint of the big toe no longer acts as a hinge joint but becomes more of a ball-and-socket joint, and prolonged abnormal joint movements lead to pain, irritation and inflammation of the joint. When it comes to climbing with a bunion, the tight fit of climbing shoes can place additional pressure on the MTP joint as the angle of the bunion can increase from 14° while barefoot to 21° in the climbing shoe (Schöffl & Winkelmann, 1999), further exacerbating the symptoms. The altered position of the big toe also affects the climber’s ability to push off on their toes due to weak and stiff musculature, pain or the fear of pain. This thus affects their ability to balance on their toes which hinders climbing on routes which requires balancing on small footholds such as slab climbing. Bunion development is more likely in long-time and elite climbers; 53% of them develop bunions, of which 20% develop them on both feet. It is also significantly more likely for climbers to develop bunions as compared to the general population (Schöffl & Winkelmann, 1999).
Assessment
Bunion Staging
The severity of a bunion is classified based on its visual appearance. Mild bunions have an angle of less than 14°, moderate bunions are between 14-20°, and severe bunions are more than 20° (Yu et al., 2020).
| Stage | Image | Symptoms |
|---|---|---|
| Mild (<14°) | 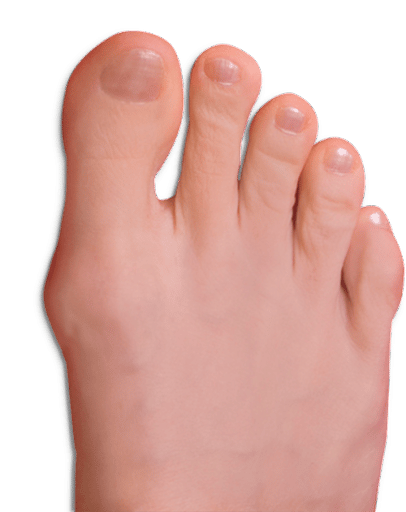 |
Just a small bump with no pain. |
| Moderate (14-20°) | 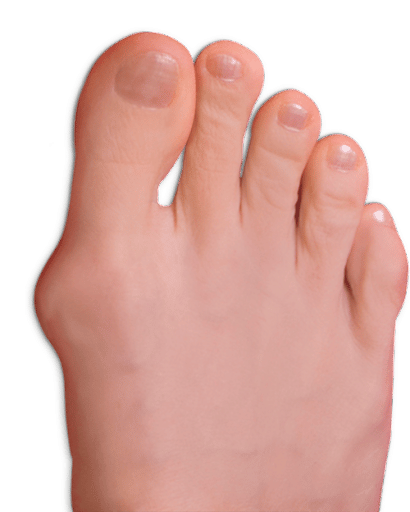 |
Noticeable bump, big toe begins to deviate towards other toes. Pain begins to occur. |
| Severe (>20°) | 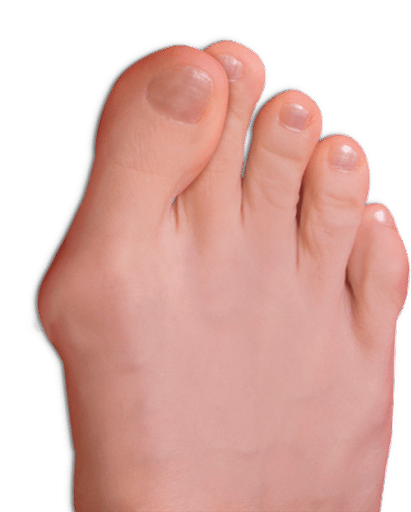 |
The big toe deviates significantly, taking up the space of the second toe. The bump begins to feel bony, and pain can be felt. |
Ruling Out Other Conditions
To be sure that the pain in your big toe is from a bunion, you first need to rule out other diagnoses that can generate pain at the base of the big toe. The most common conditions are 1st MTP joint osteoarthritis and sesamoiditis.
Ruling Out Joint Osteoarthritis
Osteoarthritis of the MTP joint, which is the wearing down of the joint, can bring about similar symptoms as a bunion, or can lead to the development of a bunion. To rule this out, the range of motion (ROM) of the joint is assessed. A normal range of the big toe is more than 60°; whereas in cases of osteoarthritis, there is pronounced stiffness and limited range.
Ruling Out Sesamoiditis
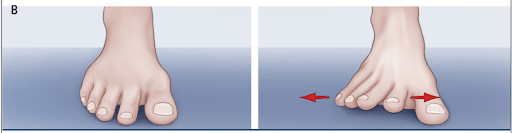
Sesamoiditis is the inflammation of the special bones in the balls of the feet called sesamoid bones. These bones are not connected to other bones but are connected to soft tissue like tendons or embedded in the muscle. In sesamoiditis, pain is felt under the big toe, at the balls of the feet unlike that of bunion pain which is felt on the bump itself.
One test to diagnose sesamoiditis is a positive result of the passive axial compression test, as seen below.
Muscle Strength Testing of Abductor Hallucis and Gluteus Medius
Muscle strength is graded out of 5, with 3/5 meaning that the muscle is able to contract against gravity and 4 and 5/5 meaning that it is able to withstand some form of resistance.
Muscle imbalances can also contribute to the development of a bunion. One such muscle is the abductor hallucis, which is the muscle in the foot that pulls the big toe away from the other toes. When the abductor hallucis muscle is weak, it is unable to counteract the action of the adductor hallucis muscle, which pulls the big toe towards the other toes. This imbalance can thus lead to or worsen bunion development. As such, assessing the strength of the abductor hallucis is important
Another muscle that when weak can contribute to bunion development is the gluteus medius, which is a hip muscle that helps to keep the pelvis level in order to have optimum weight distribution across the entire ball of the foot. When the gluteus medius is weak, the pelvis on the opposite side will drop when weight bearing on one leg, also known as the Trendelenburg sign (Gogu & Gandbhir, 2021) as seen below, resulting in the weight being placed on the inside of the foot and on the ball of the foot under the first and second toes, or sometimes only on the first ball of the foot. Prolonged weight bearing at those points can therefore cause a bunion to form (Yass, 2019).
The Rock Rehab Pyramid
This is the framework where you can develop a progression of exercises. It was develop by Dr. Jared Vagy DPT and the pyramid is described in his book Climb Injury-Free. The exercises start with unloading, then go to mobility, strength and then movement.

Unloading:
Rest to offload the joint until the pain subsides to prevent further inflammation and exacerbation of symptoms.
Icing the bunion also helps with pain relief and decreasing any swelling of the joint. Apply an ice pack wrapped in a towel to the bunion for no more than 20 minutes at a time, with at least half an hour before applying ice again in order to prevent damage to the skin.
Mobility:
Mobility exercises are important to maintain or improve your range of movement, and prevent stiffness of the joint.
Tennis ball rolls: 3-5 minutes per foot; 3 times per day
With a tennis ball on the ground, roll it back and forth using the sole of each foot for 3 minutes. This exercise helps to loosen any tight muscles of the feet and can be performed in sitting or standing (Stockett, 2019).
Big toe alignment and stretch: 3 x 15; 2-3 times per day
While seated and with your foot placed on the ground, separate the big toe from the rest of the toes. With the opposite hand, push on the 1st MTP joint where the bunion is using your thumb while pulling the big toe away from the other toes with your fingers. Hold the stretch for 2-3 seconds, ensuring that the big toe is in line with the foot, and release. This exercise helps to align the big toe and promote a better range of movement of the joint.
Toe circles: 3 x 20 in each direction; 2-3 times per day
While seated and with your foot on the ground, separate and grip your big toe in the same way as the previous exercise. Begin to guide the toe into little circles clockwise first, then anti-clockwise. This increases the range of movement and mobility of the joint.
Strengthening
With your improved mobility, you are now ready to begin the strengthening process with these 5 simple exercises.
Banded toe spread: 3 x 10; 2-3 times per day
While seated and with your feet together on the ground, loop a thick rubber band or light resistance band around your right and left big toe. Keeping your heels together, try to separate your big toes (Villeneuve, 2017). Make sure the resistance band is not too tight such that your big toes cannot move inward.
Toe spread hold: 3 x 10; 2-3 times per day
With your feet on the ground, use your hands to separate your big toe from the rest of the toes, and hold it in that separated position for as long as possible.
Toe-spread out: 3 x 10; 2-3 times per day
With the sole of your foot and heel kept firmly on the ground, lift and spread your toes. Keeping your toes spread, bring your little toe down and out to touch the floor. Holding that position, bring your big toe down toward the inside of the foot (Teyhen, 2016).
Heel raises: 3 x 10; 2-3 times per day
With your feet flat on the floor while seated, lift your heel while maintaining pressure on the ball of your big toe. Hold this position for 5 seconds before returning to the start position. To progress, do this exercise in standing, then on single legs (Teyhen, 2016).
Gluteus medius strengthening – Clamshells: 3 x 10; 2-3 times per day
It is important that you are strengthening other muscles apart from that in the feet. A strong gluteus medius aids in improving weight distribution in your feet which can improve bunion symptoms.
To perform the clamshell exercise, lie on your side with your knees bent at 90 degrees. Keeping your feet together, rotate the top knee up and outward at least 60 degrees, ensuring that the movement is slow and controlled. Slowly lower the top knee back into the starting position. To progress, wrap a resistance band around your knees.
Movement Exercises
You’ve put in all this hard work to increase your joint mobility and strengthen the relevant muscles, and you feel ready to get back to climbing again! Here are some movement techniques you can incorporate into your climbing in order to reduce stress and pressure on the inside edge of your foot, which can aggravate the bunion pain.
Heel hooks

Using the leg and heel as an additional arm and hand can put you in a position of great stability without placing excessive pressure on the first MTP joint.
To practice this technique, ensure that you are warmed up and stretched as heel hooks require strong and warm hamstrings. Start in a stable position with all 4 limbs in contact with the wall. Plan where to place your heel to maximise surface contact, looking for dips or bumps to catch the heel. When performing the heel hook, begin drawing your heel towards your bottom, then point your toes down and outward to further engage the leg muscles.
Toe hooks

With toe hooks, you want to ensure that your foot is at a 90-degree angle, and that you maintain tension through that foot (the alpha foot). While straightening your leg, raise your toes up towards your knee, feeling the tension in the ankle, calves, hamstrings, and quads. You can practice this movement in sitting or standing before trying it out on the wall.
The other foot that is not doing the toe hook (the beta foot) is usually placed below your centre of gravity for balance. When releasing the toe hook on the alpha foot, ensure that you have enough tension and power on the beta foot and control the swing of the alpha foot so that the momentum from the release does not carry you off the wall.
Outside edging – inside flag

Using the outside edge of the foot when climbing also helps to offload stress on the bunion to prevent exacerbations of bunion pain.
One such method to use the outside edge is the inside flag, which is a different method from the more commonly utilised side flag and rear flag. With the inside flag, the free leg usually crosses in front of the other leg, and the outside edge the flagging foot is placed against the wall for balance. The flagging leg does not necessarily have to cross in front though.
To perform the inside flag, you need to ensure that the foot opposite to the direction you are reaching toward is on the foothold. If you are reaching to the right, your left foot is on the foothold. If you are reaching to the left, your right foot is on the foothold.
Cross the flagging foot in front of your leg/foothold, moving your hips to point in the opposite direction of where you are moving. Your hips and knees should all be facing the same direction. If you are moving to the right, point your hips and knees to the left, and vice-versa. Extend your flagging leg until it is straight and place the toe against the wall. You can then reach for the next hold while smearing your flagging foot on the outside edge. Keep your hips as close to the wall as possible throughout the movement.
Outside edging – back step
Instead of climbing while facing the wall head-on and stepping with your big toe, turn your hips to the side and step with the outside edge of your foot instead. This keeps your hips close to the wall and is more energy conserving, and also takes the pressure off the ball of your big toe to help reduce bunion pain.
Pivoting
Precise placement of the toes is important for pivoting on the foothold. When pivoting, you are able to turn your toe in any direction in order to perform moves such as flagging or drop knees to climb efficiently or reach the next holds. If the ball or arch of the foot is on the foothold, it is not possible to pivot and perform those moves.
Avoid over pronating the foot
As mentioned in the beginning of this article, over-pronation of the foot, or the inward tipping of the arch, can place additional pressure on the joint which can exacerbate bunion pain. As such, it is important to avoid movements that cause over-pronation of the foot. Care should be taken to have proper landing positions when bouldering, ensuring that the knees do not collapse inwards as that can increase the angle of the bunion. Excessive drop-knees should also be avoided as it puts the foot into over-pronation.
The Research
- Climbing Blogger. (2020, April 15). How to heel hook – Climbing 101 • Climbing blogger. https://climbingblogger.com/heel-hook/
- FeetCare. (2019, June 13). The stages of bunion development. https://feetcare.sg/the-stages-of-bunion-development-2/
FrictionLabs. (2022, January 27). How to toe-hook for climbing. FrictionLabs – Chalk for Athletes Who Demand Better Grip. https://frictionlabs.com/blog/how-it-works-the-toehook - Gogu, S., & Gandbhir, V. N. (2021). Trendelenburg sign. Treasure Island (FL): StatPearls Publishing. https://www.ncbi.nlm.nih.gov/books/NBK555987/
- Haddad, S. L. (2016, February). Bunions – OrthoInfo – AAOS. American Academy of Orthopaedic Surgeons. https://orthoinfo.aaos.org/en/diseases–conditions/bunions/
- Optimum Health Solutions. (2015, November 3). Trendelenburg gait. https://opt.net.au/optimum-life/trendelenburg-gait/
- Phillips, R. (2011, June 9). Training to become a better climber – Part 2. UKClimbing.com. https://www.ukclimbing.com/articles/skills/series/become_a_better_climber/training_to_part_2-3804
- Schöffl, V., & Winkelmann, H. P. (1999). Footdeformations in sport-climbers. D Z Sport-med, 50, 73-76.
- Town Center Foot & Ankle. (n.d.). How bunions can lead to additional foot Problems : Town center foot & ankle: Podiatry. Town Center Foot & Ankle: Podiatry: Kingwood, TX & Atascocita, TX. https://www.tcfootandankle.com/blog/how-bunions-can-lead-to-additional-foot-problems
- Yass, M. (2019, May 29). How to stop a bunion from developing. Bottom Line Inc. https://bottomlineinc.com/blogs/pain-relief-in-motion/how-to-stop-a-bunion-from-developing
- Yu, G., Fan, Y., Fan, Y., Li, R., Liu, Y., Antonijevic, D., Milovanovic, P., Zhang, B., Li, Z., Djuric, M., & Fan, Y. (2020). The role of footwear in the pathogenesis of hallux valgus: A proof-of-Concept finite element analysis in recent humans and homo naledi. Frontiers in Bioengineering and Biotechnology, 8. https://doi.org/10.3389/fbioe.2020.00648
See a Doctor of Physical Therapy
While there is a lot of information out there on the internet, it is always beneficial to get an expert opinion and guidance from a physical therapist. There could be other factors that affect bunion pain which may not have been mentioned in this article or on websites. The physical therapist would be carrying out various assessments to narrow down the contributing factors in order to help you address specific issues, and prepare a tailored approach to your rehabilitation so that you can return to climbing as soon as safely possible. They can also educate you more on the condition so that you are aware of what to do to prevent the bunion pain from worsening.
Author Bio

Cera Chiu is a 3rd year Physiotherapy student at Singapore Institute of Technology, taking her second degree. She takes time out of her hectic school schedule to climb and has recently started lead climbing, and hopes to climb her first 7a soon. Physiotherapy has allowed her to understand the long-term benefits of movement and exercise which can be more helpful than medication or passive manual therapy, and strongly believes that age should not hinder you from moving your body and being active. She is currently starting her clinical placements and is looking forward to graduation already. She aspires to open a clinic and collaborate with other like-minded PTs to specialise in climbing rehab in the future.
To reach out to the author with questions or comments:
cera.chiuu@gmail.com
- Disclaimer – The content here is designed for information & education purposes only and the content is not intended for medical advice.

Related Posts