Long Head of the Biceps Tendinopathy
You have been working on your project for some time – maybe getting stuck on a burly sequence on that magical line you’ve been hoping to send. Every time you give the project a go, you get a soreness in the front of your shoulder. You thought initially this would go away with a couple days rest, but it has only gotten worse through each day projecting. This achiness and soreness used to only bother you while climbing, but now it seems like even simple everyday tasks cause symptoms in the front of your shoulder. What could be happening?![]()
What is the Long Head Tendon of the Biceps?
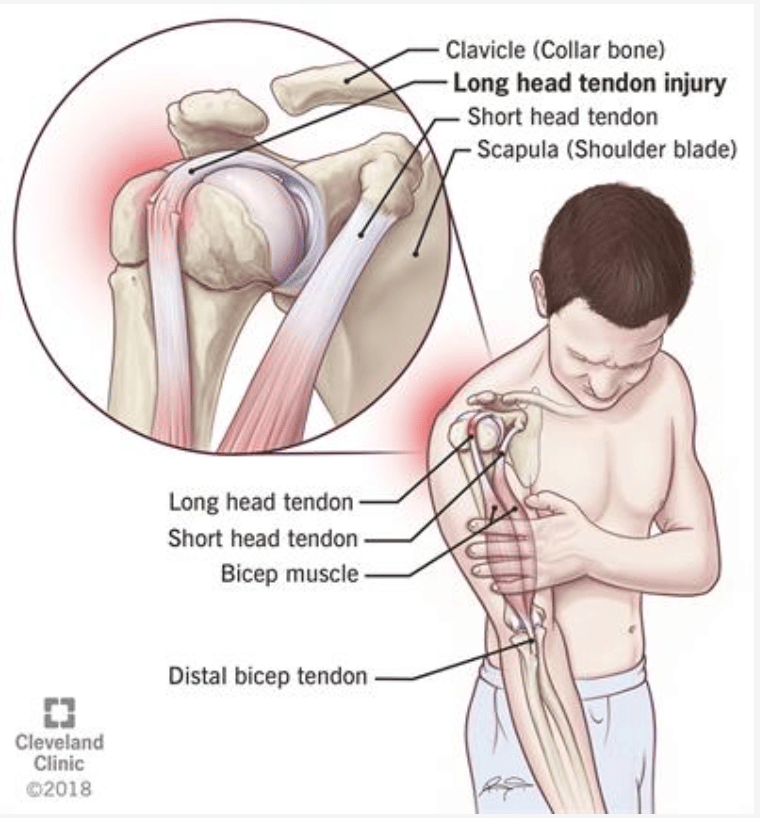
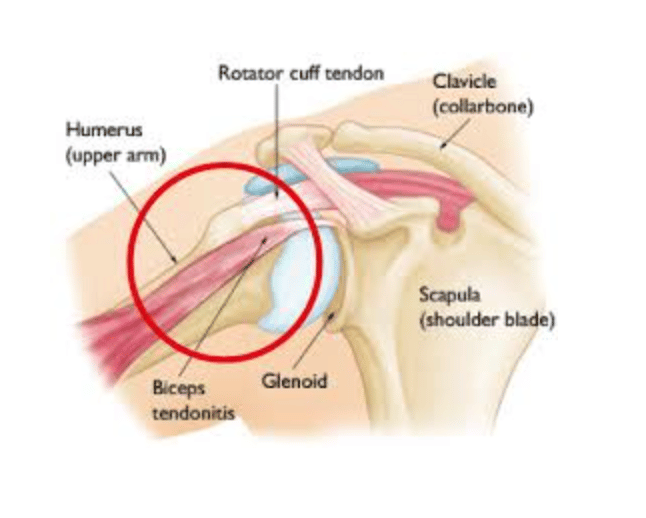
Most people are familiar with the location and function of the biceps, but few may know why the biceps gets its name. The muscle has two originating points within the front of your shoulder from which it connects down in front of your elbow. Each of these originating points is for a different head of the muscle, namely the long head and the short head. The long head runs directly over the ball of your shoulder, and rests in a neat groove. From a functional standpoint, this tendon helps keep the shoulder stable and comes into play when you are using your biceps. In general, tendinopathy refers to injury to a tendon, which is a structure that attaches the muscle to bone.1
Signs and Symptoms
Long head of the biceps tendinopathy is often associated with pain in front of the shoulder. Pain can vary in intensity depending on the state of the tendon, how long the issue has been going on, and what you have done to manage your symptoms. Certain positions and tasks can improve/worsen symptoms, but in general, pain will be worse when using your biceps, during overhead movements, and during/after repetitive motions with your elbow and shoulder. Pain also usually gets better after activity or with rest.
Symptoms include:
- Pain in the front of your shoulder
- Pain during overhead movements
- Pain while utilizing your biceps (under clings, side pulls, locking off)
- Pain when stretching biceps/front of shoulder (mantles)
- Popping in front of shoulder
- Feeling of instability with shoulder
- Symptoms get better with rest
- Tender to touch in the front of your shoulder
Assessment
The following are a few tests to help rule in whether your pain might be coming from the long head of the biceps:
- Speed’s test: perform downward resistance at your wrist with your arm out directly in front of you with palm up. Reproduction of pain in the front of your shoulder is a positive test.
- Yergason’s Test: with your elbow at 90 degrees and wrist neutral (thumb side up), give resistance to your forearm while twisting your forearm out rotating your shoulder out (laterally). Reproduction of pain or clicking/popping in the front of your shoulder is a positive test.
- Obrien’s Tests: with your arm directly in front, across your body, and thumb down, give resistance downward onto your forearm. Perform resistance again, but with thumb up. A positive test is pain reproduction with the first position, and decreased symptoms with the second position.
- Tenderness with palpation: with 1-2 fingers, press directly over the front of your shoulder with light-moderate resistance. A positive test would be a reproduction of your symptoms with the added pressure. Rotate your shoulder outward and add pressure with 1-2 fingers once again. With the rotation, symptoms should be more lateral or more towards the outside of your shoulder.
The Rock Rehab Pyramid
Now that you have tested your shoulder to become more confident of the source of your pain, you may begin the rehab process following the four phases depicted in the rock rehab pyramid structure below. It should be noted that you should be able to complete all of the exercises in each phase before moving on following phase.
The Rock Rehab Pyramid was developed by Physical Therapist, Dr. Jared Vagy in his book Climb Injury-Free. This pyramid aides in the rehabilitation of climbing injuries by providing a system of four major categories that will guide the climber’s recovery process. Following an injury, one will start at the bottom of the pyramid and work upwards using general guidelines to determine appropriateness for progression to the next level. A decrease in pain/soreness allows advancement to the next level. With no change in symptoms at a particular level, a climber should stay at the current level for one week and then progress to the next level. An increase in soreness should have the climber regress down one level.
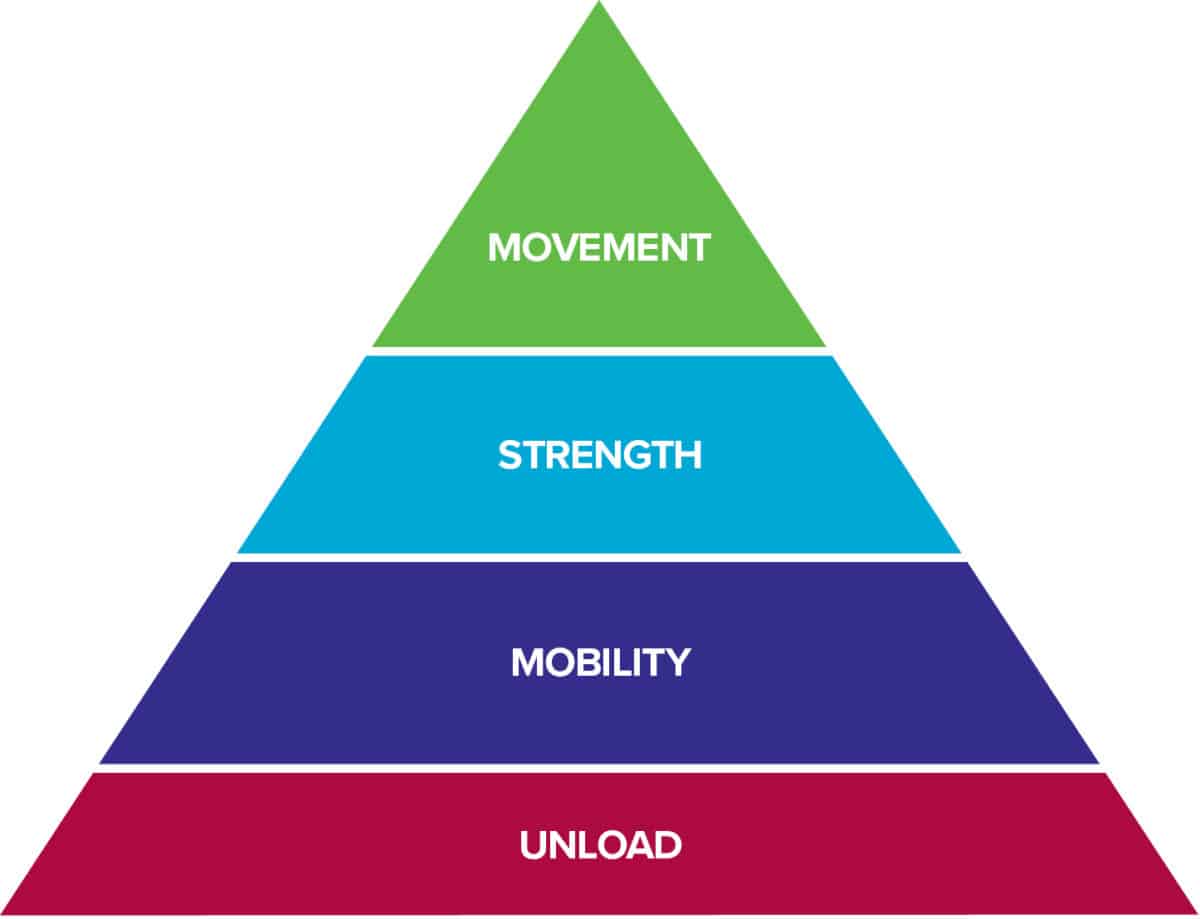
The bottom level of the pyramid aims to Unload the tissues in the body so that they have the best healing environment. Often times, after an injury there is some sort of change in Mobility. After the tissues have calmed down from the previous level, this stage will look to reestablish normal, pain free range of motion. Once the injured area restores its mobility, it is time to increase the Strength of the surrounding muscles so that Movement in the following level can be coordinated and optimized. Click here to learn more about the rock rehab pyramid structure.
Unloading
- Rest: The first step in the rock rehab pyramid is to address tissue overload by unloading the tissue. Rest should be considered in order to allow the injured tissue to begin recovering, or in other words, you should take a short hiatus from climbing. This may be difficult, but it is an essential part to prevent any further injury to your biceps tendon.
- Ice: Can be used to help reduce the inflammation around your biceps tendon and decrease pain in the region. Use if the injury is feeling worse or after climbing. Apply ice within the first 1-2 weeks of the onset your injury at the front of your shoulder. Another technique, ice cup massage can be used in 2-5 minute bouts directly on the skin to help relieve some of the symptoms in the front of you shoulder.
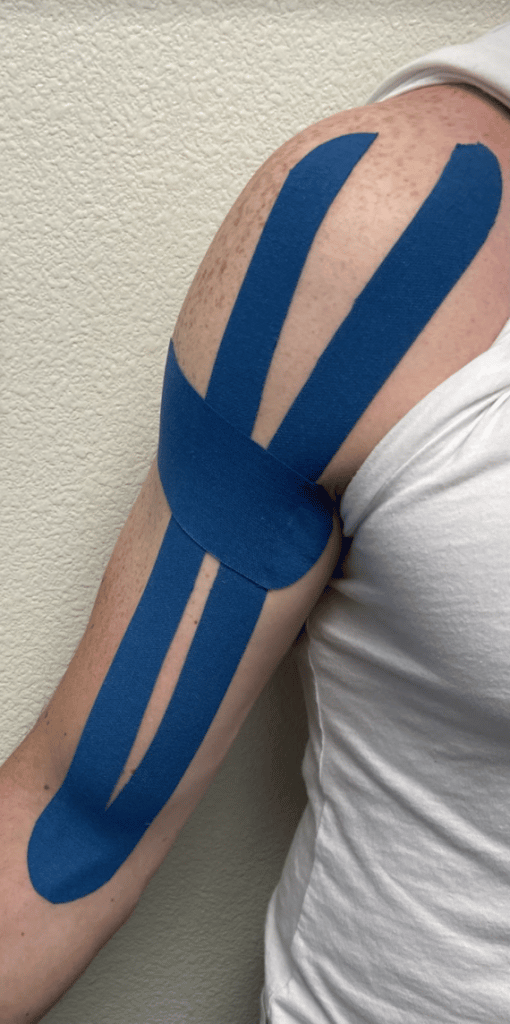
- Taping: Kinesio Tape can be used in a variety of ways to help reduce the load on the biceps tendon and assist with stability at the shoulder joint. Trial the technique below during climbing activities or during work if your duties require repetitive overhead or lifting motions. Taping is a nice adjunct to therapeutic exercise to reduce the load on the tendon while strengthening other structures around the shoulder. Example pictured below.
Mobility
The following exercises are a progression of stretches and manual techniques that will help improve the mobility of your biceps and shoulder musculature. These exercises are designed to improve how well the tissue can move, thus improving function within the shoulder region. Each exercise is a progression from the previous one, and the overall goal is to restore full pain free range of motion at the shoulder. This meaning before moving into the strength portion of the rock rehab pyramid, you should be able to lift your arm overhead with little to no pain.
Stretching the pecs, biceps, and anterior (front) of your shoulder:
Perform stretches 2-3 times per day for 3 sets of 30s
- Standing doorway stretch: in a doorway, hold onto each side of the frame with both hands keeping elbow tucked near your sides, then lunge forward bringing your chest through the doorway. I expect you to feel this stretch both in the front of your shoulder and your chest.
- Standing doorway stretch with shoulder at 90°: perform the steps in the previous stretch with your arms slightly overhead and shoulders perpendicular (90°) away from your body. This one you may feel more in the shoulder compared to the previous position, but I encourage you to perform whichever position you feel the least discomfort while experiencing a stretch.
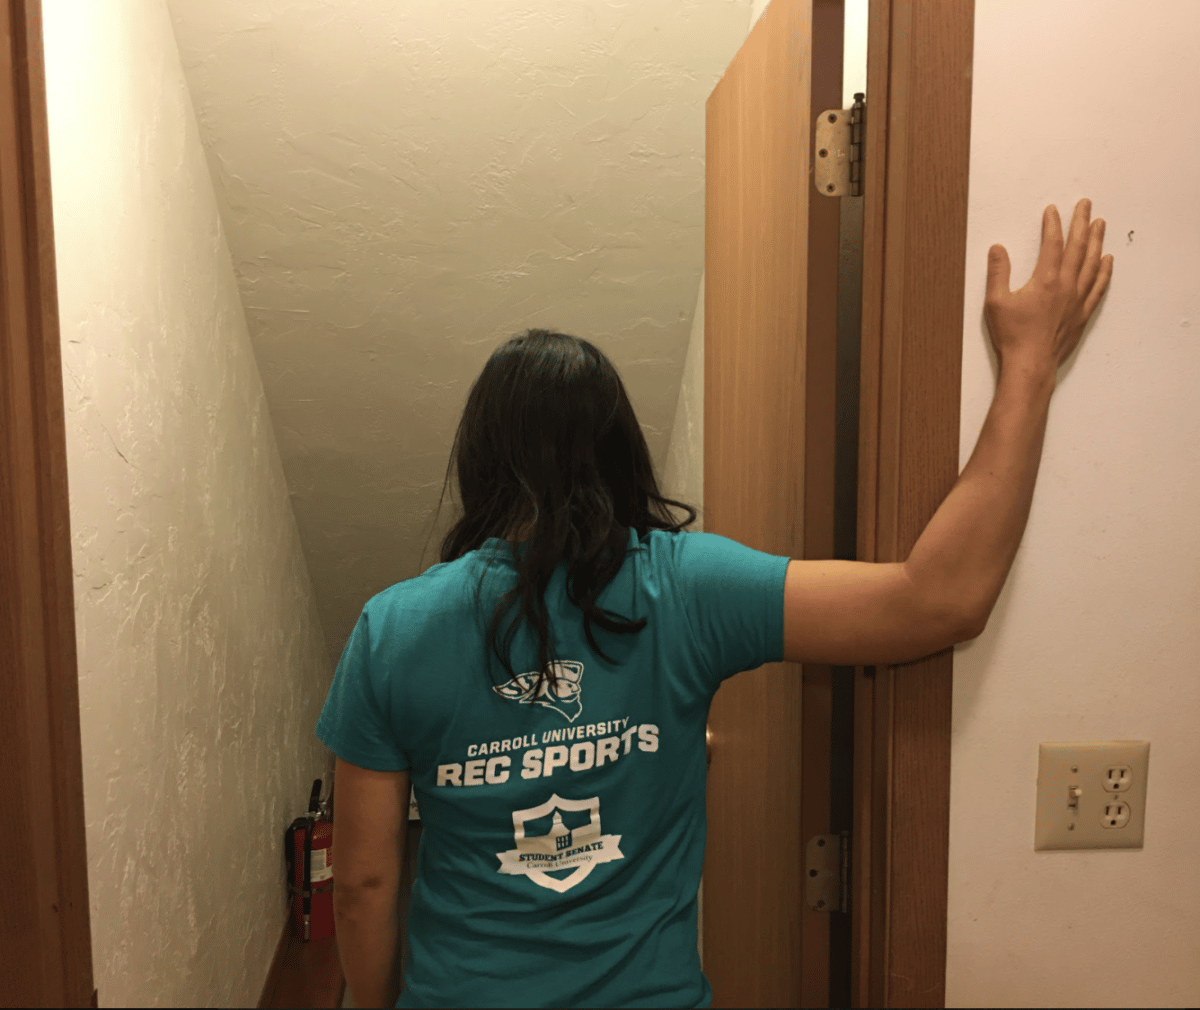
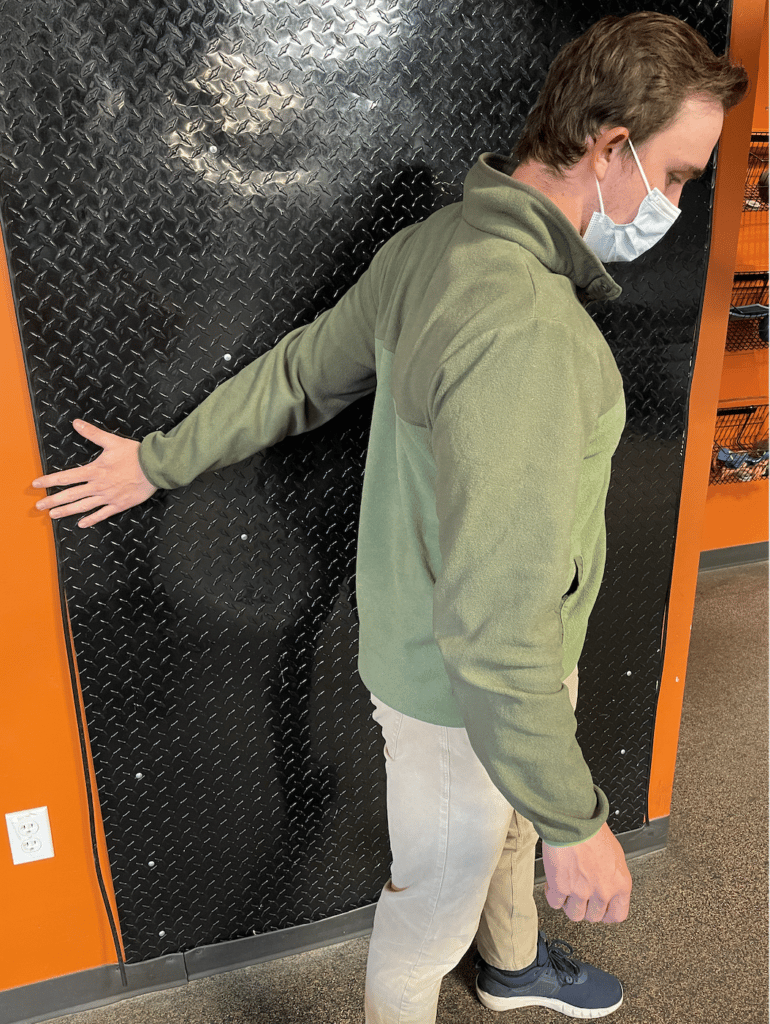
- Standing wall pec/anterior shoulder stretch: with arm extended straight against wall, twist slightly away from wall while keeping shoulder close/onto surface of the wall. This stretch should be felt in both the pec and front of you shoulder, but also stretches the biceps more than the first two positions due to the arm being straight.
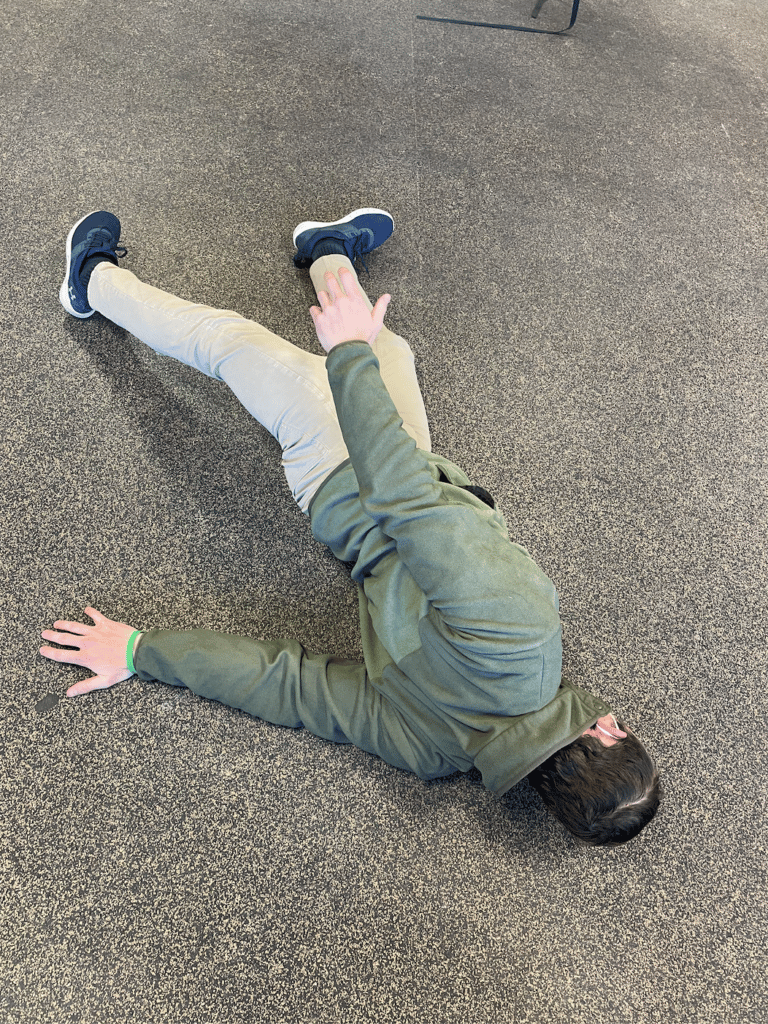
- Floor pec/anterior shoulder stretch: start by lying face down on the floor with one injured arm at 90°. Then twist your torso up to on your side and lean back slightly. This position is similar to the previous position but may allow for a more intense stretch.
Soft tissue mobilization and cross friction massage
Perform each technique 1 time per day 3-5 times per week during the sub-acute and chronic phases of your injury. (>4 weeks since onset)
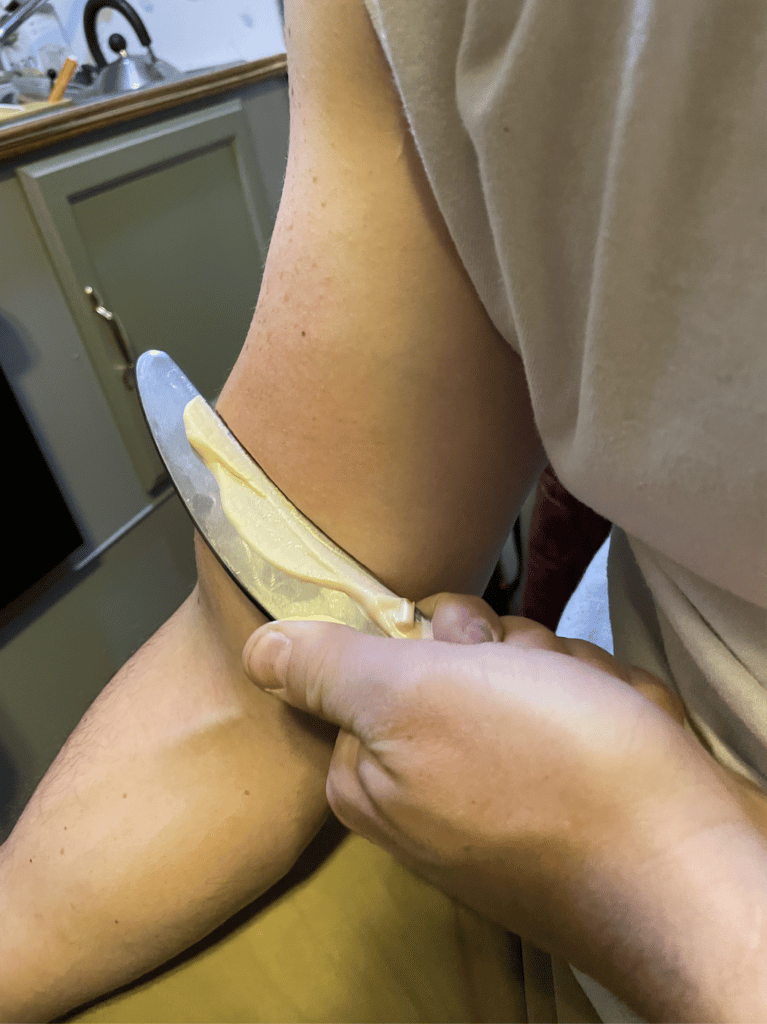
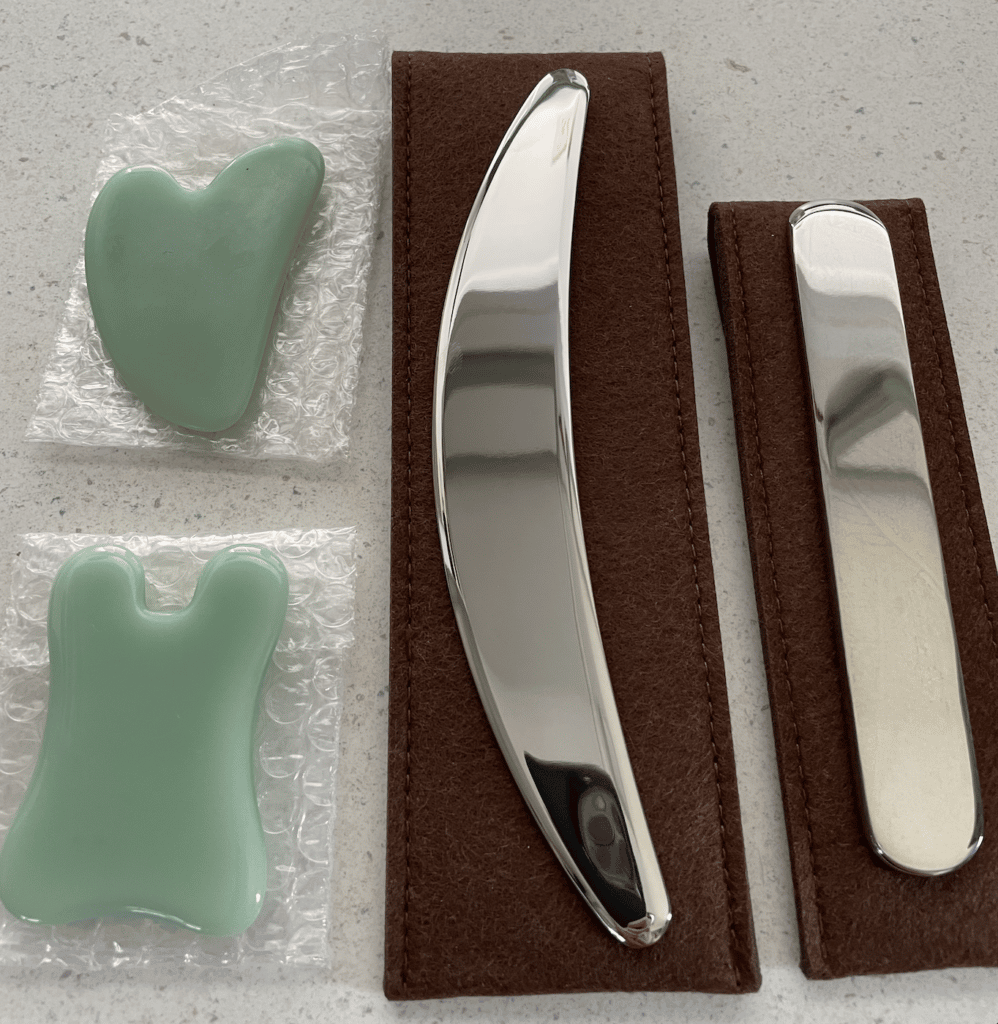
- Instrument assisted soft tissue mobilization: use a stainless steal or gua sha tool scrape the front of your biceps muscle with tool angled at 45°. If you don’t have one these instruments, you can use the back of a carabiner for a similar effect. Perform for 3-5 minutes targeting the entirety of the biceps muscle.
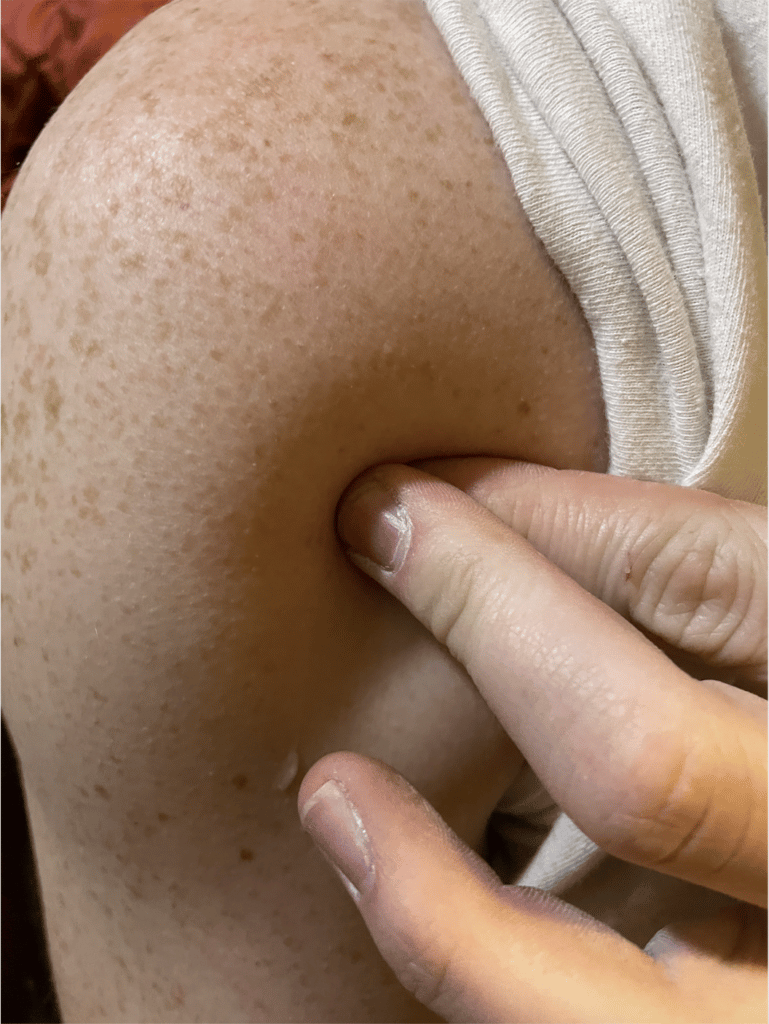
- Cross friction massage: with your index finger, press on the tender spot in the front of your shoulder. Then match your middle finger on top of your index finger and press down. From this position move back and forth across the sensitive spot. Your pressure with have to deep due to deltoid covering up the long head biceps tendon. Apply this cross friction for massage for 15 minutes, which can be broken up into 3-5 sets.
Strength
After achieving full, pain-free ROM, it is time to initiate strengthening at the biceps and surrounding musculature. Often times, long head of the biceps tendinopathy is paired with or caused by other muscles within the shoulder complex due to weakness or poor range of motion. The following strength exercises are targeted at both the biceps and other shoulder stabilizers with the intended purpose of strengthening the shoulder within the pain free range and improving shoulder stability. If symptoms return in the shoulder, return to the mobility phase of the rock rehab pyramid.
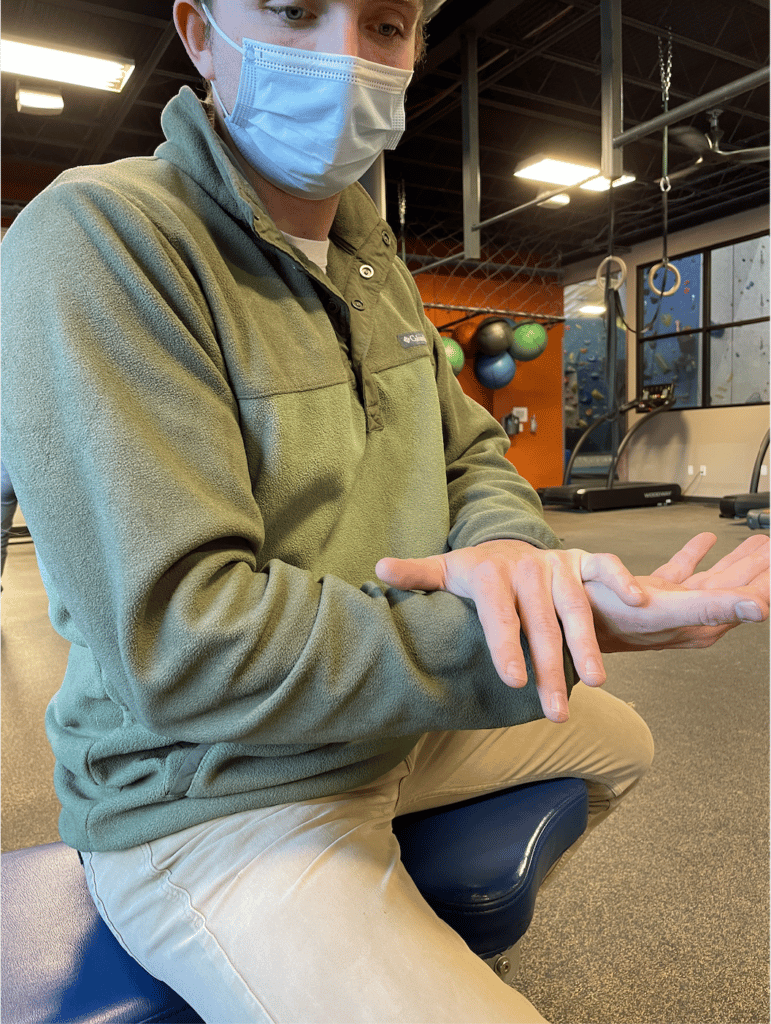
- Isometric elbow flexion: with your elbow bent to 90°, press down on your forearm with a moderate resistance and hold for about 10 seconds while maintaining the position of your elbow. Repeat for 10-12 repetitions.
- Long lever eccentric bicep curls: while lying on your back preferably on a bench, table, or bed, begin with a light to moderate weight directly above you (shoulder flexed to 90°). Slowly lower weight allowing your shoulder to extend below table level. This exercise helps improve strength of biceps muscle/tendon in a controlled and safe manor. 3 sets of 10-12 reps is a good place to start in regard to dosing, but if symptoms in the front of the shoulder increase, consider decreasing either sets or reps to reduce the load on the tendon. See in video below.
Beyond strengthening the biceps muscle/tendon itself, other shoulder structures need to be targeted to improve the stability of the shoulder and promote proper mechanics while climbing. The following exercises target the rotator cuff and shoulder blade muscles, which support the glenohumeral joint (actual ball and socket of the shoulder) as it is performing movements. It is important to have strength in these regions, especially in climbing due to the high intensity overhead movements that take place on the wall.
- Face pull with moderate resistance band: begin in standing while holding resistance band in both hands with thumbs pointing towards your body. Bring your hands to about ear level with thumbs pointing back and squeeze your shoulder blades together. Perform for 3 sets of 8-12 with the goal of feeling fatigue in your upper back musculature with each set. See in video below.
- I’s, T’s, Y’s in prone (face down) position: this can be performed in a variety of ways, either on a bench, on the floor, on the side of the couch, or on the side of a bed. For this example, start face down on the floor (could use crash pad for comfort). Alternate lifting your arms in each position: out to the side (T), straight above your head (I), and in between each position (Y). Perform for 3 sets of 4 in each position. See in video below.
Movement
The final phase of the rock rehab pyramid is correct movement patterns that may be the true cause of the pain. In this section, we will focus on a couple ways to decrease the amount of bicep recruitment while on the wall, and give exercises that will improve scapular engagement while in the pulling position. The goal is to reduce the strain on the bicep tendon and promote the engagement of the shoulder stabilizers while moving on the wall in order to reduce the chance of further injuries.
- Decreasing use of biceps while one the wall: this can be trick, but one general rule of thumb is to climb with arms extended rather than flexed. This keeps your biceps from being overused while having your arms bent while climbing.
- Improve footwork: improving footwork will essentially decrease the workload on the arms and thus the biceps. One drill that is commonly used to focus on footwork is look at a foothold until foot placement is complete. This makes you as the climber focus on proper foot placement and will help improve correct foot placement, thus reducing the use of arms and biceps while on the wall.
- Over gripping: may be a cause of increased bicep activation and load during climbing. Try to reduce how hard you squeeze each hold as an attempt to reduce arm activation while climbing.
- Keep arms extended on under cling/avoid under clings depending on where you are in the rock rehab pyramid. Under clings require a higher amount of bicep activation compared to other holds, therefor avoiding these holds will be advantageous if you are in the beginning stages of the rock rehab pyramid. As your symptoms decrease and strength of surrounding musculature improves, you can begin to climb routes with under clings, but monitor symptoms, and if shoulder pain begins to increase, reduce your usage of under clings while climbing.
See a Physical Therapist
The shoulder complex has many structures and is often hard to diagnose specifically what is causing pain. Seeking a professional, such as a physical therapist, will allow for an in depth examination to help identify the root cause of your issue. Physical therapists are movement specialists that also may be able to identify certain patterns in your climbing that may be influencing your symptoms.
Author
Drake recently graduated from Carroll University with his Doctorate of Physical Therapy. He has begun working as a travel PT with the hopes of exploring the country. In his free time, he plans on hiking, climbing, and biking. Drake also recently started an online physical therapy practice with his girlfriend in which they hope to make full-time career treating outdoor enthusiasts.

Reach Out:
-peakpursuitrehab@gmail.com
IG: @peakpursuitrehab
References
- Nho SJ, Strauss EJ, Lenart BA, et al. 2010. Long head of the biceps tendinopathy: diagnosis and management. American Academy of Orthopedic Surgeon 18(11), 645-656. https://journals.lww.com/jaaos/Fulltext/2010/11000/Long_Head_of_the_Biceps_Tendinopathy__Diagnosis.2.aspx
- Varacallo M, Mair SD. Proximal Biceps Tendinitis and Tendinopathy. [Updated 2020 Jun 27]. In: StatPearls [Internet]. Treasure Island (FL): StatPearls Publishing; 2020 Jan-. Available from: https://www.ncbi.nlm.nih.gov/books/NBK533002/
- Photo 1: https://my.clevelandclinic.org/health/articles/14534-biceps-tendon-injuries
- Photo 2: https://sgbonedoctor.com/shoulder/long-head-biceps-strain/
- Disclaimer – The content here is designed for information & education purposes only and the content is not intended for medical advice.

