Common Knee Injuries While Heel Hooking Diagnosis, Rehab, Prehab and More!
Imagine you’re bouldering at the gym at the start of your session, slowly starting to build up the intensity. As you make your way over to the new set you spot a shiny new boulder that seems to revolve around a tough rock over move on a heel hook. As you near the end of your warmup you hop on, flowing through the start of the new route nearing the crux. You place the heel intentionally, opening up the hips and trying to engage your hamstrings. As you crank up onto the heel things aren’t feeling quite right but you push on not wanting to blow your flash. Suddenly you hear a loud pop and the sensation of your knee giving way. You crumble onto the mats kicking yourself for not warming up your lower body properly and stand up only to notice your leg feels a little unsteady with an intense pain in your knee. You end the session there as things don’t feel right and immediately start to self-diagnose the injury only to be overwhelmed by the number of things that could have been hurt. Was it my hamstrings? LCL? Meniscus? How can you possibly figure out what the issue is and ensure you start the road to recovery on the right foot?
The knee is a complex structure with many components that are prone to injury. Factors like an inadequate warmup, improper technique, and insufficient strength can all contribute to placing unnecessary stress on the knee while heel hooking. From a recovery standpoint, figuring out which part of the knee is hurt and having the ability to rule in or out different injuries can help ensure that you aren’t further damaging the area. In this article, you will find information on the various parts of the knee that can be injured while heel hooking, ways to help figure out what has or has not been injured, general principles of recovery, and some exercises that can be done during your warm-up and off the wall training to help decrease risk of future injury.
In this article, we will focus only on “acute” injuries (often an obvious cause of injury) and we will not cover “chronic” injuries (often no obvious cause of injury but gradually worsens over time). Those experiencing a chronic injury will present with different symptoms and require a different treatment approach. Additionally, this article covers the most common injuries that stem from heel hooking injuries. The knee is a complex part of the body, and there are many other less common structures that can be injured. If throughout this article, your particular set of symptoms and issues does not resonate with any one injury don’t fret! It may be something that wasn’t covered in which case, checking out some of the other articles on The Climbing Doctor website or following up with a healthcare professional familiar with climbing injuries would be best.
General Overview of the Knee
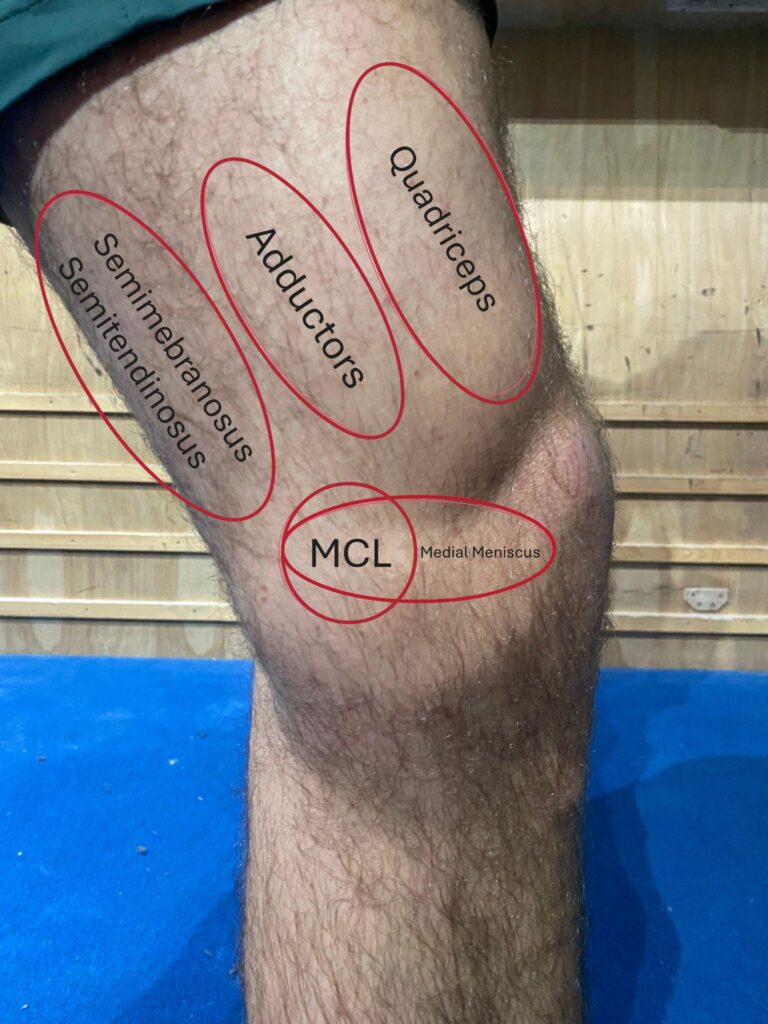
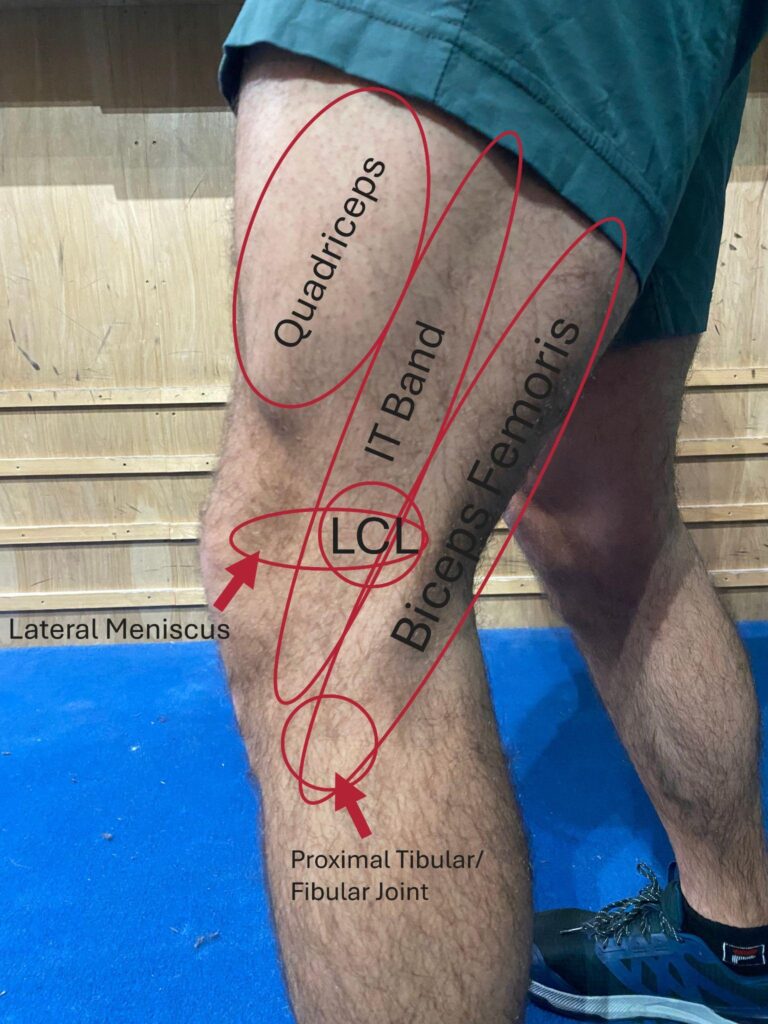
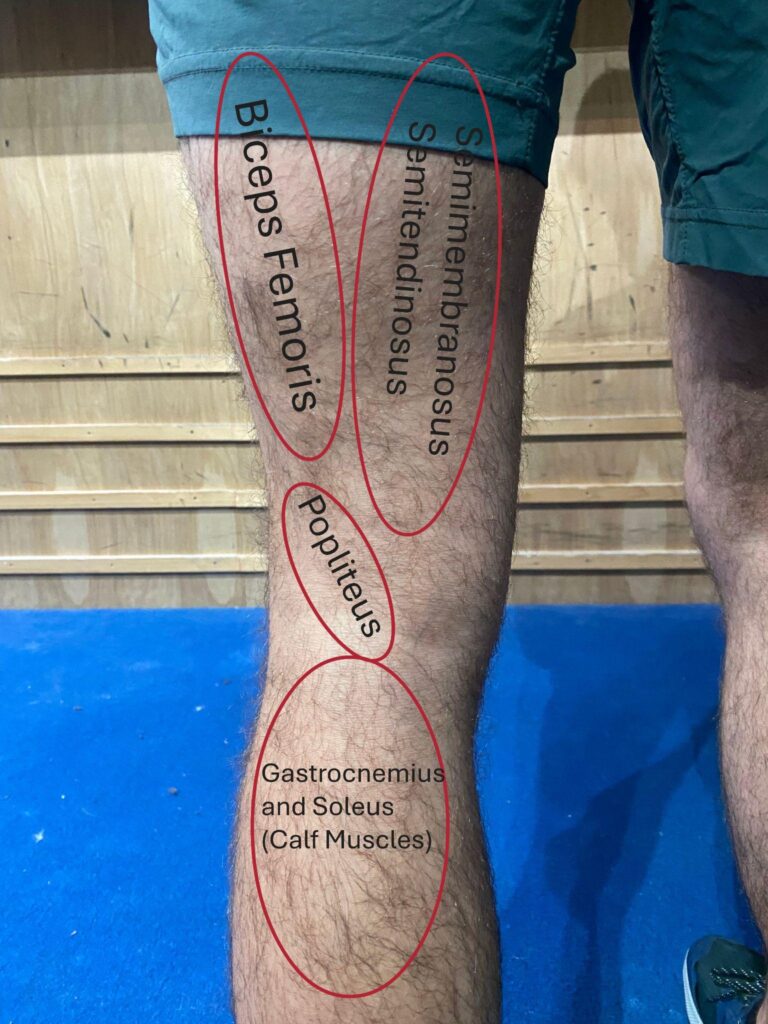
Figure 1-3: Relevant Structures of the inside, outside, and back of the knee respectively. Not pictured is the ACL/PCL which are deep within the knee.
The knee is made up of a variety of different structures that provide stability and strength in everyday life and also climbing. Due to the varied positions and movements that are present during climbing movement, there are quite a number of different ways that the structures of the knee can be put into stressful positions. To simplify, we can categorize the structures into two groups: 1) muscles that produce movement, and 2) ligaments and cartilage that offer passive support to the knee.
Muscles:
Hamstrings – There are three main hamstring muscles that actively bend the knee and extend the hip.
- Biceps femoris: situated on the outside of the back of the thigh and connects the pelvis/femur to the lower leg (tibia/fibula) right below the knee. This muscle helps to bend the knee and extends the hip. It is more active when our knee is out to the side when heel hooking. Injuries to the biceps femoris can occur in the center of the muscle or at the tendon (where it attaches to the bone).
- Semitendinosus and semimembranosus: situated on the inner aspect of the back of the thigh. These muscles originate from the pelvis and attach into the tibia below the knee. They are more active when you are heel hooking and pulling straight down with your knee in line with your body. Similar to the biceps femoris, injuries to the semimembranosus/semitendinosus can happen in the center of the muscle or the tendon.
Popliteus muscle
- It is a small muscle situated on the back of the knee that helps to rotate the lower leg inwards (towards the center of the body). While heel hooking, the lower leg is often turned outwards placing considerable stretch through this muscle.
- Note: The popliteus muscle also attaches to the lateral meniscus and can often be injured at the same time.
IT Band
- This is a long sheet of fibrous tissue that originates from the front and side of the hip (glutes and tensor fascia latae muscles) and attaches just below the knee on the outside of the lower leg (tibia). While heel hooking this muscle can be fully tightened and prone to injury if there is a sudden slip or overload to the tissue.
Ligaments and Cartilage:
Lateral Collateral Ligament (LCL)
- The LCL connects the end of your femur to the head of the fibula. Heel hooking with your knee to the side (hip externally rotated) tightens the LCL and increases stress on it.
Medial Collateral Ligament (MCL)
- The MCL is similar to the LCL, but on the inside of the knee, it connects the end of the femur to the tibia. Injuries to the MCL are less common while heel hooking compared to the LCL as it is less likely to be placed in a vulnerable position. The exception to this is during hard rock over moves where you are really sitting on the heel. This position can apply an inward force on the knee that can place considerable stress on the MCL.
Meniscus
- The meniscus are a pair of disc-shaped cartilage on both sides of the knee (medial and lateral) that act as a shock absorber between the ends of the femur and tibia. In a study by Lutter et al. (2020), they found that medial meniscus injuries were the most common knee injury among climbers of varying abilities. When the knee twists and rotates to an extreme extent (like when heel hooking) it is possible to damage them. Similar to the collateral ligaments, it is more common to damage the lateral (outside) meniscus over the medial (inside) meniscus.
Proximal tibiofibular joint
- The proximal tibiofibular joint has ligaments on the front and back that provide stability to the joint. Similar to an IT band injury, LCL injury, or biceps femoris injury, the hip out to the side in a strenuous position puts this structure on tension and at a greater risk. Proximal tib/fib injuries are less common than those aforementioned but do still occur while heel hooking.
Anterior Cruciate Ligament
- The ACL is a structure deep within the joint that connects the end of the femur with the end of the humerus. The ACL helps prevent excessive movement of the lower leg in a forward direction (anterior translation of the tibia on the femur) and is involved in extending the knee and rotational movements. This structure is the 3rd most common site to be injured while climbing but is less likely to be injured while heel hooking and, as such, won’t be covered in depth in this article (Lutter et al., 2020).
Signs and Symptoms
As we can begin to see, there are quite a few different parts of the knee that can be injured while heel hooking. After an injury, it is understandable to have some uncertainty when trying to figure out what the issue is. Fortunately, in this next section we will start to get a better idea of what each of these injuries could look like. It is important to note that when talking about what you feel or see (signs and symptoms) you don’t necessarily need to have all of the items listed to have a certain injury. Additionally, there may be more things that you are feeling that are not listed.
Injuries can vary in their severity, anywhere from minor strains that you recover from in a week to full blown ruptures that can be a multi-month recovery. As you read through this, if you are only feeling a few of these signs and symptoms it could indicate a more minor injury and if you are feeling all of these (and more!) it could indicate something more major. Keep in mind that each injury is unique and what you experience can present differently to what is presented below.
Muscles:
Hamstrings Muscle Injury
- After the injury, when you are climbing, you may feel pain or discomfort in the back of your thigh when you are actively pulling down on a hold, either with your toes or in a heel hook. This feeling may go away at rest or may linger. Additionally, you might feel your hamstrings when you are running or you may have a limp when walking. Any stretching or foam rolling of the area doesn’t feel very good.
Hamstring Muscle Injury (biceps femoris, semimembranosus, semitendinosus)
| Pain along the back of the thigh anywhere from your hip to your knee. | Limp while walking (depends on severity). |
| Swelling in the back of the thigh. | Difficulty/pain bending the knee. |
| Tenderness along the hamstring muscles (see above photo for approximate location). | Decreased strength when bending (flexing) the knee. |
| Bruising. | Sudden onset – can feel a lump in the back of the thigh if severe. |
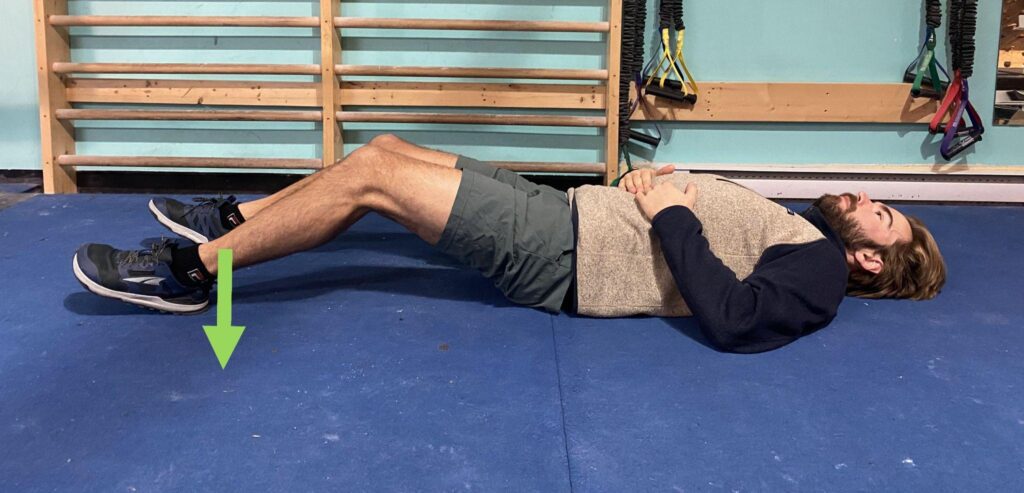
Aggravating movement to try at home:
Lie on your back with your knee bent and your heel pressing into the ground. This position can be quite painful if you have a hamstring muscle strain.
Hamstring Tendon Injury
- Similar to muscle strains in the hamstrings. However, the major differences will be the location of the pain; muscle strain injuries often occur in the middle of the thigh, where tendon injuries occur either up near the pelvis or down by the knee. Additionally, it is less common to have swelling and bruising with a tendon injury, but it still is possible.
- Aggravating movement to try at home: Lie on your back, hug your thigh to your chest and then straighten your knee. Pain up near the hip suggests a proximal hamstring tendon injury.
Popliteus Muscle Injury
- After the incident, when you are climbing you will notice it when turning your foot out towards the side (laterally) while heel hooking or climbing regularly. The area affected is quite specific to the back/outside of the knee. It can also be painful actively turning your foot to the inside (medially).
Popliteus Muscle Injury
| Swelling in the back/outside of the knee. | Pain while flexing the knee with the lower leg turned inward or outward. |
| Pain in the back/outside of the knee, more painful when rotating the tibia inward. | Tenderness along the popliteus muscle (can be difficult to properly locate). |
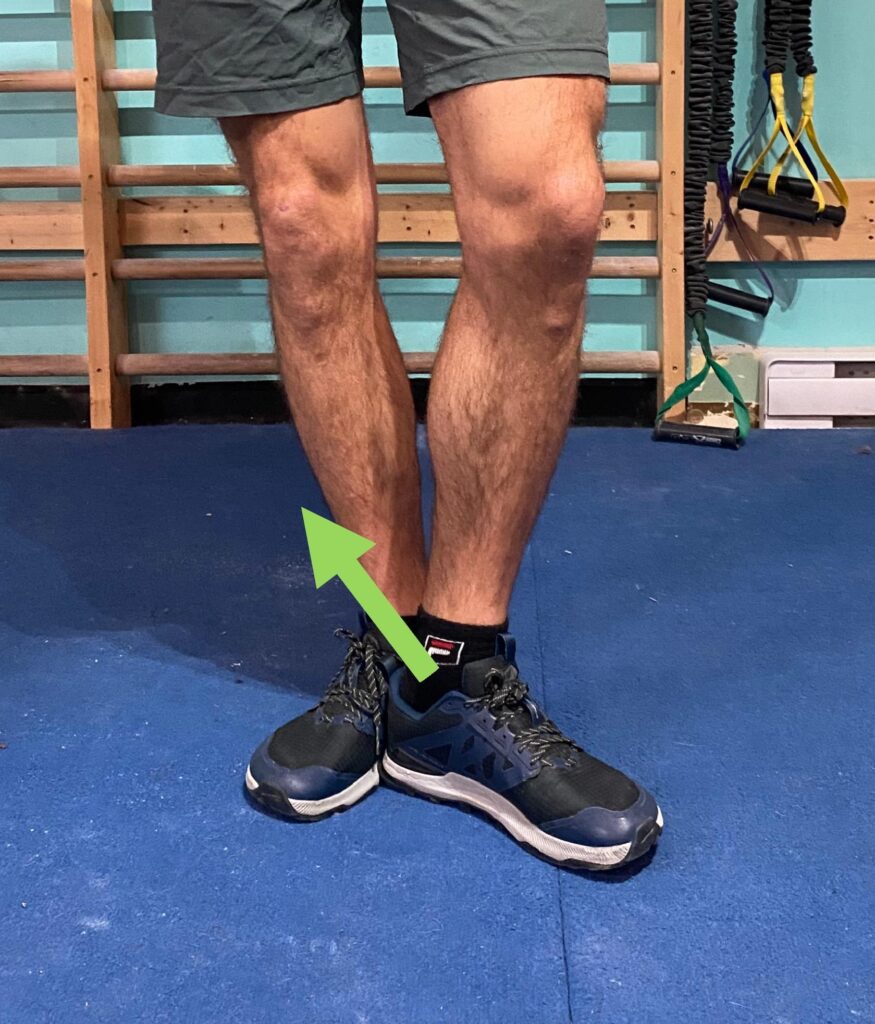
Aggravating Movement to try at home:
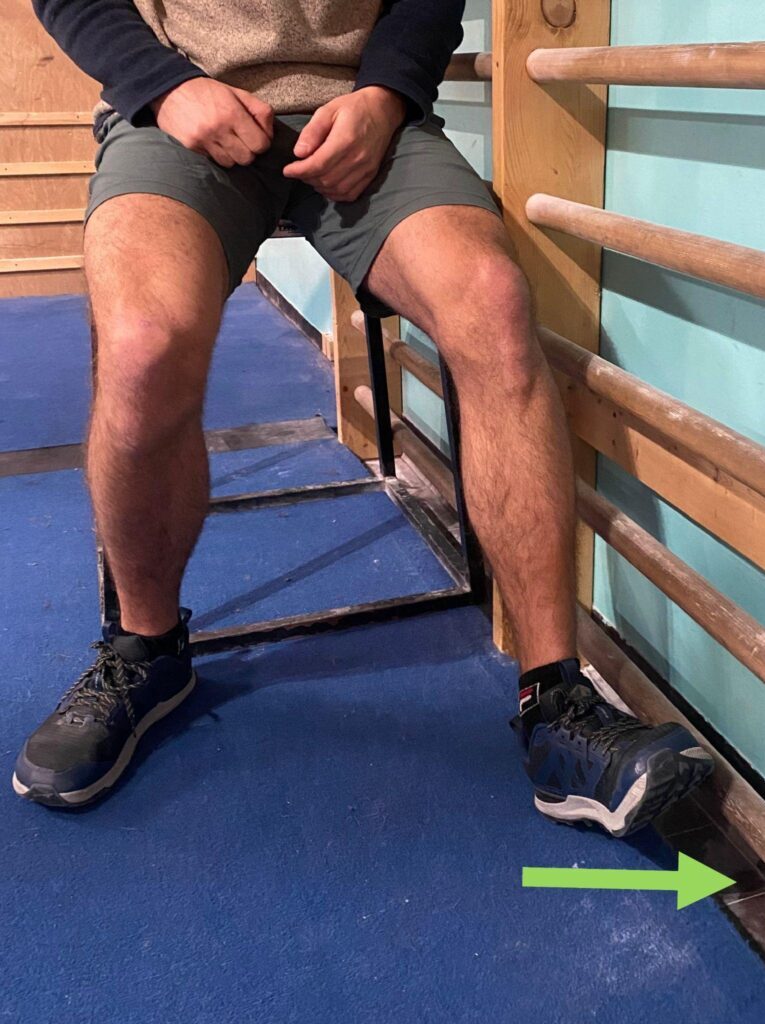
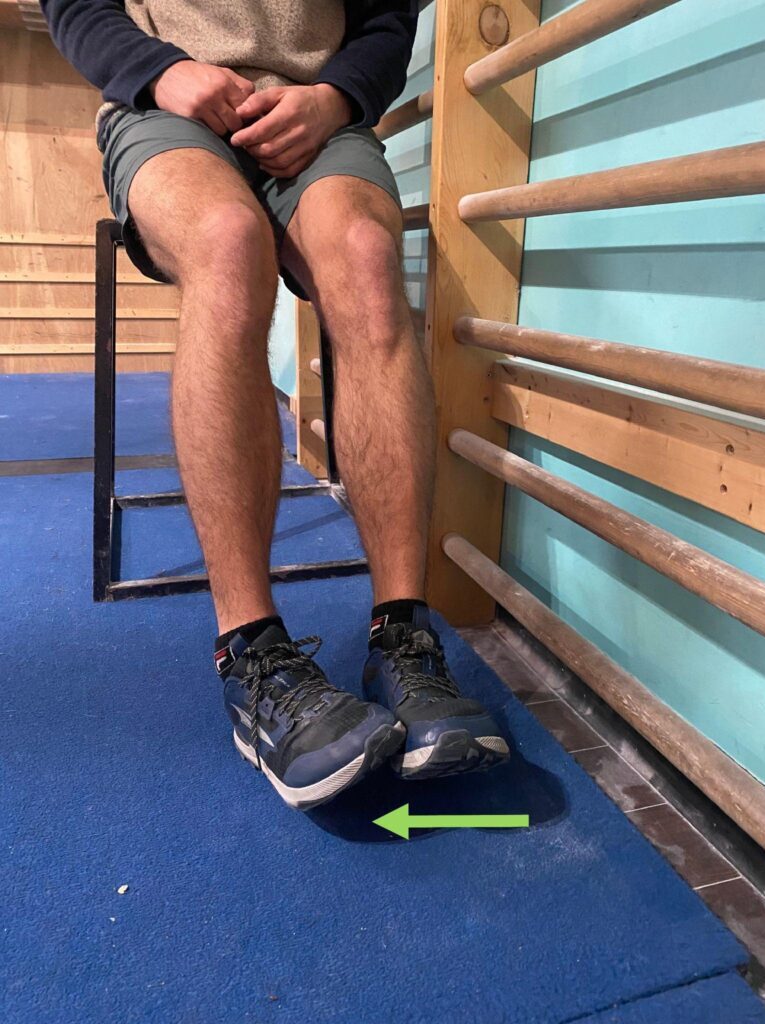
Shoe removal test: turn your hip to the outside, place the heel of your shoe against the inside middle of your other foot and then take off your shoe. Pain in the back of the knee indicates a popliteus muscle injury.
IT Band Injury
- After the incident you’ll notice it the most on the outside of your knee. The discomfort is more pronounced when you are focusing on extending through your hip while heel hooking. Additionally, you may feel it when climbing regularly and when you are really focusing on pulling your hips into the wall with your toes. This can be either quite a sharp pain or a more dull ache that tends to feel worse after you are done climbing.
IT Band Injury
| Pain at or just below the knee on the outside of your lower leg. Pain worsens during prolonged exercise or after exercise has stopped. | May or may not have been a specific movement or moment that caused the pain. May gradually worsened over time. |
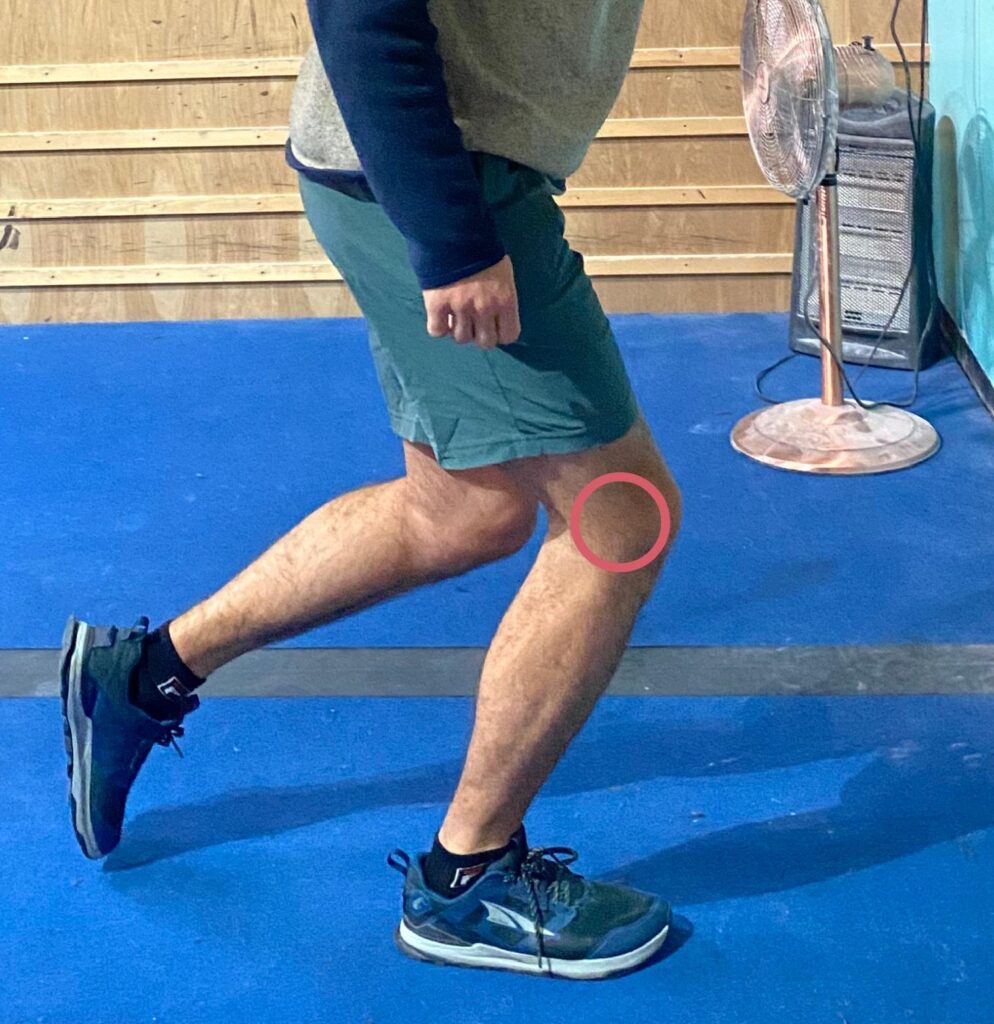
| Clicking/Snapping sounds or sensations when bending the knee. | Tenderness over the IT band attachment as shown in the photo below. |
| Worse with hiking long distances, running, or going down stairs. | Swelling on the outside of the knee. |
Aggravating movement to try at home:
Stand on one leg, squat a quarter of the way down (30-40 degrees), a positive test will aggravate the outside of the knee around the location of the IT band insertion.
Ligaments/Cartilage:
Meniscus Injury
- After the incident, when you are climbing, you will feel a general lack of stability in the knee; this will be apparent when jumping down off of a climb or when going into very deep knee flexion (such as a deep squat). Additionally, in more severe cases, you may experience a locking or catching sensation in the knee when you move it. Injuries to the meniscus can occur on both the inside (medial) or outside (lateral) of the knee, but while heel hooking lateral meniscus injuries are more common.
Meniscus Injury (lateral or medial)
| Occurs suddenly, often as a result of extreme twisting movements of the knee while it is bent. | Knee pain that is deep within the knee either on the inside (medial) or outside (lateral). |
| General swelling in the knee (try comparing it to the other side). | Difficulty/pain bending the knee with possible locking (unable to straighten or bend). |
| Clicking in the knee during flexion/extension or tibial internal/external rotation. | With the knee bent to 90 degrees there is tenderness when feeling around the meniscus (photo above). |
Aggravating movement to try at home:
1) Hold onto a countertop, standon one leg, do a quarter squat down and then rotate side to side.
2) Squat down as far as you can and then walk forward while trying to stay low.
LCL/MCL Injury
- The biggest difference in the signs and symptoms will be depending on if it is on the outside (LCL) or inside (MCL) of the knee. After the incident, when you are climbing, there will be a lack of stability on the sides of the knee. It may feel okay when you are really actively heel hooking, but if you are passively “hanging” off a heel hook, it will feel worse.
LCL/MCL Injury
| Occurs suddenly, often as a result of extreme knee flexion with inward or outward stress on the knee. | Difficulty/pain bending the knee and rotating side to side. Can have a limp on the injured side. |
| General swelling in the knee (try comparing it to the other side). | Tenderness on the inside or outside of the knee on the MCL/LCL, as pictured above. |
| Giving way of the knee or the knee feeling generally “loose”. | Reduced strength in the knee. |
Aggravating movement to try at home:
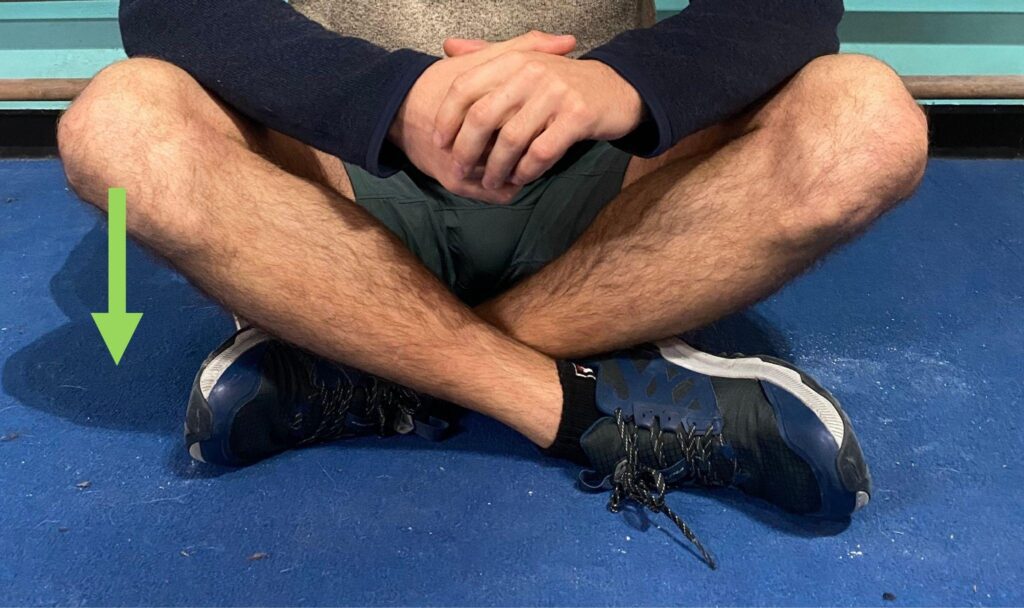
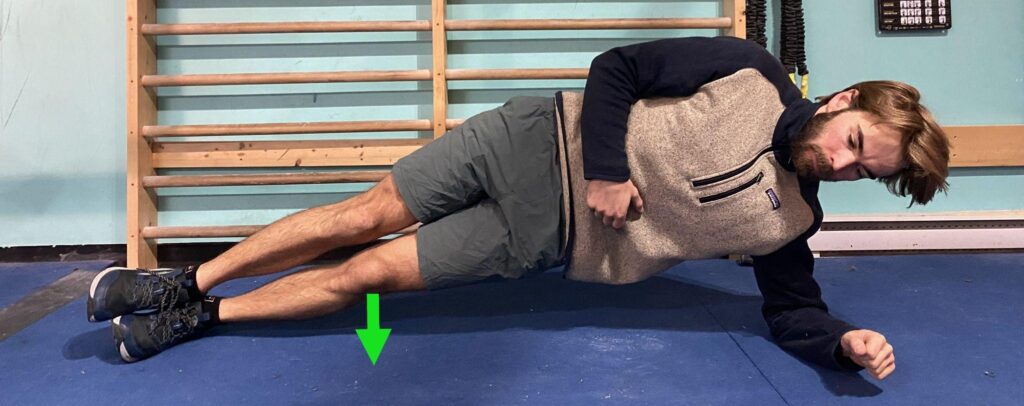
LCL: sitting cross legged OR side planking might cause pain on the outside of the knee. While walking knee can feel like it is collapsing outward.
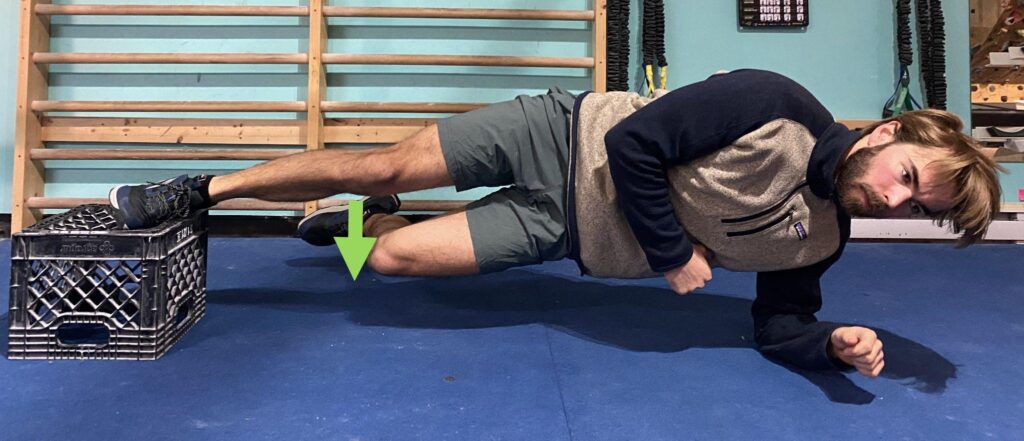
MCL: copenhagen plank might cause pain on the inside of the knee. While walking knee can feel like it is collapsing inward.
Proximal Tibiofibular Injury
- After the incident, you will feel general instability around the joint. Heel hooks with the hip out to the side (externally rotated) will increase pain and tenderness, but general climbing may feel okay. Additionally, you may feel it when jumping off of boulders or doing other high impact activities such as running/hiking.
Proximal Tibiofibular Injury
| Injury came on suddenly. | Weakness and/or pain when moving ankle to the outside (eversion). |
| Pain at the proximal tibiofibular joint as pictured above. | Tenderness along the edge of the joint line as pictured above. |
Aggravating movement to try at home:
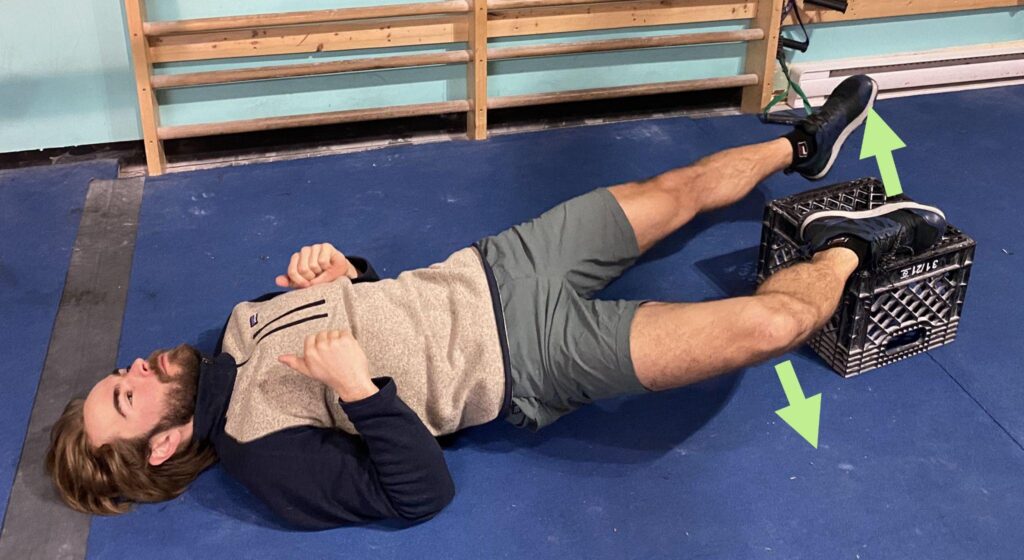
Deep two legged squat or, heel hooking with the hip to the outside (externally rotated) and the ankle to the inside (inverted). Pain at the superior tibiofibular joint can be indicative of an injury.
See a Medical Provider
As you can see, there are a lot of different symptoms that could be involved in an injury to the knee and it can be confusing trying to hone in on exactly what is going on. It is important to note that every presentation is different, and if you are left with uncertainty about what might be wrong then it may be worthwhile to book an appointment with a physical therapist who specializes in these types of climbing injuries to get properly assessed. Starting a rehab program for the wrong injury may cause more harm than good.
Injury Recovery: The Rock Rehab Pyramid
Now that we’ve got an idea of what our particular injury is, we can move on to starting to recover from it. For those unfamiliar with The Rock Rehab Pyramid, it is a framework that can be used to help an athlete progress right from the onset of their injury all the way to returning to sport. It was developed by physical therapist and rock climber Dr. Jared Vagy in his book Climb Injury-Free. This rehabilitation system breaks down the recovery process into four distinct levels with general rules used to determine if a climber can progress or regress between levels. As pictured, the rock rehab pyramid begins right after injury with the unload phase focusing on managing pain, inflammation and tissue overload, these techniques are used to give the injured tissue time to heal. The second level is the mobility phase which places emphasis on breaking up fibrotic adhesions and promoting tissue mobility. The third level is the strength phase which aims to build strength and help prevent future injury. The final level is the movement phase where technique and movement strategies are introduced to promote proper movement mechanics.
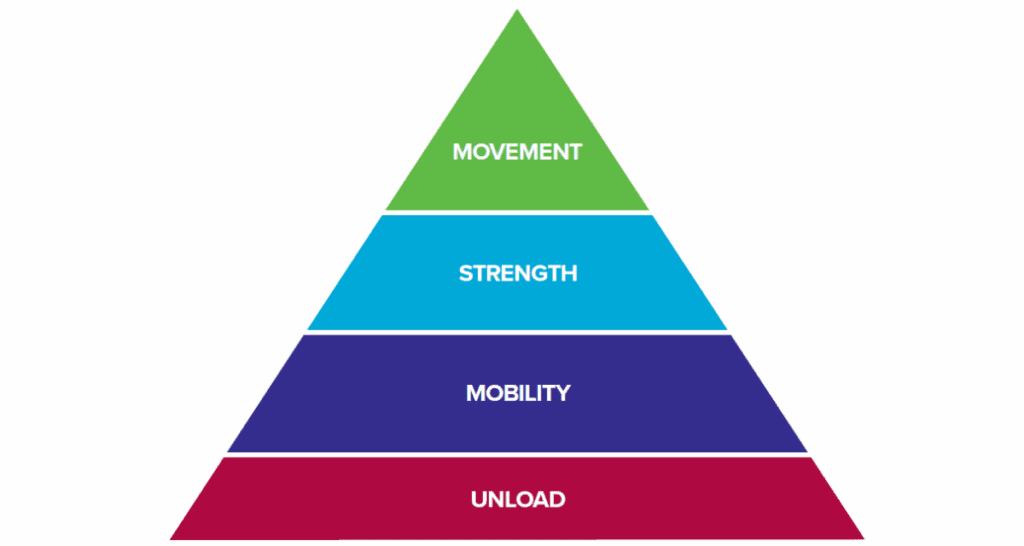
It is important to note that progression through The Rock Rehab Pyramid is not linear. Just because you may have progressed through the mobility phase quickly does not indicate that the strength and movement phases will follow a similar pattern. How you feel on a daily/weekly basis will be the guiding factors that dictate whether you progress or regress in your recovery plan. Any increase in pain and symptoms that are long lasting (greater than a few hours or a day) indicate that you have done too much and need to regress exercises, weights, or sets/reps. Symptoms that are elevated immediately after a workout but settle down within an hour or two OR symptoms that are remaining consistent to your baseline is an indication that you have found the sweet spot in loading and should stay at that level. Finally, symptoms that are gradually decreasing or exercises that are starting to feel easy should be progressed. The transition from one stage to the next does not need to be sudden, for example once the mobility exercises are feeling pain free and you are able to move in a similar way to your unaffected side, you can try adding in one or two of the strength exercises to see how it feels before adding in more. It is better to progressively add in exercises and increase intensity slowly as opposed to trying to do it all at once and setting yourself back in your recovery.
1. Unloading Phase: Pain, Inflammation and Tissue Overload:
At the start of an injury our bodies just need PEACE and LOVE (google it!). In this phase we need to focus on protection, ensuring our body is healing optimally, and moving the body within a pain free range. This phase can look different for the injuries listed previously, we’ll leave it up to you to find ones that feel okay and aren’t too strenuous on the area.
These are:
- Easy biking with minimal resistance
- Start with 5-15 minutes once a day and build up from there. It should not aggravate your injury.
- Heat
- Hot pack to the area 2-3 times a day. Be sure to check your skin to make sure there’s no skin damage.
- Ankle pumps
- Move your ankles up and down twenty times, 3 times a day to promote fluid movement through the area.
- Active Assisted Range of Motion (AAROM) knee flexion/extension/tibial rotation
- AAROM means that you are doing as much as you can to actively take your joint through as much range as possible and then using something (towel/hands/etc.) to passively take your joint the rest of the way.
- Knee Extension AAROM – 20 reps, 3 sets, 2x/day
-
- Knee Flexion AAROM – 20 reps, 3 sets, 2x/day
-
- Tibial AROM – 20 reps, 3 sets, 2x/day
- Crutches if walking is challenging and/or painful.
- Focusing on sleep/nutrition/reducing stress.
- These are often overlooked factors that can greatly impact your recovery. Take care of your body and it will help your recovery timeline.
2. Mobility Phase: Mobility exercises
This phase aims to introduce area specific movement and begin re-teaching the body that it is okay to move in directions that were provoking initially. A little bit of discomfort is okay during these exercises as long as it goes away quickly after stopping.
Hamstrings:
- Prone knee flexion Active Range of Motion (AROM) Prone Knee Flexion – 20 reps, 3 sets, 2x/day
-
- Lying on your stomach, bring your foot towards your bum holding the top position for a few seconds. If your hamstrings start to cramp ease off and resume once things have settled.
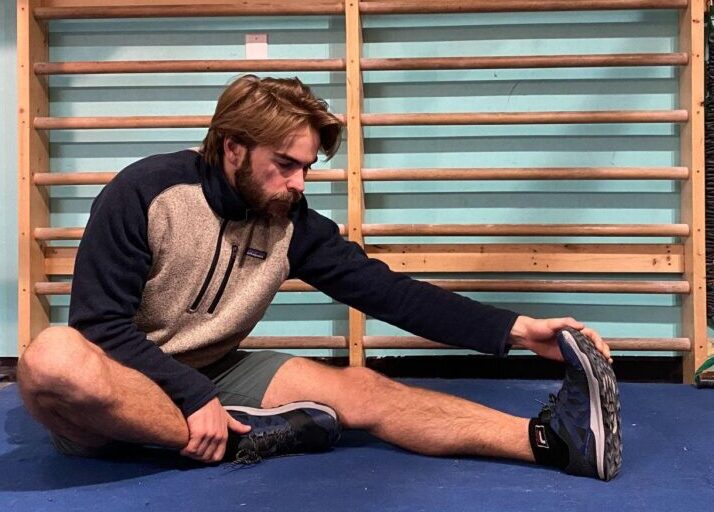
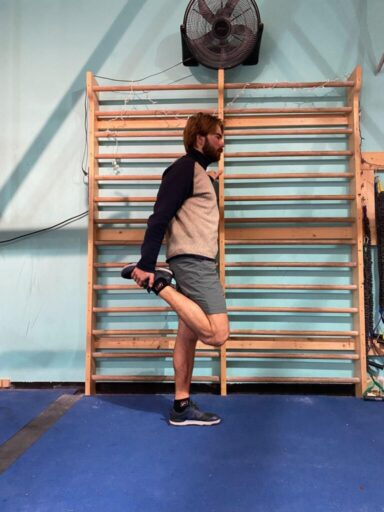
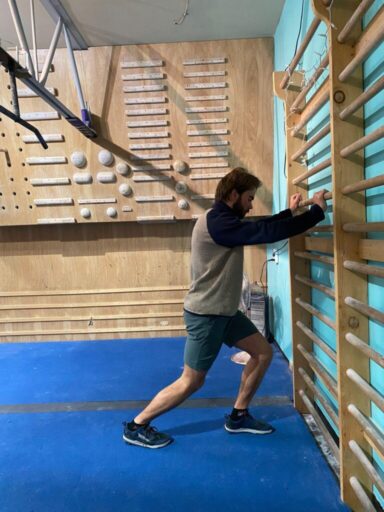
- Light stretching of hamstrings/quads/calves – 30-60 seconds holds, 3-5 sets, 2x/day
- Hamstring Sweep – 20 reps, 3 sets, 2x/day
Popliteus:
- Tibial AROM – 20 reps, 3 sets, 2x/day
-
- Make sure your knee isn’t moving while you do this!
- Popliteus Release – 1-2 minutes, 3 sets, 2x/day
-
- Try to place the ball near the outside part of the back of the knee. Find the tight spots and relax into it as much as you can.
IT band:
- TFL release – 1-2 minutes, 3 sets, 2x/day
-
- TFL is shown in the video here. For glute release just place the ball further underneath you. Find the tight spots and relax!
- Lunge with knee on foam roller – 10 reps, 3 sets, 2x/day
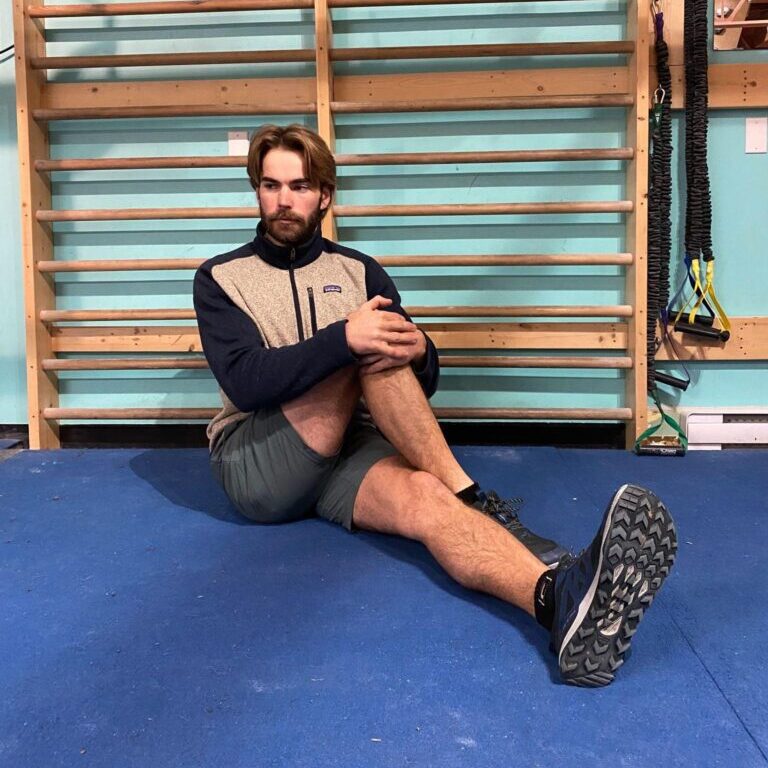
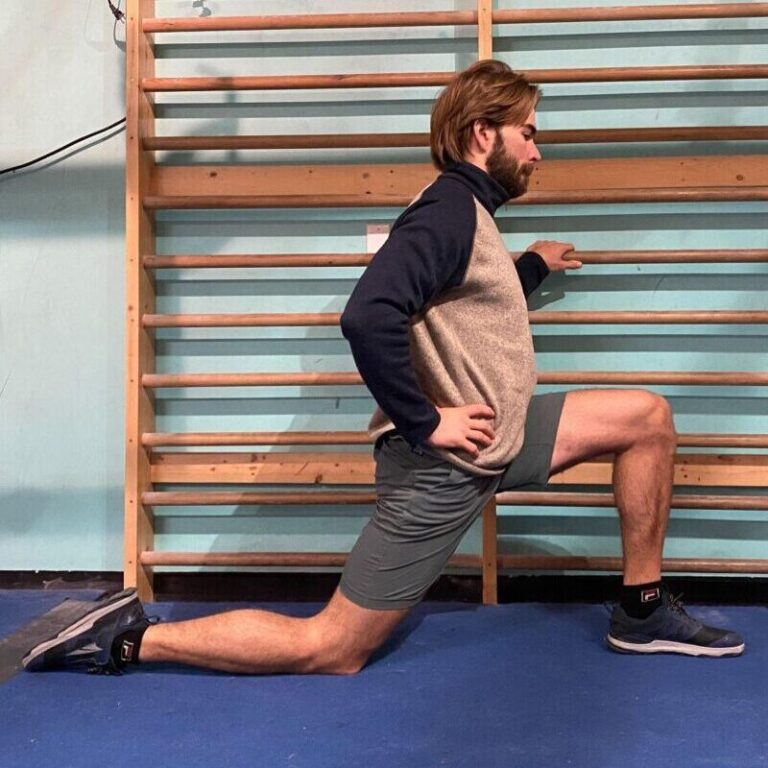
- Hip flexor and glute stretches – 30-60 seconds, 3-5 sets, 2x/day
Meniscus:
- Tibial AROM – 20 reps, 3 sets, 2x/day
-
- Make sure your knee isn’t moving while you do this!
- Heel Slides – 20 reps, 3 sets, 2x/day
- Quads Over Roll – 20 reps, 3 sets, 2x/day
- Popliteus Release – 1-2 minutes, 3 sets, 2x/day
-
- Try to place the ball near the outside part of the back of the knee. Find the tight spots and relax into it as much as you can.
LCL/MCL:
- Wall Heel Slides – 20 reps, 3 sets, 2x/day
-
- Same as regular heel slides but up against the wall allows you to get a bit deeper into the movement.
- Knee CAR (Controlled Articular Rotations)
-
- Follow along with this video. Complete 2-3 times, 2x/day
- Hamstring/Calf/Quads/Groin stretches (photos listed previously) Groin Stretch
-
- 30-60 seconds OR 10-20 reps, 3 sets, 2x/day
Proximal Tibiofibular:
- Fibularis Stretch – 10 reps, 3 sets, 2x/day
- Biceps Femoris Stretch – 30-60 seconds, 3 sets, 2x/day
-
- Follow along with this video. Complete 2-3 times, 2x/day
3. Strength Phase: Strength Exercises
- The strength phase aims to regain function and build up your tissues capacity to endure load. Typically, from a rehab standpoint, we are aiming to get to a place of ~90% of the strength on the non-injured side. This phase can take a considerable amount of time and exercises should be progressed to continuously challenge the affected area.
Hamstrings:
- Standing Knee Flexion – 10 reps, 2-3 sets, 1x/day
-
- Don’t let your hips come forward. Can attach a band or use ankle weights to make it harder.
- Glute Bridge Variations – 10 reps, 2-3 sets, 1x/day
- Cable Knee Flexion with Internal and External Rotation – 10 reps, 2-3 sets, 3x/week
-
- 10 reps of internal and external rotation.
- Nordic Curls – 6 reps, 2-3 sets, 3x/week
-
- Only go as far down as is comfortable before falling to the ground. If you have a nordic machine that takes off weight and allows you to go through full range of motion even better!
Popliteus:
- Tibial IR/ER isometrics – 30 seconds, 2-3 sets, 1x/day
- Banded/Cable tibial IR/ER
- Banded Tibial External Rotation – 10 reps each, 2-3 sets, 1x/day
-
- Banded Tibial Internal Rotation – 10 reps each, 2-3 sets, 1x/day
- Lunges with Tibial Rotation – 10 reps, 2-3 sets, 1x/day
- Banded Side Steps – 30-60 seconds (each way), 2-3 sets, 1x/day
- Cable Hip Extension – 10 reps, 2-3 sets, 1x/day
- Cable Hip Abduction – 10 reps, 2-3 sets, 1x/day
- Single Leg Step Ups – 10 reps, 2-3 sets, 1x/day
- Single Leg Step Downs – 10 reps, 2-3 sets, 1x/day
Meniscus:
- Full Depth Squats – 6 reps, 2-3 sets, 1x/day
- Cable/banded tibial IR/ER
- Banded Tibial External Rotation – 10 reps each, 2-3 sets, 1x/day
-
- Banded Tibial Internal Rotation – 10 reps each, 2-3 sets, 1x/day
- Pistol squats Pistol Squats – 6 reps, 2-3 sets, 1x/day
- Duck Walk – 30-60 seconds, 2-3 sets, 1x/day
LCL/MCL:
- Single Leg Calf Raises – 10 reps/side, 2-3 sets, 1x/day
- Banded/Cable tibial IR/ER
- Banded Tibial External Rotation – 10 reps each, 2-3 sets, 1x/day
-
- Banded Tibial Internal Rotation – 10 reps each, 2-3 sets, 1x/day
- Glute Bridge Variations – 10 reps, 2-3 sets, 1x/day
- Single Leg Step Ups – 10 reps, 2-3 sets, 1x/day
Proximal tibiofibular:
- Banded Ankle Eversion – 10 reps, 2-3 sets, 1x/day
- Standing Knee Flexion – 10 reps, 2-3 sets, 1x/day
-
- Don’t let your hips come forward. Can attach a band or use ankle weights to make it harder.
- Single Leg Step Ups – 10 reps, 2-3 sets, 1x/day
- Single Leg Step Downs – 10 reps, 2-3 sets, 1x/day
4. Movement Phase: Movement Exercises
Movement exercises are intended to “apply” the strength that was built in the strength phase in a climbing specific way. The movements can vary in their intensity and should be done as part of your warm-up. These movements exercises have been clumped together for all knee injuries. Find the ones that are hard for you and work on those!
- Heel Hook Isometrics – 2-5 sets, 3x/week
-
- Holding onto positive holds, place your heel on a variety of different footholds, actively engaging on the hold for 5s. Aim to cycle between a few different holds per repetition.
- Heel Hook Pull Throughs – 2-5 sets, 3x/week
-
- Similar to the isometric exercise but this time actually pull on on the heel and lock off. Can take an arm off and hold the end position for a few seconds to really engage the heel hook.
- Heel Hook Tibial ER – 2-5 sets, 3x/week
-
- This video aims to just show different amounts of tibial ER. Play around with heel hooking with varying amounts of tibial ER. This exercise is especially useful for those with popliteal, meniscus, and proximal tibiofibular injuries.
- Heel Hook Hip Extension – 2-5 sets, 3x/week
-
- Instead of trying to actively bend your knee while heel hooking, try to extend through your hip to engage your glutes. Similar motion to the heel hook pull throughs, hold the end position for a few seconds
- Heel hooking with different amounts of knee flexion – 3-5 sets, 3x/week
- The amount of knee flexion you have will alter the amount of engagement through the muscles around the knee. Vary the angle of knee flexion to prepare for your knee for the varying nature of climbing heel hooks!
- Heel Hook Extensions, moving from shortened to lengthened – 3-5 sets, 3x/week
-
- Similar to the previous exercise but this time you are moving from a shortened to lengthened position by just moving your hands further and further away.
- Heel Hook Warmup – 3-5 sets, 3x/week
-
- Climb warm ups only using heels. Do this after a thorough off/on the wall warm up and practice it on a variety of wall angles and terrain.
Proper Heel Hook Technique
There are many different ways to heel hook, with some being more stressful to structures of the knee than others. Due to the myriad of positions that we find ourselves in while climbing, there likely isn’t a right or wrong way to heel hook and the application of different heel hooking techniques will be situationally dependent. With that being said, there are a few positions that often occur during climbing that the climber should be aware of that places the knee in a more vulnerable position. These positions should be used sparingly or with awareness that they are more prone to injury.
Some of the things that we want to be aware of when heel hooking are:
-
- Tibial external rotation is when the shin twists out to the side while the knee is still facing forward. This can be problematic as it significantly stretches the popliteus muscle (remembering that the lateral meniscus is also attached to this muscle). Excessive use of this heel hooking technique can lead to pain on the outside of the knee, popliteus muscle strains, and in more extreme cases lateral meniscus tears. Instead of only using tibial external rotation, try opening up the entire hip to the side (hip external rotation). This ensures that bigger muscles are being used and avoids overstraining a single structure.
- Passively Heel Hooking without active engagement (“Resting the heel onto the hold”)
-
- When you are passively hanging off a heel hook, the general stability of the knee is decreased, placing additional strain on the inert (non-contractile) structures of the knee. By actively trying to engage the hamstring/calf muscles it increases the stability of the knee, reducing the risk of injury.
- Heel Hook Deep Knee Flexion
-
- This ties into the previous point. When a climber is heel hooking with the knee maximally bent, the hamstring muscles are in a weakened position, meaning that it is more challenging for them to engage effectively. As a result, these positions can rely more heavily on passive structures than active structures, decreasing the general stability of the knee.
- Heel Toe Cam
- While not necessarily a bad thing, where heel toe camming can lead to injury is when the climber falls, but the heel-toe cam does not immediately release. The possible injured structures can be both at the ankle and the knee. When using a heel-toe cam, we want to be cognizant of how we will get out of the position in the case of a fall.
Prehab
For those of you that are currently healthy or nearing the end of your recovery, and interested in learning about what you can be doing in your warm ups and training to reduce the risk of injury while heel hooking, then this section is for you! Here is a generic warm up for the lower extremity that I’ve found useful, as well as some exercises that can be incorporated into your training. These exercises can be done on your climbing days at the end of your session, or on a non-climbing day. It will take time to find the right sets and reps for your current strength levels, and I encourage you to start things slowly and build gradually. The videos for the exercises below have been linked earlier in the article.
Warm up
- Glute bridges 2 legs then 1 leg with active pulling towards your glutes – 10 reps of 2 legs, and then 10 reps/side of 1 leg.
- Standing knee flexion isometrics (banded or ankle weights if too easy) – 10 reps
- Squats and calf raises, bodyweight – 10 reps of each
- Heel hook isometrics – 3-4 reps each side
- Heel hooks pull throughs – 3-4 reps each side
- Warm up climbs using only heels – 2-4 reps
Strength and Conditioning Program – complete these exercises at a high intensity 1-2 times per week.
- Cable hamstring curls – 10 reps, 2-3 sets
- Squats with full depth – 6 reps, 2-3 sets
- Banded tibial inversion/eversion – 10 reps, 2-3 sets
- Nordic Curls – 6 reps, 3 sets
- Single leg step ups/downs with proper knee tracking – 10 reps, 2-3 sets
- Heel hook movement drills – choose two or three of the above movement exercises
See a Physical Therapist
This article aims to educate the reader on potential injuries at the knee while heel hooking and some potential treatment strategies that you can do on your own. Ensuring that you have the right diagnosis and treatment plan that is specific to your injury is essential for proper healing. If you have uncertainty over what’s going on, nothing compares to the expertise that a physical therapist that specializes in climbing injuries can provide. It is well worthwhile booking an appointment and getting properly assessed if you have some doubt about what is going on with your specific injury.

Author Bio
Dawson is a physiotherapist based in Squamish, B.C., Canada who has a special interest in climbing, running, and skiing injuries. To book in with Dawson for an in-person or online assessment, click the links here for his Squamish based clinic, and here for his Horseshoe Bay based clinic. When not in the clinic, Dawson can be found playing in the mountains on snow, trail, and rock, and taking advantage of the many things that make the Sea to Sky so special.
The Research
Lutter C, Tischer T, Cooper C, et al. Mechanisms of Acute Knee Injuries in Bouldering and Rock Climbing Athletes. Am J Sports Med. 2020;48(3):730-738.
- Disclaimer – The content here is designed for information & education purposes only and the content is not intended for medical advice.

