Clinical Management of MCP Joint Collateral Ligament Injury in Rock Climbers
You’ve reached the upper crux on your first red point burn on your project. You’re pumped and you’re starting to get a little sloppy with your movement and coordination. You make a dynamic cross move throwing your hand up and across your body to the next hold, but your accuracy has gone out the window and your finger impacts a protruding section of the wall between the holds causing you to miss the hold. You immediately notice pain in your finger joint where the finger connects to the hand. After a few days the pain is still there and you’re starting to think you may have sustained a significant injury. It is possible that you have sustained an injury to a collateral ligament of your metacarpophalangeal (MCP) joint. This article discusses ways to help you rule in/out this diagnosis, and what you should do about it.
Relevant Anatomy
In order to understand this injury it’s helpful to understand the anatomy of the MCP joint. The MCP joint is the joint that connects your finger to your hand. It connects your proximal phalanx (finger bone) to your metacarpal (hand bone). Collateral ligaments run diagonally on each side of this joint, connecting to the proximal phalanx on the palm side and the metacarpal on the back side of your hand. Finger collateral ligaments come in pairs, and are located on either side of the joint. There are also collateral ligaments in the other joints of the finger and other parts of the body, but this article focuses on the MCP collateral ligaments. For more information on collateral ligament injuries at other finger joints, see this article by Dr. Jared Vagy.
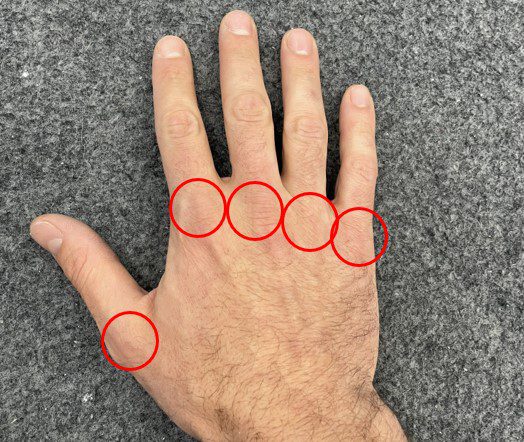
Image 1. Photo identifying Metacarpophalangeal (MCP) joints of the fingers and thumb.
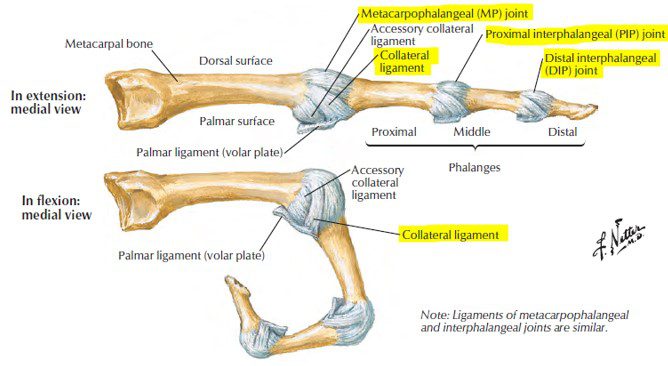
Image 2. Ligament anatomy of finger joints.
Netter, Frank H. (2014). Atlas of human anatomy (6th).
Mechanism of Injury
Injury to the MCP collateral ligaments is typically caused by a forceful sideways movement of the finger while it is flexed at the MCP joint. This can occur during dynamic climbing movements when your finger impacts the wall or another hold as you bump or throw for your next hold. Additionally, repetitive crimping with improper finger positioning can lead to increased stresses and microtrauma of the ligamentous structures of the fingers. Although you’re unlikely to injure a collateral ligament as a result of improper crimping, it can weaken the ligaments making an injury more likely.
Generally, any finger position resulting in rotation of the finger relative to the hand is going to stress the collateral ligaments of the MCP joint. This rotation can’t be completely avoided during climbing, but we can minimize the stress it puts on our collateral ligaments by focusing on good finger mechanics and strong hand musculature. There are some common climbing positions and hold types that are more likely to result in excessive collateral ligament stress, such as vertical or diagonal holds requiring a lot of downward force (Image 3), oddly shaped holds requiring you to spread your fingers (Image 4), finger jams, or wide lateral moves where the fingers on the trailing hand are forced to pivot to accommodate body movement.
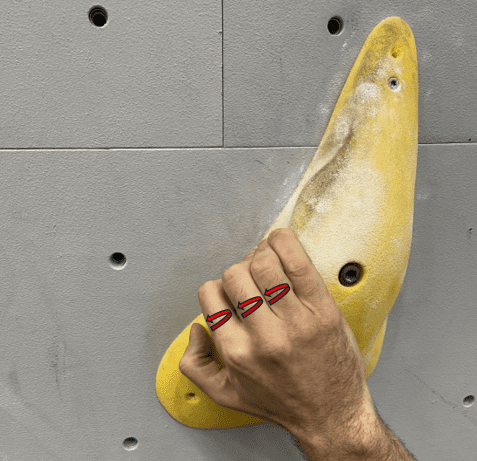
Image 3. Diagonal hold requiring downward pull resulting in rotational stress at MCP joints.
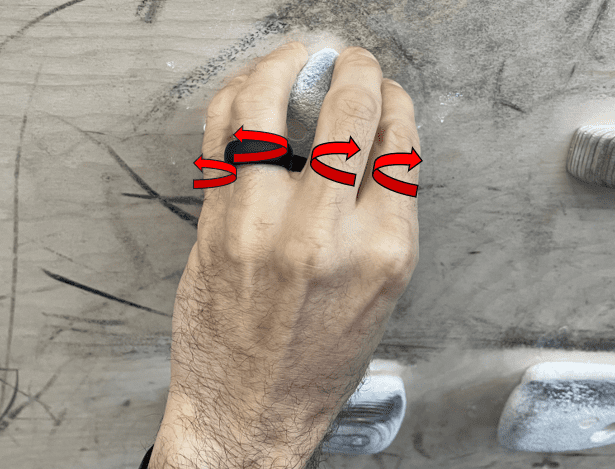
Image 4. Oddly shaped hold requiring fingers to spread and causing rotation at MCP joints.
Signs and Symptoms
Collateral ligament injuries at the MCP joint typically result in swelling and tenderness in the area of the injury. You might also notice a feeling of instability in the joint, especially when the joint is fully flexed and a sideways force is applied to the injured finger in the direction away from the painful side of the joint. For example, when pinching something between the injured finger and your thumb in the case of a radial-sided injury (on the “thumb side” of the joint) as shown in the image below.
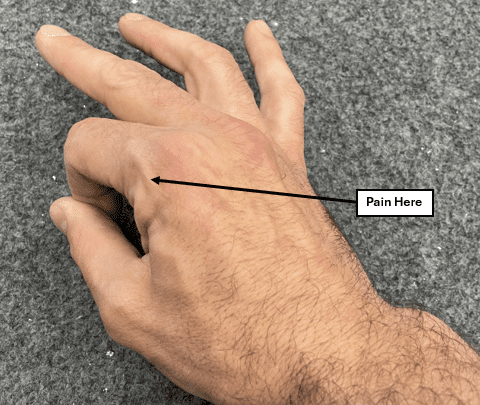
Image 5. Painful pinch test for pain on the thumb side of the MCP joint of the pointer finger.
While climbing you may experience pain or feelings of joint instability with diagonal or vertical holds or while dynamically transitioning between holds, as these movements can create torsion and horizontal forces through a flexed MCP joint. Finger jams and ring locks in thin cracks are also likely to feel painful or unstable. However, horizontal holds with the fingers parallel and in the neutral position may be completely pain free. The photos below show a half crimp position with proper finger alignment (Image 6) vs one example of improper finger alignment (Image 7).
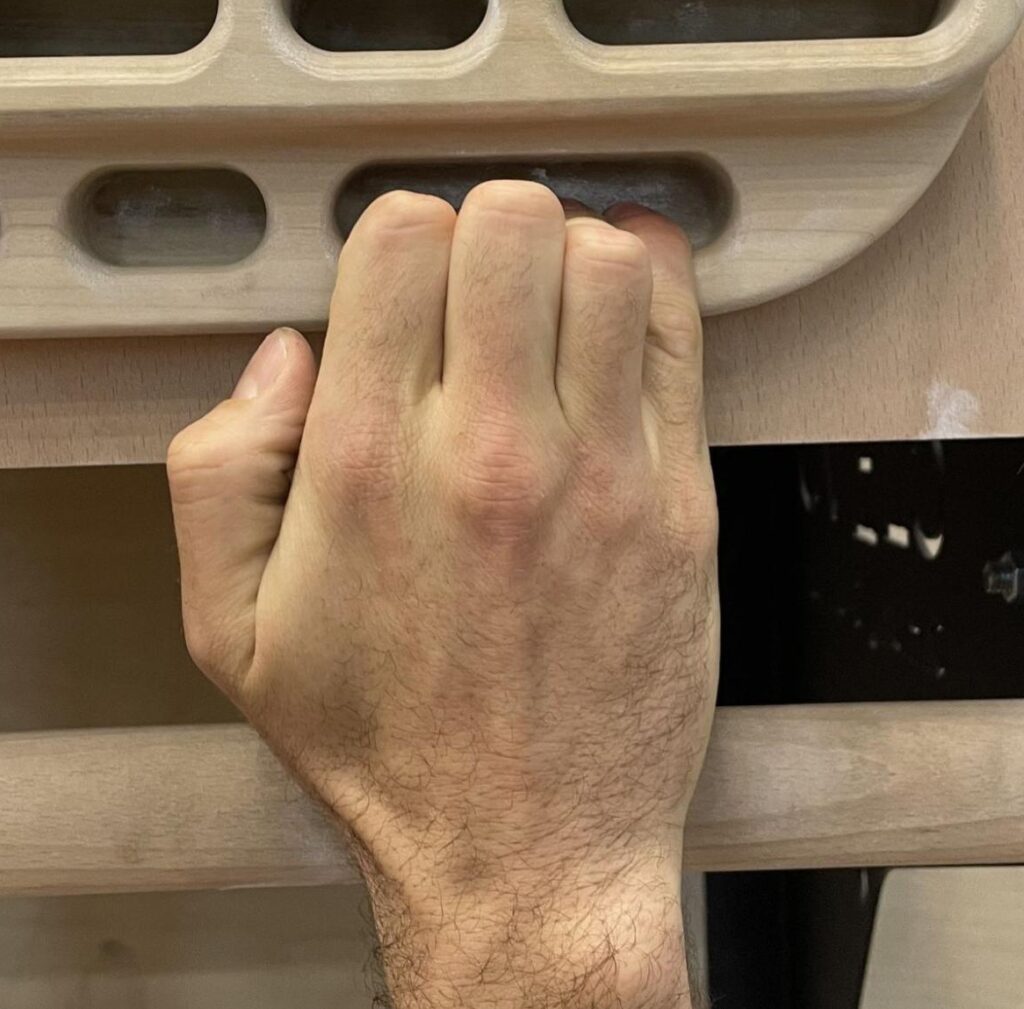
Image 6. Half crimp position with proper finger alignment.
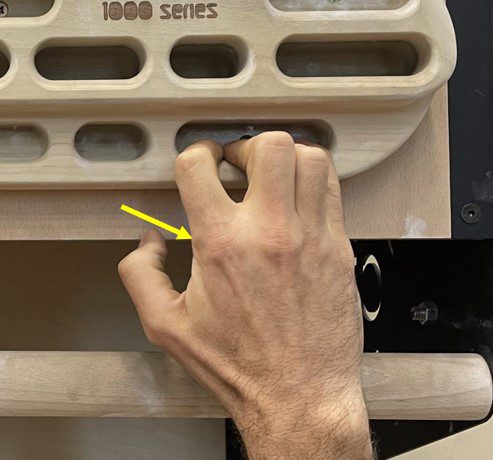
Image 7. Half crimp position with improper finger alignment. Added stress on collateral ligament on thumb side of pointer finger (arrow).
Assessment
To determine if your MCP pain is caused by a collateral ligament injury, your physical therapist or physician may apply a gentle sideways force to the injured finger while the finger is flexed to 90 degrees at the MCP joint. We will call this the lateral stress test. The force should be applied in the direction away from the painful side of the joint. The test is then performed on the same finger on the uninjured side to compare the amount of laxity present in the injured joint relative to the uninjured joint. A video example of a lateral stress test of radial (thumb-side) collateral ligament of a pointer finger can be found here.
Although the pointer finger is referenced throughout this article, collateral ligament injuries can occur at any finger, with the pointer and pinky being most prominent.
Collateral ligament injuries are categorized as grades I, II, or III as described below:
Grade I: Joint is painful or tender to the touch, but no joint laxity is observed relative to the same finger on the uninjured hand during the lateral stress test.
Grade II: Joint laxity with a firm end feel is observed relative to the same finger on the uninjured hand during the lateral stress test. In other words, there is more horizontal motion in the injured finger than in the uninjured finger, and a firm resistance to the applied force will be felt at the end range of the joint’s available motion.
Grade III: Joint laxity with no firm end feel is observed relative to the same finger on the uninjured hand during the lateral stress test. The joint will feel unstable when tested, and the injured finger may even have a resting deviation away from the painful side of the joint.
It is important to remember to be gentle when performing this test. The amount of force applied should generally be thought of in terms of ounces, not pounds. Although this test may elicit some discomfort it should not be extremely painful. If you are experiencing a high level of pain during this test, stop and immobilize your finger with a splint (described below) and contact a health care provider, such as an orthopedic specialist or certified hand therapist.
Diagnostic imaging such as MRI, CT, and ultrasound may be used to help diagnose a collateral ligament injury. These imaging methods are also helpful in ruling in/out other potential injuries such as fractures and dislocations.
The Rock Rehab Pyramid
The Rock Rehab Pyramid was developed by Dr. Jared Vagy, and provides a general guideline that climbers can use to direct their rehab progression. The Rock Rehab Pyramid does not take the place of the advice of an experienced clinician, but it can be helpful in determining when to progress, regress, or maintain your current level in your rehab program. As illustrated in the diagram below, each level of the pyramid represents a stage in the rehab process and builds upon the previous level.

Image 8. The Rock Rehab Pyramid.
Recovery should be assessed on a daily basis. If you are experiencing an increase in pain or soreness, you should regress back to a level in the pyramid that doesn’t result in increased pain. If your current level in your rehab program does not result in an increase in pain or soreness, stay at that level for one to two weeks before progressing to the next level. Note that it is not uncommon for joint tenderness after a collateral ligament injury to persist for 6 to 12 weeks, and pain with forceful gripping can last up to a year. Remember that low levels of pain and soreness are to be expected, and are not necessarily indicative of further damage.
Pain during the unloading phase should be kept to an absolute minimum, and pain in the mobility, strength, and movement stages of your rehab should be kept to a 1 out of 10, or a slight discomfort. Brief periods of pain up to 2 out of 10 may be experienced, but these should be inconsistent and kept to a minimum. The graphic below can help you interpret what level of pain you’re feeling from zero to 10.
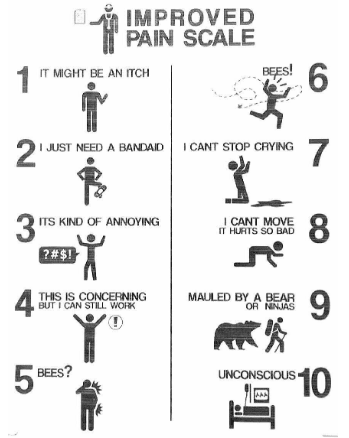
Image 9. The Improved Pain Scale.
https://www.reddit.com/media?url=https%3A%2F%2Fi.redd.it%2Fqsyk59t9bxjz.jpg
With the exception of the unloading phase, the rehab protocol described below is the same for Grade I and II injuries. Treatment of Grade III collateral ligament injuries is not discussed in this article, and often requires surgery due to the extent of the tissue injury. Additionally, the outcomes reported for surgical repairs for Grade III injuries were better for patients who had the surgery within 4 weeks of the injury, so time is of the essence. If you are suspicious of a Grade III collateral ligament injury, immobilize your finger using a two finger gutter splint as described below until you can see your orthopedic specialist or certified hand therapist. If you suspect that your MCP joint might have become dislocated, do not attempt to relocate it, as this can result in serious additional complications.
The table below provides an example timeline for when each phase of a Grade I injury rehabilitation plan should be active. Remember that everyone’s timeline will be slightly different based on how their body reacts to each phase, so listen to your body and regress, maintain, or progress accordingly.
| Unloading Technique | Mobility Exercises | Strength Exercises | Movement Exercises | |
|---|---|---|---|---|
| Day 0 – Day 14 | Immobilization | 3 x a day | Not Yet | Not Yet |
| Day 15 – Recovered (12 weeks or more) | Buddy Tape | 3 x a day and as a warmup for strength and movement phases | As discussed in article below | As discussed in article below |
Unloading Phase
The rehab program should begin with an initial period of immobilization using a two finger gutter splint with the fingers flexed to 30 degrees at the MCP joint. The adjustable two finger gutter splint in the image below is available on amazon for $16, but other options can work just as well. The table below described the recommended splinting schedule:
| Grade I | Wear splint at all times (including when sleeping) for 2 weeks* |
|---|---|
| Grade II | Wear splint at all times (including when sleeping) until no joint laxity is found on assessment (typically 3-4 weeks)* |
*splint may be removed for mobility exercises
After the splint is removed, buddy taping should be used at all times up to the 6 week mark, including while sleeping. When possible, the injured finger should be taped to the adjacent finger on the side of the injury. However, this isn’t always possible for the index or pinky finger, which can just be taped to the middle or ring finger, respectively.
When climbing, buddy taping should be used until the ligament has fully healed. I recommend using the “double X” method shown below, as it tends to stay in place better than other methods. However, when not climbing, two simple loops of tape above and below the middle knuckle will get the job done. I prefer to use Leukotape because it’s stiff and sticky, but any climbing tape should work. Reusable buddy tape finger straps can also be purchased online for daily wear, but tape is still recommended while climbing.
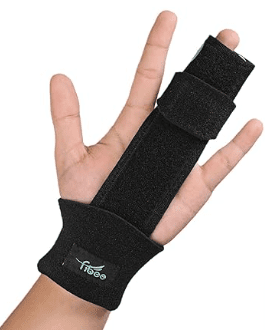
Image 10. Two finger gutter splint available on amazon.com.
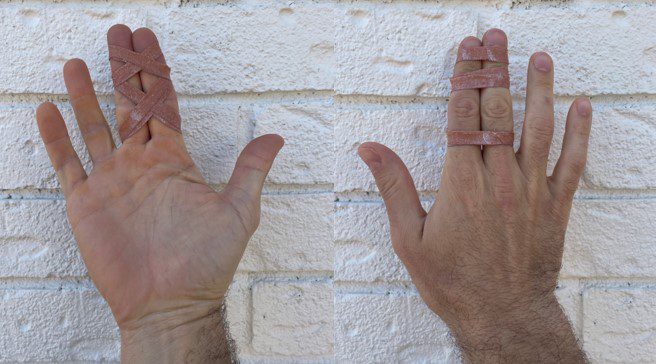
Image 11. Double X method of buddy taping.
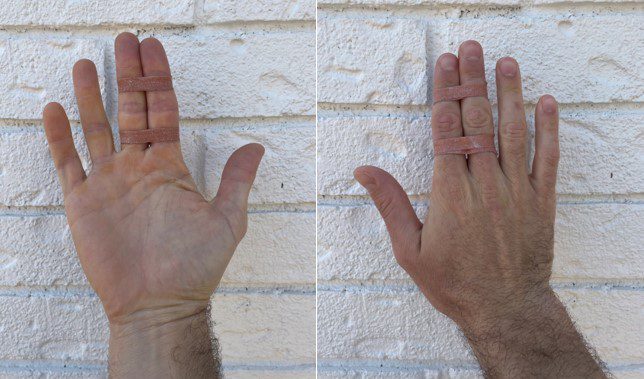
Image 12. Two loops method of buddy taping.
Mobility Phase
Finger tendon glides: 10-15 reps; 3 times a day
- Perform at this frequency throughout the rehab process (starting day 1) and always before performing strength or movement exercises.
- This exercise will help prevent stiffening of your fingers while they’re immobilized, as well as bringing nutrients to the location of the injury to help in the healing process.
- This is a great exercise to include in your climbing warmup routine.

Image 13. Sequence of one finger tendon glide repetition.
Right now is also a great time to start working on other nagging mobility deficits which can have a significant impact on climbing performance. I recommend taking a look at other articles on The Climbing Doctor’s blog for more information on mobility training, such as the article about thoracic mobility or the article about triple flexion mobility.
Strength Phase
Strengthening of your fingers and hands can begin after the initial period of immobilization (2 to 4 weeks). The strengthening exercises listed below will help you have a strong return to climbing, as well as decrease your likelihood of a similar injury in the future.
Lumbrical strengthening: 2 x 10 every 1 to 2 days
- Flex MCP joints to 90 degrees while keeping fingers straight. Flex and extend your wrist while keeping your hand in this position.
- Aim for about 3 seconds to go from flexion to extension and vice versa. The slower you go, the harder it will be.
- A video example of this lumbrical strengthening exercise can be found here.
Rice bucket exercises: 3 x 30 seconds each; 3 times/week
- Stab your hand into the rice with fingers straight to just cover your palm, make a fist, pull your hand out, and repeat.
- Push your fist into the rice up to your wrist, then open your hand extending your fingers as much as you can and repeat.
- Stab your hand into the rice with fingers straight to just cover your palm, then spread your fingers as wide as you can, bring them back to the neutral position, and repeat keeping your hand in the rice the whole time.
Rubber band finger exercises: 3 x 15 reps with 5 second hold; 3 times a week
- Strengthen your finger extensors by placing a rubber band around the tip of the injured finger and pulling the rubber band tight with the other hand while trying to keep the injured finger from bending.
- Strengthen the muscles on either side of your finger by wrapping a rubber band around the injured finger and pulling it to the side while trying to keep the injured finger in the neutral position. Do this in both directions.
- If you are also performing the rice bucket exercises listed above, the rubber band exercises only need to be performed on the injured finger. Otherwise perform the rubber band exercises on all fingers.
- Pro tip: The blue rubber bands used to package vegetables like asparagus are perfect for this.
Hangboarding: Repeater protocol; 2 times a week
Hangboarding is a great way to load the finger flexors and systematically increase strength in a controlled environment. In the case of MCP collateral ligament injuries, hangboarding is a great way to maintain and even increase climbing-specific strength during the rehab process. Since the stress on the MCP collateral ligaments will be relatively low in finger positions where the proximal phalanges (first finger bones) are parallel to the metacarpals (hand bones), climbers can often hangboard at or near their pre-injury levels without pain shortly after the immobilization period. Below are a few important things to keep in mind when hangboarding as part of your rehab program.
Hangboarding should be completely pain free. If you are feeling pain – even a 1 out of 10 – stop and assess:
- First: Consider your finger positioning. Are your fingers closely approximated and parallel with the hand bones, or are they spread out, leaning to one side, or otherwise oriented in a way that would cause rotation at the MCP joint?
- Next: If your finger positioning is good and you’re still experiencing pain, decrease the resistance using a pulley system to unload until you are at a pain free weight.
Stick to the open crimp and half crimp positions during rehab. Pockets and full crimps should only be added into your protocol near the end of your rehab program, if at all, and only if pain-free. I recommend using a hangboard repeater protocol rather than a max hang protocol, as there is less room for error when you’re operating closer to your limit. Jędrzej has a great article summarizing a 7-3 strength endurance repeater protocol that can be accessed at this link. I also recommend taking a look at Esther Smith’s Black Diamond article discussing proper hangboarding posture and shoulder maintenance.
Movement Phase
THE PART WHERE YOU GET TO CLIMB!! The movement phase occurs concurrently with the strength phase, and primarily consists of on-the-wall technique and/or endurance training. This phase can begin directly after the immobilization period. As with every phase in this rehab program, buddy tape should be used during the movement phase. Since we know that big dynamic moves are one of the primary culprits for stressing and injuring collateral ligaments, you should focus on controlled static climbing. It is also a good idea to avoid routes with finger jams, or routes that will require you to pull hard in the downward direction on vertical or diagonal holds (see Image 3). The difficulty should generally be kept below your on-sight level.
There is an abundance of information on the internet about endurance and technique drills, and every climber will need to find what works best for them based on their individual strengths and weaknesses. I have added some discussion about a couple of my favorite technique/endurance drills below, but I recommend looking online for additional drills that may more directly address your specific weaknesses.
Perfect 10s: 3-5 routes or 5 – 10 problems; 1-3 times a week
In this technique drill you will pick a route or problem that you can climb statically, and that is below your onsite grade and repeat it until you feel that you have climbed it to the best of your ability. After every climb, take a minute to think about what you could have done better. Could you have kept your hips in closer? Could you have adjusted your feet in a way that makes the movement more efficient? Repeat until you feel that you have perfected your performance. For those of us with shorter memories, this drill works best when bouldering, but it can also be done on routes.
ARC Training: 20-45 minutes x 2 – 3 routes with 10 minutes rest between; 1-3 times a week
The purpose of ARC training is to increase capillarity, thereby increasing blood flow capacity to the muscles of your forearms. This increases the amount of oxygen available to your muscles while increasing the rate of removal of metabolic waste products. In short, it increases your endurance. A secondary benefit of this type of training is that it trains you to climb while pumped, and to manage that pump through efficient gripping and technique. It also forces you to focus on footwork, as half of your session will be spent downclimbing.
After a thorough climbing-specific warmup, pick three vertical or slightly overhanging routes that are about two full number grades below your redpoint grade. Each route will be climbed for a full 20-45 minutes, never touching the ground. When you reach the top of the route you will downclimb to the bottom and then climb back up, repeating until the 20-45 minutes is up. The difficulty of the route should be enough that you get a sustained pump while climbing, but not enough that your form or technique suffer. You should never feel like you’re going to fall off of an ARC training route. Try not to spend much time at no-hands rests, as the point is to climb with a sustained pump. However, if you find a good hold to shake out on, take advantage of it, as this is an essential skill for route climbing.
In my experience, ARC training is most easily done using an autobelay. However, it can also be done on a tread wall or spray wall, or even with a very patient belay partner.
See a Doctor of Physical Therapy
If you are experiencing pain of almost any kind, you can probably benefit from the help of a skilled physical therapist. Whether it’s a climbing-related injury or just a nagging pain that you experience in your daily life, a skilled physical therapist can provide a treatment plan that is tailored to your specific needs. This article is meant to serve as a reference point for people experiencing pain at their MCP joint caused by collateral ligament damage, and is not a substitute for treatment by a physical therapist.
Author Bio

Reid Markus is a Doctor of Physical Therapy student at Texas State University. He lives in Austin, Texas with his wife, two dogs, and two cats. His professional interests include sports physical therapy, manual therapy, and injury prevention for athletes of all kinds. When he’s not climbing you can find him running, biking, hiking, strength training, paddleboarding, or doing anything else that involves having fun outside. Prior to pursuing a career in physical therapy, Reid worked as a structural engineer in Dallas, Texas and Nashville, Tennessee.
Contact Reid:
Email: reidmarkuspt@gmail.com
The Research
- Lourie GM, Hanson ZC. Finger Metacarpophalangeal Joint Injuries in Athletes: Evaluation, Diagnosis, Treatment, and Return to Play. J Am Acad Orthop Surg. 2023 Feb 15;31(4):e177-e188. doi: 10.5435/JAAOS-D-21-01031. PMID: 36757330.
- Shah SS, Techy F, Mejia A, Gonzalez MH. Ligamentous and capsular injuries to the metacarpophalangeal joints of the hand. J Surg Orthop Adv. 2012 Fall;21(3):141-6. doi: 10.3113/jsoa.2012.0141. PMID: 23199942.
- Gaston RG, Lourie GM. Radial collateral ligament injury of the index metacarpophalangeal joint: an underreported but important injury. J Hand Surg Am. 2006 Oct;31(8):1355-61. doi: 10.1016/j.jhsa.2006.05.015. PMID: 17027799.
- Wilson RL, Liechty BW. Complications following small joint injuries. Hand Clin. 1986 May;2(2):329-45. PMID: 3517016.
- Sawant N, Kulikov Y, Giddins GE. Outcome following conservative treatment of metacarpophalangeal collateral ligament avulsion fractures of the finger. J Hand Surg Eur Vol. 2007 Feb;32(1):102-4. doi: 10.1016/j.jhsb.2006.06.010. Epub 2006 Oct 23. PMID: 17056167.
- Smith, Esther. “Hang Right-Part 1: Shoulder Maintenance for Climbers.” Black Diamond Equipment, 15 Nov. 2016, https://www.blackdiamondequipment.com/en_US/stories/experience-story-esther-smith-shoulder-maintenance-for-climbers/
- Netter, Frank H. (2014). Atlas of human anatomy (6th). Philadelphia, PA: Saunders/Elsevier.
- Jędrzej. “Hangboard Repeaters Strength Endurance Protocol.” Strength Climbing. April 8, 2019. https://strengthclimbing.com/hangboard-repeaters/
- Vagy, J. (2022, November 19). Collateral ligament injury exercise. The Climbing Doctor. https://theclimbingdoctor.com/portfolio-items/collateral-ligament-sprain-4/
- Disclaimer – The content here is designed for information & education purposes only and the content is not intended for medical advice.

