Blood Flow Restriction (BFR) Training for Pulley Injuries in Rock Climbers
Ever had your foot slip on a crimp while climbing and felt a pop or tweak in your finger? Pulley (or annular ligament) injuries are one of the most common types of injuries that rock climbers experience. Thankfully, there are ways you can treat these injuries and train at the same time. Blood flow resistance (BFR) training is a growing topic in the climbing world and research demonstrates its efficacy in both men and women in treating soft tissue injuries quicker than a typical rehab protocol while building strength and enhancing endurance performance to help get you back to your projects.
Pulley Injury Signs and Symptoms
- Acute localized pain that may be accompanied by a pop during injury.
- Pain increases with palpation and initial swelling may occur around the joint.
- Pain may be experienced when in a half crimp or with resisted finger flexion movements like holding a grocery bag in the injured hand.
Assessment
The most effective method of identifying a pulley injury is diagnostic ultrasound. X-rays should be utilized to rule out fractures or avulsions and MRI may be used if results of an ultrasound are unclear. Pulley sprains are classified into 4 grades. Grades I-III indicate a single pulley sprain or isolated rupture that can be treated conservatively whereas Grade IV indicates a multiple pulley rupture that must be surgically repaired. An ultrasound may be performed on your suspected pulley in a fully extended position as well as a 40 deg PIP with 10 deg DIP flexion against resistance. Diagnosis is based on the distance of the flexor tendon from the phalanx which varies with the type of pulley (A1, A2, A3, A4 or A5). The picture below serves as a visual reference for pulley locations. A2 followed by A4 in the middle and/or ring fingers are the most commonly injured pulley ligaments in rock climbers.
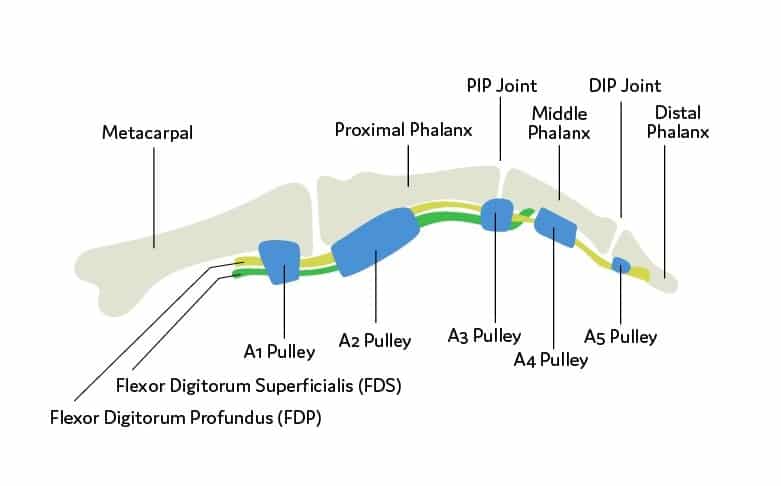
(Image by Nichelle Reyes)
In a 2019 article, Carrie Cooper DPT suggests a possible alternative method of diagnosing a pulley injury which includes pain rating, active range of motion tests, resisted tests with half and full crimp positions and palpation of the A2.
In another 2019 article by Fenil Bhatt, researchers suggest the use of a silicone wedding band for identifying A2 pulley ruptures. Researchers successfully identified an A2 rupture, later confirmed by MRI, by testing range of motion in finger flexion with and without the ring on. Finger flexion was increased with the ring on because it served as the A2 pulley by keeping the flexor tendon close to the bone. In this case, an increase in finger flexion with the ring on would be indicative of a pulley injury.
Blood Flow Restriction Training (BFR)
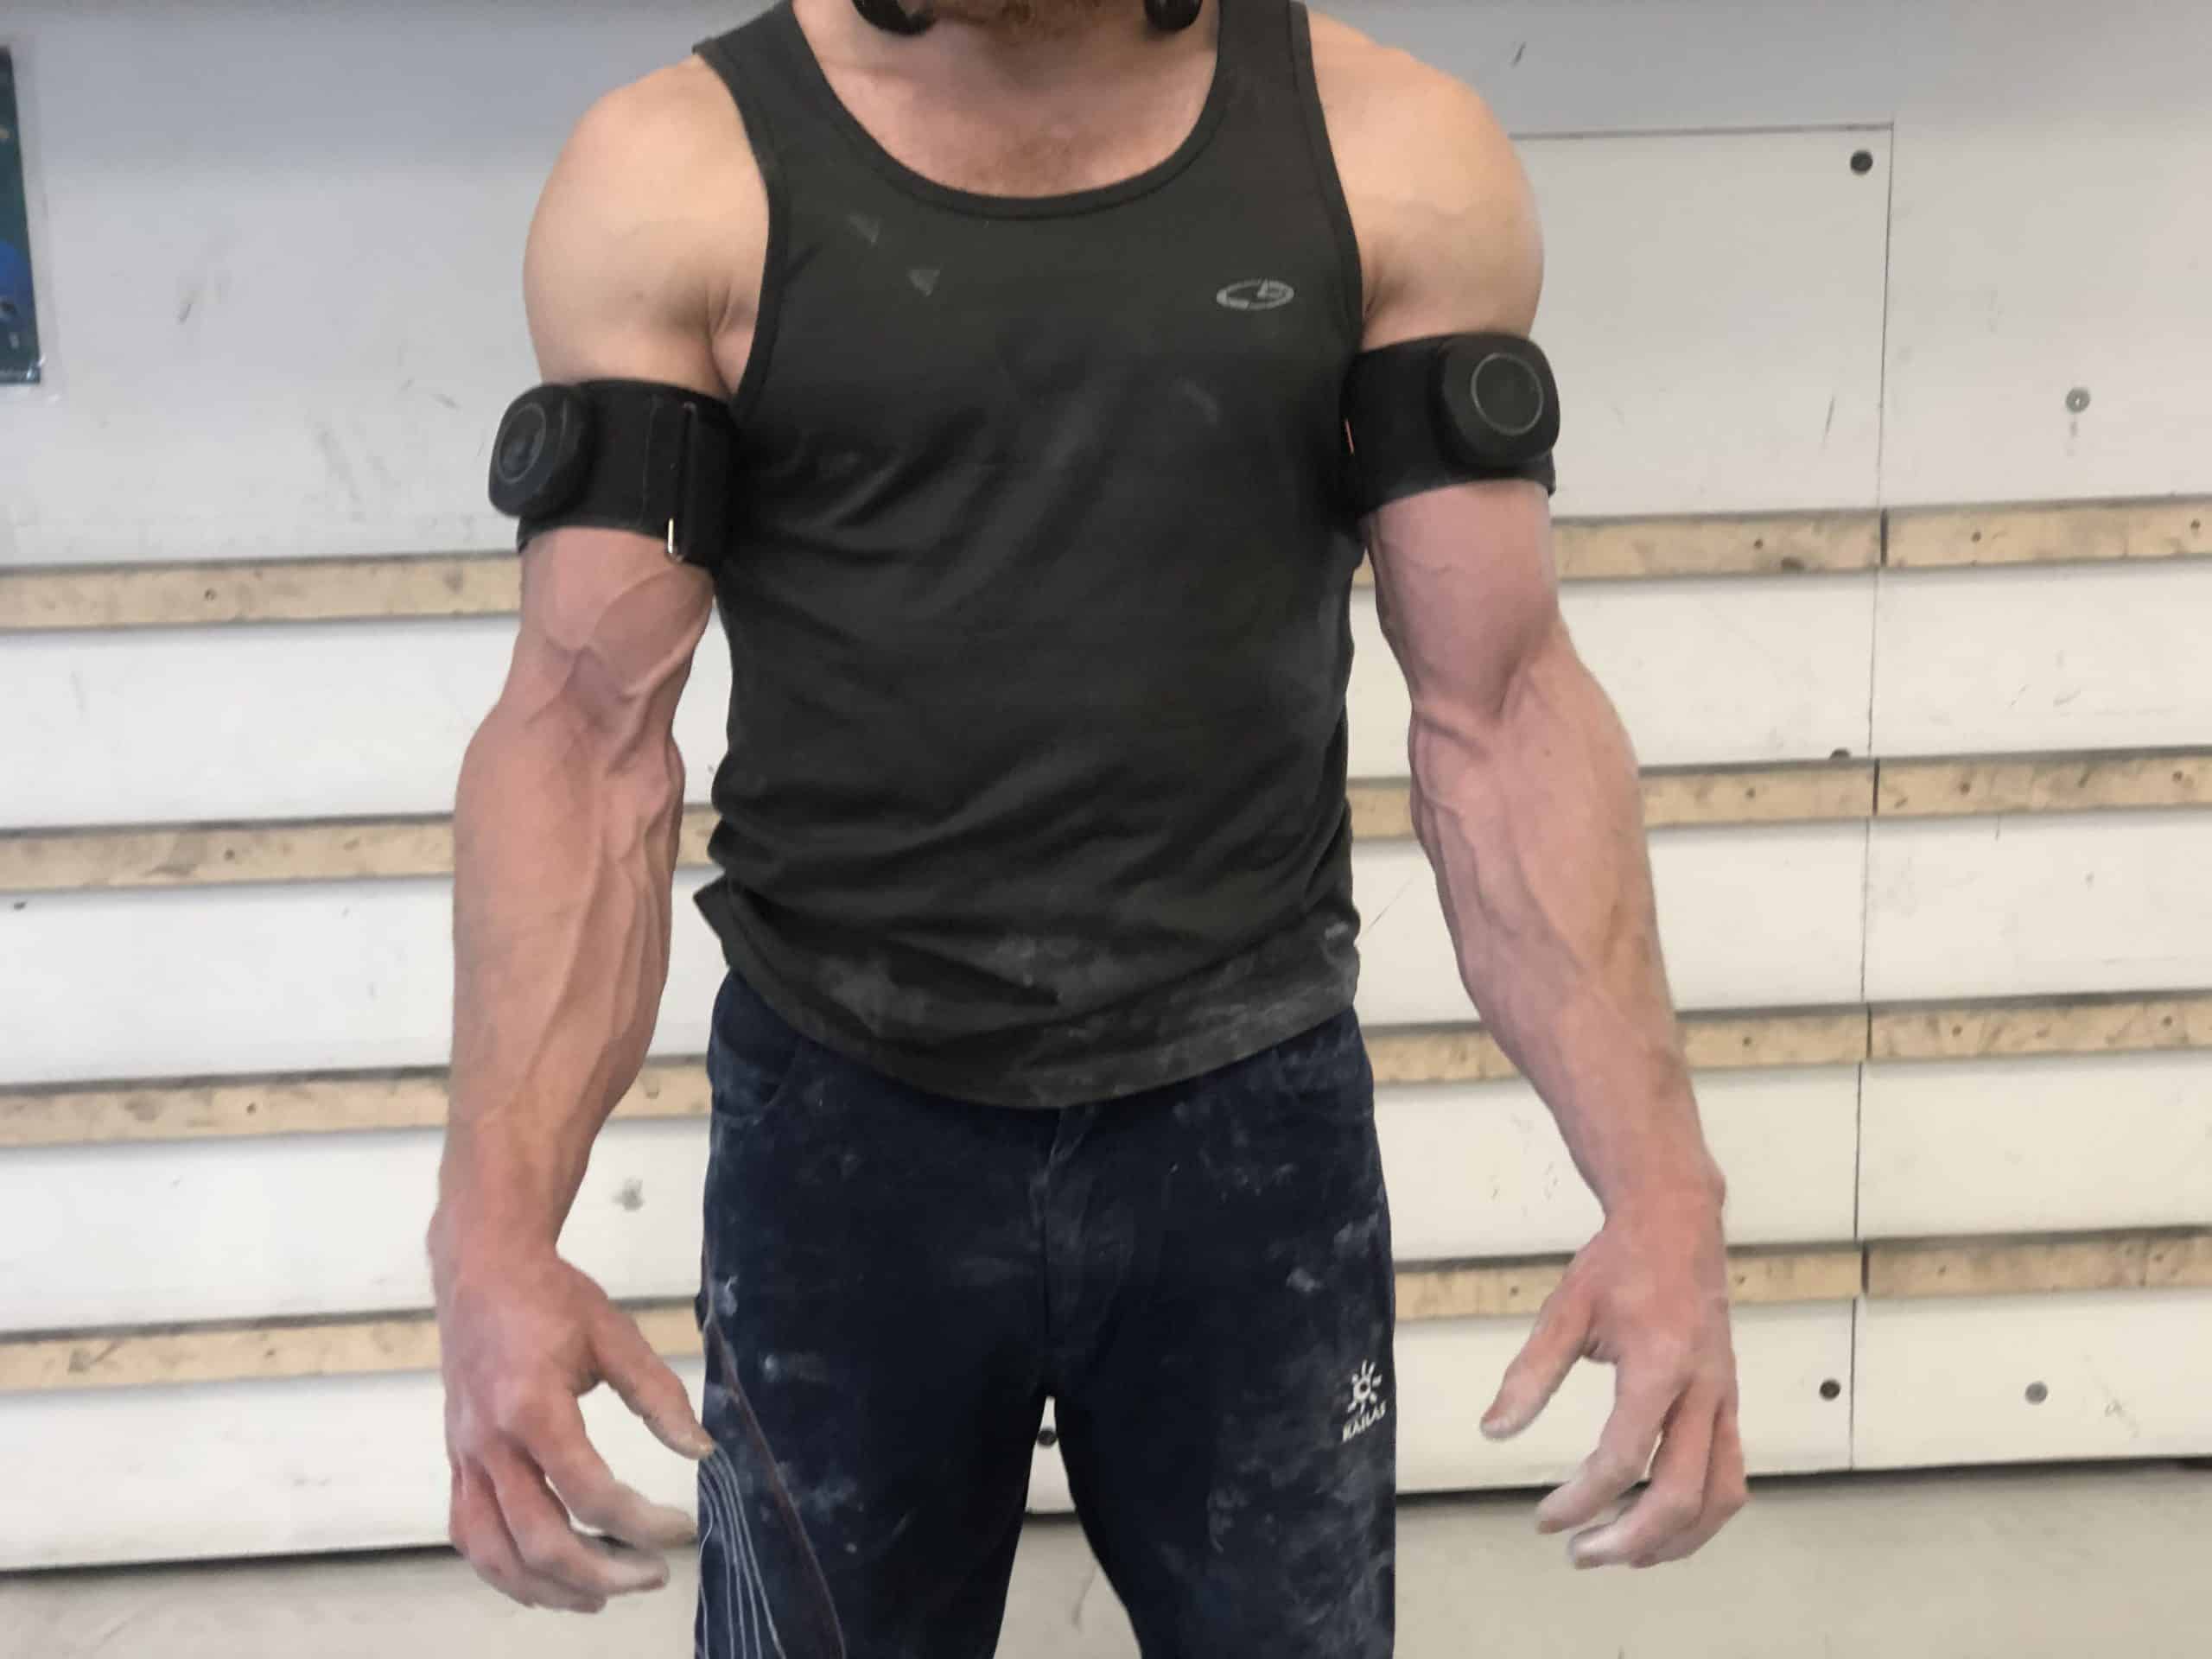
BFR was first developed in the 1970’s in Japan and termed “Kaatsu” but was not used much elsewhere in the world until 2008 with more availability of BFR devices. BFR is a training method in which an inflatable cuff is placed at the most proximal portion of the limb to partially occlude venous blood flow causing blood pooling. The amount of pressure required to do this is called the limb arterial occlusion pressure (AOP). AOP varies person to person as well with limb size. The buildup of metabolites in the blood stimulates a growth hormone, which in turn causes collagen synthesis necessary for tissue repair. BFR enables us to incorporate low load resistance training, normally utilized for treating injuries, with strength and hypertrophy training safely.
There is extensive research on the effectiveness of BFR use in the upper and lower extremities although there is currently little scientific research investigating the effects of BFR on tendon and pulley injuries specifically. Despite the lack of specificity pertaining to pulley injuries, research has shown that BFR can increase endurance performance and when used with grip training is more effective in increasing hand grip strength and forearm muscle volume when compared to traditional strength training. Furthermore, BFR allows us to load injured tissue in a safe and controlled manner.
Underloading connective tissue is just as potentially risky as overloading because it decreases the amount of oxygen getting to the tendon and ligaments and we need oxygen and mechanical load for tissue healing. Sufficient load on injured tissue will reduce stiffness and increase strength and capacity for load. BFR has similar effects to high resistance training so it can be very useful for recovery from an injury as well as for training purposes in uninjured people.
Possible contraindications for BFR use include pregnancy, history of blood clotting, uncontrolled high blood pressure, sickle cell disease, cancer, active infections, multiple comorbidities (like diabetes, HBP, obesity), and/or no previous resistance training.
Blood Flow Restriction Parameters
Total time with BFR should not exceed 15-20 minutes per session, although it may be performed as often as twice a day with at least 30 min between the two sessions. Research suggests using 40-80% of an individual’s AOP measured by limb occlusion pressure, generally within 150-300mmHg for BFR use with aerobic and resistance exercise, and 70-100% AOP for BFR use passively without exercise. For suggested ranges of occlusion pressure, higher pressures may be more uncomfortable, but research has shown that they do not increase the response to BFR, so it is better to start with a lower pressure and progress from there.
Cuffs should be placed below the deltoid and above the biceps brachii for BFR use in the upper extremity. The type of cuff can affect the amount of pressure necessary for limb occlusion. Cuff types can vary between brands, size and type of material. Research has shown that there are two types of material used for cuffs: elastic or nylon restrictive. These materials cause the same amount of BFR at the same pressure although cuff size does affect BFR. Wide cuffs have been found to have a lower AOP than narrow cuffs and may be more efficient for use with BFR. Certain BFR cuff brands have automated pressure readings with an app that allows you to control the percentage of limb occlusion pressure. For brands that do not have this, limb occlusion pressure (LOP) is measured with a device called a Doppler. There is a video demonstrating measuring LOP below. BFR should initially be performed with a knowledgeable professional.
The Rock Rehab Pyramid
The Rock Rehab Pyramid was developed by Physical Therapist, Dr. Jared Vagy in his book Climb Injury-Free. This pyramid aides in the rehabilitation of climbing injuries by providing a system of four major categories that will guide the climber’s recovery process. Following an injury, one will start at the bottom of the pyramid and work upwards using general guidelines to determine appropriateness for progression to the next level. A decrease in pain/soreness allows advancement to the next level. With no change in symptoms at a particular level, a climber should stay at the current level for one week and then progress to the next level. An increase in soreness should have the climber regress down one level.
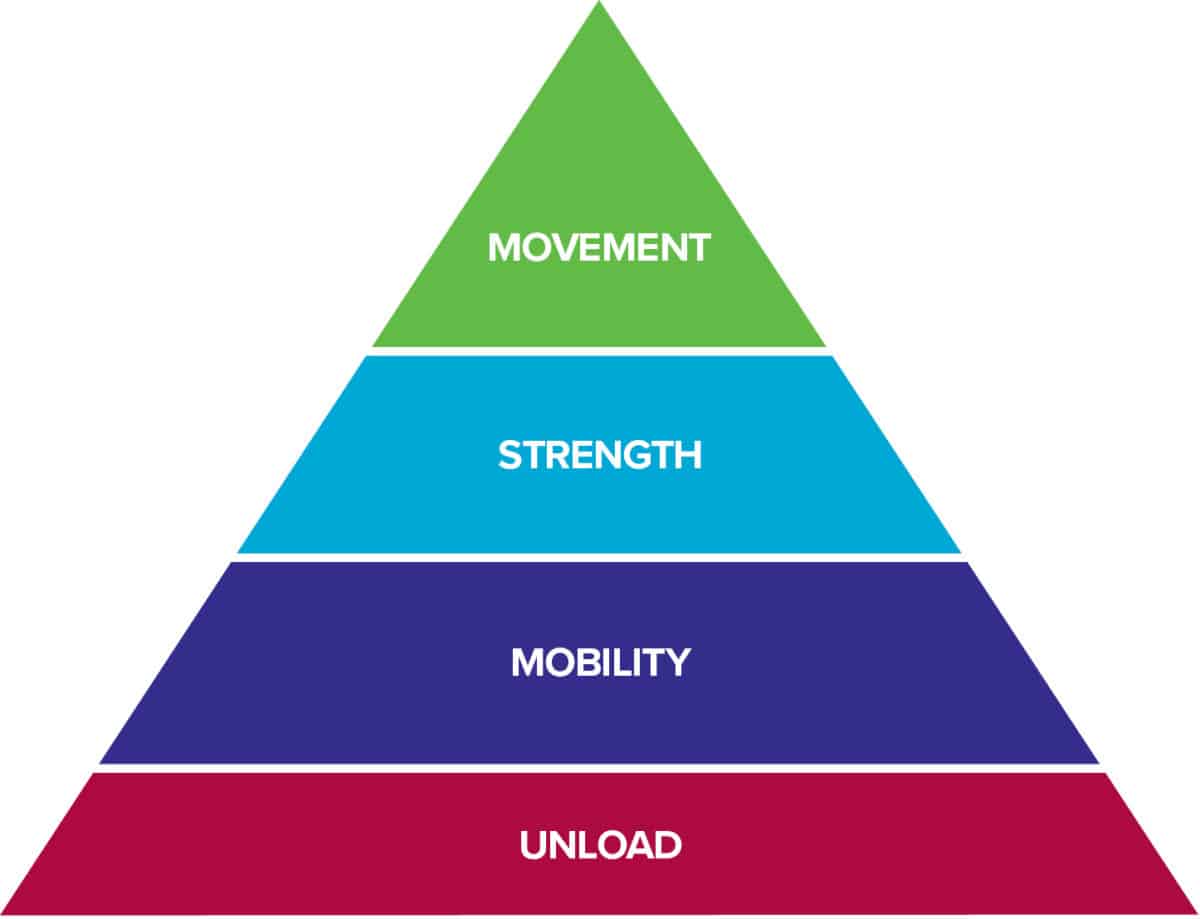
The bottom level of the pyramid aims to Unload the tissues in the body so that they have the best healing environment. Often times, after an injury there is some sort of change in Mobility. After the tissues have calmed down from the previous level, this stage will look to reestablish normal, pain free range of motion. Once the injured area restores its mobility, it is time to increase the Strength of the surrounding muscles so that Movement in the following level can be coordinated and optimized. Click here to learn more about the rock rehab pyramid structure.
Unload exercises:
Immobilize followed by non-exercise movement with BFR.
- Immobilize with a pulley protection splint developed to maintain the flexor tendon close to the phalanx in place of the pulley without compressing neurovascular structures. This allows the pulley to heal in a manner close to its original location while unloading it as well. Please refer to The Climbing Doctor for instructions on making your own pulley protection splint. Place climbing tape over the splint to help it stay in place.
- Unloaded non-exercise movement with ischemic conditioning.
- Walk around with BFR bands on both upper extremities
- Can be performed 1-2 times per day for 2 to 3 weeks initially following pulley injury.
- 70-100% AOP at 150-300mmHg
- Start with a lower pressure and progress from there.
- 5 sets of 5 minutes with cuff pressure on followed by 3 minutes of rest with cuff pressure off for a total treatment time of about 45 minutes per session.
- Can be super uncomfortable but that is normal.
- The importance of this phase of unloading is to provide the tissue adequate initial rest depending on the severity of the injury but still maintain muscle mass and promote blood flow for tissue healing.
- Walk around with BFR bands on both upper extremities
Mobility exercises:
- Early mobilization improves tendon healing and reduces adhesions.
- Perform each exercise listed below in one session with continuous pressure. You will start with bigger muscle groups and work your way down to the smaller intrinsic muscles of the hand. Again, total time with BFR should not exceed 15-20 minutes per session of continuous pressure.
- Can be performed 2 to 3 days per week for 2-3 weeks.
- 20-50% AOP at 150-300mmHg. (Start with lower pressure and progress from there)
- 4 sets of 5 exercises all performed within each set.
- Reps will be performed in a 30/15/15/15 split for 75 total reps with 30 seconds of rest between sets. Set split is explained further below.
- Perform each exercise listed below in one session with continuous pressure. You will start with bigger muscle groups and work your way down to the smaller intrinsic muscles of the hand. Again, total time with BFR should not exceed 15-20 minutes per session of continuous pressure.
- Set 1:
- 30 total reps for set 1 (6 reps per exercise followed by 30 sec of rest).
- Unweighted shoulder IYT- 6 reps then 30 sec rest
- Unweighted bicep curls- 6 reps then 30 sec rest
- Unweighted tricep extension- 6 reps then 30 sec rest
- Unweighted wrist flexion- 6 reps then 30 sec rest
- Partial tendon glides- 6 reps then 30 sec rest
- Move on to Sets 2-4
- 30 total reps for set 1 (6 reps per exercise followed by 30 sec of rest).
- Sets 2-4:
- 15 total reps per set (3 reps per exercise followed by 30 sec rest).
- Unweighted shoulder IYT- 3 reps then 30 sec rest
- Unweighted bicep curls- 3 reps then 30 sec rest
- Unweighted tricep extension- 3 reps then 30 sec rest
- Unweighted wrist flexion- 3 reps then 30 sec rest
- Partial tendon glides- 3 reps then 30 sec rest
- Repeat 3 times for Sets 2-4
- 15 total reps per set (3 reps per exercise followed by 30 sec rest).
Strength exercises:
- These weighted exercises serve as a progression after 2-3 weeks of the mobility exercises.
- Perform each exercise in one session with continuous pressure not to exceed 15-20 minutes total. You will again start with bigger muscle groups and work your way down to the small intrinsic muscles of the hand.
- Can be performed 2 to 3 days per week for 2-3 weeks.
- 20-50% AOP at 150-300mmHg. (Start with lower pressure and progress from there)
- Weight used should be 20-40% 1RM.
- 4 sets of 5 exercises all performed within each set.
- Reps will be performed in a 30/15/15/15 split for 75 total reps with 30 seconds of rest between sets. Perform tendon glides during rest period with cuff pressure still on. Set split is explained further below.
- Perform each exercise in one session with continuous pressure not to exceed 15-20 minutes total. You will again start with bigger muscle groups and work your way down to the small intrinsic muscles of the hand.
- Set 1:
- 30 total reps for set 1 (6 reps per exercise followed by 30 sec of active rest performing tendon glides). Weight used should be 20-40% 1RM.
- Weighted shoulder IYT- 6 reps then 30 sec active rest performing tendon glides
- Weighted bicep curls- 6 reps then 30 sec active rest performing tendon glides
- Weighted tricep extension- 6 reps then 30 sec active rest performing tendon glides
- Weighted wrist flexion- 6 reps then 30 sec active rest performing tendon glides
- Weighted finger curls- 6 reps then 30 sec active rest performing tendon glides
- To be performed on any portable fingerboard or fingerboard block with a 20mm edge in a half crimp position (90 deg PIP flexion and DIP hyperextension) with pulley splint on. Using a portable fingerboard or finger board block rather than a mounted hang board not only better isolates the intrinsic muscle of the hand but better allows gravity to pull fluid towards the fingers. Similarly, isotonic (meaning the muscle is changing length through movement) requires more ATP use than isometric (no muscle length change) and is better for healing tissues.
- Begin with about 30 pounds per arm for males and 20 pounds per arm for females.
- Move on to Sets 2-4
- 30 total reps for set 1 (6 reps per exercise followed by 30 sec of active rest performing tendon glides). Weight used should be 20-40% 1RM.
- Sets 2-4:
- 15 total reps per set (3 reps per exercise followed by 30 sec of active rest performing tendon glides). Use same weight for each exercise as set 1.
- Weighted shoulder IYT- 3 reps then 30 sec active rest performing tendon glides
- Weighted bicep curls- 3 reps then 30 sec active rest performing tendon glides
- Weighted tricep extension- 3 reps then 30 sec active rest performing tendon glides
- Weighted wrist flexion- 3 reps then 30 sec active rest performing tendon glides
- Weighted finger curls- 3 reps then 30 sec active rest performing tendon glides
- Repeat 3 times for Sets 2-4
- 15 total reps per set (3 reps per exercise followed by 30 sec of active rest performing tendon glides). Use same weight for each exercise as set 1.
Movement exercises:
- Progress from 2-3 weeks of strengthening to climbing specific movement with laddering on a campus board with feet on until pumped.
- Perform with continuous pressure.
- Can be performed 2 to 3 days per week for 2-3 weeks.
- 20-50% AOP at 150-300mmHg. (Start with lower pressure again and progress from there)
- 5 sets of 30-45 seconds of laddering with 2 min of rest between sets (keep pressure on during rest periods)
- Can progress by skipping rungs for bigger moves or regress as you fatigue by either doing smaller moves or using larger rungs.
- Perform with continuous pressure.
The Research
- Bhatt F, Batul A, Schwartz-Fernandes F. A Potentially Inexpensive Diagnostic Method for A2 Pulley Ruptures. Cureus. 2019 Sep; 11(9). doi:10.7759/cureus.5751
- Cooper C, LaStayo P. A potential classification schema and management approach for individuals with A2 flexor pulley strain. J Hand Ther. 2020;33(4):598-601. doi:10.1016/j.jht.2019.01.002
- Fernandes DZ, Weber VMR, da Silva MPA, et al. EFFECTS OF BLOOD FLOW RESTRICTION TRAINING ON HANDGRIP STRENGTH AND MUSCULAR VOLUME OF YOUNG WOMEN. Int J Sports Phys Ther. 2020;15(6):901-909. doi:10.26603/ijspt20200901
- Iruretagoiena-Urbieta X, De la Fuente-Ortiz de Zarate J, Blasi M, Obradó-Carriedo F, Ormazabal-Aristegi A, Rodríguez-López ES. Grip Force Measurement as a Complement to High-Resolution Ultrasound in the Diagnosis and Follow-Up of A2 and A4 Finger Pulley Injuries. Diagnostics (Basel). 2020;10(4). doi:10.3390/diagnostics10040206
- King EA, Lien JR. Flexor Tendon Pulley Injuries in Rock Climbers. Hand Clin. 2017;33(1):141-148. doi:10.1016/j.hcl.2016.08.006
- Klauser A, Frauscher F, Bodner G, et al. Finger pulley injuries in extreme rock climbers: depiction with dynamic US. Radiology. 2002; 222:755–761.
- Loenneke JP, Thiebaud RS, Fahs CA, Rossow LM, Abe T, Bemben MG. Effect of cuff type on arterial occlusion. Clinical Physiology and Functional Imaging. 2013;33(4):325-327. doi:https://doi.org/10.1111/cpf.12035
- López-Rivera E, González-Badillo JJ. The effects of two maximum grip strength training methods using the same effort duration and different edge depth on grip endurance in elite climbers. Sports Technology. 2012;5(3-4):100-110. doi:10.1080/19346182.2012.716061
- Medernach JPJ, Kleinöder H, Lötzerich HHH. Fingerboard in Competitive Bouldering: Training Effects on Grip Strength and Endurance. The Journal of Strength & Conditioning Research. 2015;29(8):2286-2295. doi:10.1519/JSC.0000000000000873
- Patterson SD, Hughes L, Warmington S, et al. Blood Flow Restriction Exercise: Considerations of Methodology, Application, and Safety. Front Physiol. 2019;10. doi:10.3389/fphys.2019.00533
- Schöffl V, Hochholzer T, Winkelmann HP, Strecker W. Pulley injuries in rock climbers. Wilderness Environ Med. 2003;14(2):94e100
- SchÖFFL VR, Einwag F, Strecker W, SchÖFFL I. Strength Measurement and Clinical Outcome after Pulley Ruptures in Climbers. Medicine & Science in Sports & Exercise. 2006;38(4):637-643. doi:10.1249/01.mss.0000210199.87328.6a
- Schneeberger M, Schweizer A. Pulley ruptures in rock climbers: outcome of conservative treatment with the pulley-protection splintda series of 47 cases. Wilderness Environ Med. 2016;27(2):211e218.
- Smith, Esther. “Hang Right-Part 3: Healing Nagging Finger Injuries.” Black Diamond Equipment, 17 Sept. 2018, www.blackdiamondequipment.com/en_US/experience-story?cid=esther-smith-nagging-finger-injuries.
- Vanwye WR, Weatherholt AM, Mikesky AE. Blood Flow Restriction Training: Implementation into Clinical Practice. Int J Exerc Sci. 2017;10(5):649-654. Accessed January 4, 2021. https://www.ncbi.nlm.nih.gov/pmc/articles/PMC5609669/
See a Medical Provider
Seeing a medical practitioner for diagnosis will help differentiate between an overuse injury or pulley rupture and is vital to help prevent contractures in the joint. Catching a pulley injury early informs therapeutic intervention and helps prevent loss of range of motion and grip strength in the injured finger.
Author Information
Nicole Sarles is a Doctor of Physical Therapy student at The University of Puget Sound in Tacoma, WA. She plans to specialize in hand therapy and treating rock climbers following her graduation. She has 9 years of climbing experience and spends her time outside of the classroom bouldering and traveling when there is not a global pandemic and she has not just had ACL surgery.
For questions or more information, please contact nicoledene@utexas.edu
Instagram: @nicolesarles
Photo by Alex Montgomery
- Disclaimer – The content here is designed for information & education purposes only and the content is not intended for medical advice.


Hi there!
Just wondering why you you have unweighted big muscle group exercises for the initial phase and wouldn’t recommend people start the weighted BFR strength exercises shown (minus the finger curls) earlier on? Could they not also do this and modify their grip on a dumbbell so that there is no direct contact on the pulley in question?
Hey Mattias,
Unweighted big muscle group exercises for the initial phase is often the best place to start after a pulley injury of higher grade (II or III) because the pressure from the dumbbell can aggravate the injury with direct pressure. However, with that being said, if the grip can be modified, as you mention, and there is no direct pressure, it is fine to start weighting big muscle groups earlier to increase the metabolic effects and load to the tissues.
Hope that helps clarify!
Easy! Thanks for clearing that up!
My Son plays MLB Baseball and has injured his A2 and A4 pulleys. NOT at the same time. I was wondering if you could give some names of Doctors that specialize in pulley injuries? I figured you Guys would know better than I who the BEST Doctors in the US would be. I know he is not a climber, he has been dealing with this for going on a year. I Hope and Pray you can steer me in the right direction.
Hi Rick. I am sorry to hear about your son’s injury. Please email info@theclimbingdoctor.com with the request and our team can provide you with additional information.
Is there a specific cuff brand you recommend?
Smart Tools are the ones that are used in the article. We have other articles on the site that use Bstrong, for example see below:
https://theclimbingdoctor.com/more-for-less-what-every-climber-wants/
Both are good brands but the style of BFR is completely different. There are two types of material used for cuffs: elastic or nylon restrictive.