Rock Climbing Injury: Ankle Sprain Rehab
Conditions are perfect as you approach your early season boulder project. There is a small wet streak covering a foothold near the top of the boulder on a crucial, yet large foothold. The foothold is not near the crux, so you decide to attempt the send anyways. You pull hard through the crux of the problem at the bottom of the boulder, sapping your power. When you finally reach the wet streak, you test the foothold, and realize that it is far more slippery than anticipated. Without thinking you lunge for the next crimp. You hardly make any progress before your trusted climbing shoe rubber fails and you are rendered frictionless. The slip sends your body careening to the outskirts of your pad placement. Your feet swing out from under you and you land awkwardly on the edge of the outermost placement. The big toe side of the shoe manages to grasp the edge of the pad, however the little toe side goes groundward. You hear and feel a distinct pop on the outside of your ankle. Still juiced from the fall that you barely register what just happened. While attempting to stand you begin to feel the pain level rise in the ankle. Walking is painful, but manageable as your friends help you hobble towards a seat as the ankle begins to swell and discolor. What now? Is my ankle broken? Is this it for my season???

What you’ve likely just experienced is an inversion ankle sprain. This is the most common injury in the lower leg, with about 23,000 occurring every day in the United States alone (McKeon & Mattacola, 2008). This injury occurs when downward force is applied to an ankle in an inverted position, with the big toe side of the foot up, and the little toe side down. This injury can cause damage to some of the connective tissues on the lateral, or outside, of the ankle. This injury is graded on a 1-3 scale.
- Grade 1 is characterized as a mild sprain in which there has been significant stretching of the lateral restraints of the ankle. Minimal swelling and discoloration should occur. Weight bearing is uncomfortable, yet tolerable, and the front of the outside bone of the ankle will be tender.
- Grade 2 inversion ankle sprains occur when higher amounts of force are placed on the ankle in the inverted position. It is characterized by some tearing of the ligaments on the outside of the ankle, namely the anterior talofibular ligament or ATFL (Fun fact this is the most commonly ruptured ligament in humans). People often hear a distinct popping sound emanating from the lateral aspect of the ankle. Walking on the injured foot will be difficult and painful.
- Grade 3 inversion ankle sprains are relatively uncommon and typically occur when the ankle basically dislocates and reduces on its own; leading to significant connective tissue damage to all of the ligaments on the outside of the ankle and joint laxity.
Assessment
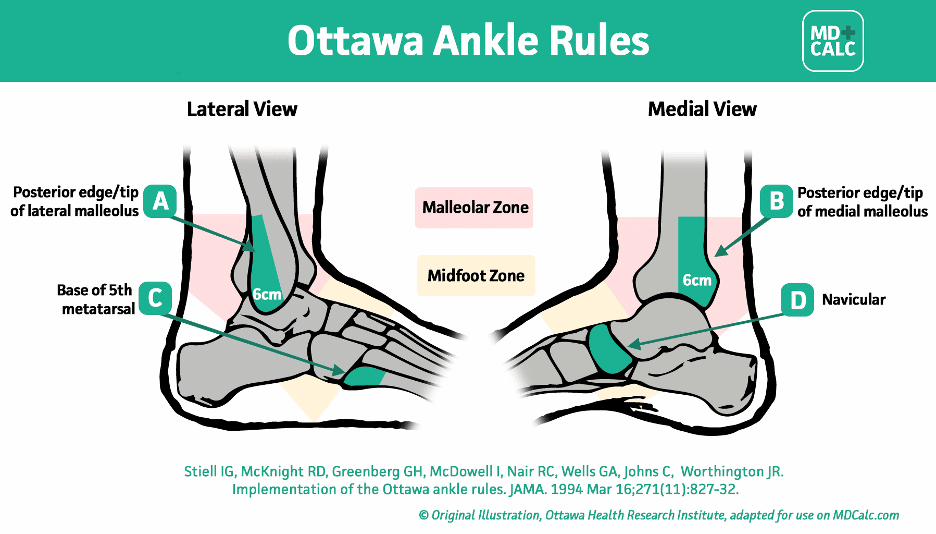
Before starting rehab, it is important to make sure the ankle was not broken during the fall. Without imaging, it can be difficult to differentiate between a broken ankle and a sprained one. Both of these can cause significant amounts of pain, swelling, and discoloration in the foot. Luckily there are a set of simple tests that help us decide whether a more comprehensive evaluation is necessary or not. These rules are called the Ottawa ankle rules. Basically if you break the Ottawa rules (fail any of the tests) then you need to see a qualified healthcare practitioner to get a more in depth evaluation of your ankle.
Rule 1: Must be able to walk 4 steps
Yes each foot strike counts as a step, and yes limping counts, but crutches and assistance from friends is not allowed
Rule 2: No significant tenderness over specific ankle/foot bones:
In this step you have to have someone place a decent amount of pressure over these specific aspects of the ankle: the distal posterior edge of the medial and lateral malleoli, the base of the 5th metatarsal, and the navicular.
If you don’t break any of these rules and pass all of the tests, then we are about 99% sure that you have not fractured your ankle (Bachmann et al., 2003). However, if your ankle rehab is not progressing or you want to make sure nothing serious is going wrong, it is important that you see a qualified healthcare practitioner for a more thorough evaluation and potentially imaging. Qualified healthcare practitioners include sport chiropractors, physical therapists, and medical doctors.
Now that we know what we are dealing with, we need to rehabilitate this ankle to help it function normally again. While Schoffl et al. report that lower leg injuries make up only a small proportion of climbing related injuries, it is important to recognize they assessed individuals that went to the hospital with their injuries (Schöffl et al., 2015). Only about 50% of people seek medical attention after an ankle sprain (Vuurberg et al., 2018), which means that ankle sprains likely make up a larger proportion of injuries in the climbing community than reported. Whether one sees a medical practitioner or not, it is crucial that the ankle be properly rehabbed. One of the more nefarious aspects of the acute ankle sprain is that one ankle sprain predisposes individuals to more ankle sprains. Repeated ankle sprains can lead to a condition bluntly titled: chronic ankle instability (CAI). CAI and multiple sprains over time can predispose individuals to ankle arthritis later on in life. To put it in a yoda esque form: non-rehabbed ankle sprains leads to more ankle sprains, more ankle sprains leads to CAI, CAI leads to ankle arthritis. Remember, there is no try in rehabilitating the ankle, do or do not, but you reading this page indicates that you want to put the consistent and patient effort into rehabbing your ankle. So where do we go from here?
The deficits we typically see after an ankle sprain include a loss of proprioception which is our joint position sense, loss of balance and coordination, loss of mobility, and loss of strength. So far, the best things that have been shown to prevent recurrence of ankle sprains is a consistent program of neuromuscular (balance, and proprioception training), and plyometric training (Vuurberg et al., 2018). However, we should not put the cart before the horse and simply begin jumping up and down on one foot to properly rehab an ankle. We have to approach rehab in a logical progressive fashion in order to ensure that we are able to consistently progress until we are ready for advanced rehab and getting back to climbing.
The entire process of rehabilitating a grade 1 or 2 sprain should take approximately 6-9 weeks. Yes, you will be back to easy and moderate climbing before that, but it is important to be patient and consistent in your rehab. When performing rehab, some discomfort or mild pain that goes away after you stop the exercise is ok. However, if there is a significant increase in discomfort or pain during the exercise, and it lingers for more than a few hours, then you likely overdid it. You tried something your ankle was not ready for. This is fine, simply be a little more patient and regress to the previous exercises for another 5-7 days. We will begin with off loaded and non-weight bearing exercises and progress until we are able to bear weight on the injured ankle, and then progress to dynamic exercise.
Described below are the different stages and progression for your rehabilitation, along with videos showing how to correctly perform the exercises. The stages begin with an unload stage in which we are are non-weight bearing and focus on giving the tissues a bit of a break and allow some of the inflammation and pain to go down. Climbing training at this time should mainly consist of finger specific strengthening such as hangboarding so that we can keep stress off of the ankle and so that we do not accidentally regress in the stages of rehab. We then gradually increase the amount of load that we are placing on the ankle and connective tissues with the partial load, and initial weight bearing stages. Once you are comfortable with walking and bearing weight, we need to focus on rebuilding the capacity of the tissues that were initially injured. We will do this by gradually introducing dynamic exercises and plyometrics into the exercise program. Once walking and total weight bearing is ok and without pain, we can begin reintroducing some easy climbing back into the program with some sport specific exercises.
Unloading Stage
The first stage in the rehab process is the unloading stage. The exercises in this stage are designed to unload the tissues, while also providing the movement and blood flow necessary for healing. The first exercise is range of motion (ROM) ankle circles. This exercise is done by lying down on your back and holding the knee of your affected side, with the ankle in the air. Then repeatedly make the biggest pain free circle with your toes as possible. Holding the knee ensures that all of the movement is coming from the ankle, and not from the knee or hip. Perform 20 slow, controlled circles to the right, 20 circles to the left, and 20 pumps up and down like you are pushing and letting off a gas pedal. It is ok if you are only able to make small circles without any pain in the beginning. Remember to be patient and consistent, and you will slowly be able to progress to larger and larger circles.
In the very initial stages of rehabilitation, functional braces and taping can be useful to help get into rehab quickly. Functional braces are superior to complete immobilization such as a cast or a boot in returning to sport, amount of pain, and swelling (Kerkhoffs et al., 2002) (Vuurberg et al., 2018). Basically you get better faster when you use supports that allow you to keep moving and maintain function rather than casting or booting yourself so you don’t have to use your ankle. You can find a decent functional ankle brace at your local pharmacy or sporting goods store. The ones most recommended have laces with overlying straps. The taping protocol that people use can vary significantly from using kinesiology tape for proprioception, to using white athletic tape for temporary support.
Partial Loading Stage
The second stage is a partial load stage. Begin this stage as soon as you are able to place your foot on the ground while seated with minimal pain. While we will continue to perform ROM ankle circles, In this stage we are going to work on some of the intrinsic foot muscles, as well as begin loading some of the calf muscles. Whenever we injure a joint, typically the muscles around the joint become less likely to be activated. In this case the muscles that often become inhibited are the small muscles in the foot, and the muscles that cross the ankle joint. These muscles are responsible for assisting us with balancing and stabilization in our foot and ankle. Performing exercises targeting the intrinsic muscles of the foot have been shown to benefit both our balance(D.-R. Lee & Choi, 2019) , as well as our joint position sense (E. Lee et al., 2019). The two exercises that have been shown to be effective in activating the foot intrinsic muscles are the short foot exercise, and practicing differentiating the big toe and the lesser toes, which some people call toe yoga.
In the short foot exercise, you begin with your foot planted on the ground, with equal pressure distributed between the base of the big toe, the pinky toe, and the heel. Then, while keeping those points down, elevate the midfoot or instep of the foot. This exercise can be done seated at first, and then progress to weight bearing as it becomes more tolerable. Perform 3 sets of 5 second holds in this exercise.
The toe yoga exercise begins similarly, with the full foot placed on the ground. In this exercise, one practices lifting the big toe while keeping the lesser toes on the ground, and then placing the big toe on the ground while lifting the lesser toes in the air. Perform this exercise in 3 sets of 30 seconds.
The last exercise in the partial loading stage will be seated calf raises. Sit with your knees bent at a 90 degree angle with your feet directly beneath them. Then simply press your forefoot into the ground, lifting your heel into the air. Weight can be added and placed on top of the knee as you get stronger. You can also loop a resistance band around your forefoot and your knee to add more resistance. Perform 4 sets of 20 slow and controlled calf raises. Because this is a lower load exercise, we have to perform a higher volume in order to achieve the stimulus we need to adapt.
Initial Loading Stage
The third stage is the initial load stage. We are also going to begin balance training in this stage. You can begin this stage when you can, quite literally, back on your feet with little discomfort. During this stage you will keep performing the short foot exercises and toe yoga, but while standing as opposed to sitting. There are various forms of balance training, as well as equipment that can be purchased to train on such as foam blocks, bosu balls, wobble boards etc… Those items are great and have been shown to be effective, but if you don’t have the means and resources to purchase one of these items then effective balance training can still be performed.
An inexpensive and effective form of balance training progresses from simply balancing on one leg with eyes open. Once that becomes easy, try closing your eyes. Much more difficult right? This is because we are essentially taking out one of the systems that we use to keep our balance. We use multiple systems in coordination with one another to keep ourselves upright. The sensory systems are our proprioceptive, visual, and vestibular systems. They work together as a redundant checks and balance system to keep ourselves upright. When we close our eyes, we effectively take the visual system out of the equation and relying solely on the proprioceptive and vestibular systems. Our proprioceptive system is composed of receptors in our muscles, joints, ligaments, and even our skin that let us know where our body is in space. If you close your eyes and raise your arm, it is your proprioceptive system that lets you know that you have in fact, raised your arm. When we injure our ankle in an ankle sprain, often times our proprioceptive system also becomes impaired. This can affect our position sense in our ankle, and make us more prone to future ankle sprain incidences. Therefore it is vital that we rehab the proprioceptive system back to maximum capacity.
The last and most challenging balance progression to test your proprioceptive system is to stand on one leg, close the eyes, and tilt your head backwards until you are looking straight up at the ceiling. This is a fairly difficult exercise and you will very likely lose your balance so I would recommend being near a wall or partner for support. The reason this is so difficult is because we are basically taking both our visual and vestibular systems out of the picture. Our vestibular system is composed of 3 semicircular canals in opposing orientations, one in each plane of motion. These canals are filled with fluid and hairlike receptors that respond to movements of our head. The horizontal plane canal, which is the one we are using the most to not sway during single leg stance, is actually tilted about 30 degrees upwards (Biller, Gruener, & Brazis, 2011). Thus when we tilt our head backwards we render this canal almost useless forcing us to really stress our proprioceptive system in our ankle. Perform 3 sets of 30 seconds holds at whatever level you are able to.
Now that we are able to bear a decent amount of weight on our ankle, we can begin doing standing calf raises to strengthen the muscles that cross our ankle joint. Begin performing these with both feet directly below the hips. As you get more strength in the muscles on the outside of your calf, begin spreading your feet wider and wider apart. Then as you reach the maximum height of your calf raise, place the weight of your body onto the base of your big toe. This wide calf raise forces you to use the peroneal muscles, located on the outside of your calf. This exercise also reintegrates and strengthens a relatively inverted position in the ankle. Begin with 3 sets of 10 pain free or minimally uncomfortable repetitions, and slowly work up to 4 sets of 20-25 pain free repetitions.
The next load bearing exercise will be a mix of load, balance, and mobility; all of the things we have been working on thus far. It is called the star drill. In this drill you begin by standing on one leg, and see how far you can extend your other leg forward to touch the ground. You can bend at the ankle, knee and hip, anything that you need to do to touch the other foot as far as possible ahead of you. Then extend your foot out to the side as far as you can, and then extend your foot behind you as far as possible while maintaining balance and control on the ankle you are strengthening. You have the option of making any kind of pattern with your movements; a clock pattern, a star, tracing your favorite aromatic carbon structure etc… As long as you are pushing yourself to balance up to your pain free end range of motion forwards, backwards, and sideways directions.
The star drill can also be modified to be more climbing specific. In order to do this, find a systems board with two jugs for your hands, and a large selection of footholds to choose from. Practice hanging on the jugs and weighting the recovering ankle in different positions and on different holds. Try out different body positions and different ankle positions relative to your body. This might include using a foothold far away from your body, crossing through your body, in a drop knee position etc… Ideally, you will practice maintaining a neutral position in the foot in order to not allow excessive repetitive inversion strain on the passive outer structures of the ankle.
Once you are able to perform the climbing specific star drill with little to no pain, it is ok to begin climbing again. It is important to start out slowly on large footholds. Top rope or auto belay is preferable because there is a lesser chance of falling and placing a load on your ankle that it is not prepared for.
Dynamic and Plyometric Stage
Dynamic and plyometric exercises are the last crucial stage in rehabilitating an ankle properly. Progressing to plyometric exercise has been shown to reduce the risk of recurrent sprains after acute ankle injury (Vuurberg et al., 2018). This is to be performed after you have progressed through all of the other stages and are basically pain free. This step is often overlooked because we can typically return to climbing much sooner than we are ready to perform plyometric and dynamic activity, which is great, but we have to remember that falling off the boulder is itself a dynamic plyometric exercise. It doesn’t make sense to make the first exposure to this kind of load in an environment with a lot of different uncontrolled variables like projecting a boulder again. The beginning of plyometric exercise is as simple as hopping up and down on both legs. While this may not seem like much of a stimulus, the dynamic action of hopping acts like a multiply for you body weight. Hop with feet about hip width apart, landing with your knees slightly bent and in line with your ankles and hips. Begin with hopping on both legs for 10 seconds, and work your way up to 30 seconds. As this becomes easier, try hopping to either side and forwards and backwards, adding in a twist etc..
Next try hopping on only one foot. See if you can hop the same number of times in a row without pain on your recovering ankle and on your normal ankle. This functions as a great audit to see if your ankle is back to normal and if you are ready to progress to full activity again. After hopping straight up and down, mix it up by hopping from side to side, hopping and turning, hopping on uneven surfaces etc.. Begin with 10 seconds of hopping and build up to 30 seconds at a time in different directions.
The next progression is falling practice. Yes you read that right. Remember it wasn’t technically climbing, but falling that got you injured. We can also often develop a significant amount of fear of falling after injury. The psychological piece is an often overlooked aspect of rehabilitation, but its importance is not to be understated. Sometimes, people are not necessarily limited in their physiological capacity to return to sport or play, but in their psychological capacity. Developing and maintaining a fear of moving in a certain direction or manner, i.e. falling off a boulder, can lead to what is called fear avoidant behavior, and/or kinesiophobia (fear of movement). These psychological factors can develop even if you have strong muscles and good movement patterns, as shown in recent research on individuals recovering from ACL reconstructive surgery (O’Connor et al., 2020). Fear avoidance and kinesiophobia are also associated with prolonging injuries, turning them into chronic pain syndromes and leading to disability over time (Vlaeyen et al., 2016; Vlaeyen & Linton, 2012). It is pretty natural to have feelings of anxiety and fear when returning to an activity that you got hurt doing. It is important to return to activity as soon as you can, and to stay as positive as possible throughout (Meulders, 2019).
This exercise will begin, and progress in a logical stepwise fashion to ensure that we do provide the correct amount of physiological, as well as psychological, stimulus. In this exercise, pick an easy problem that goes straight up (system boards and even campus boards work very well for this), climb up a small amount (even if it’s just one or two moves), and take a controlled fall onto both feet. You should try to land in a similar fashion to how you landed during the double legged hops; feet about hip width apart, with knees over situated over your feet. Try to absorb the majority of the force at your knees and hips. As you become stronger and more confident, climb higher and higher. A good progression is to climb until you feel slightly uncomfortable with the height and then take the controlled fall from there. Once you have established that controlled falls from easy routes are ok, try falling from different and awkward body positions that you normally experience during climbing such as in a side pull, on the overhang, off of a slab route etc…
Now that you have patiently and diligently completed your rehab for your ankle, get back out and climb that project! Remember to always have good pad placement, attentive spotters, and a positive mindset.
About the Author:
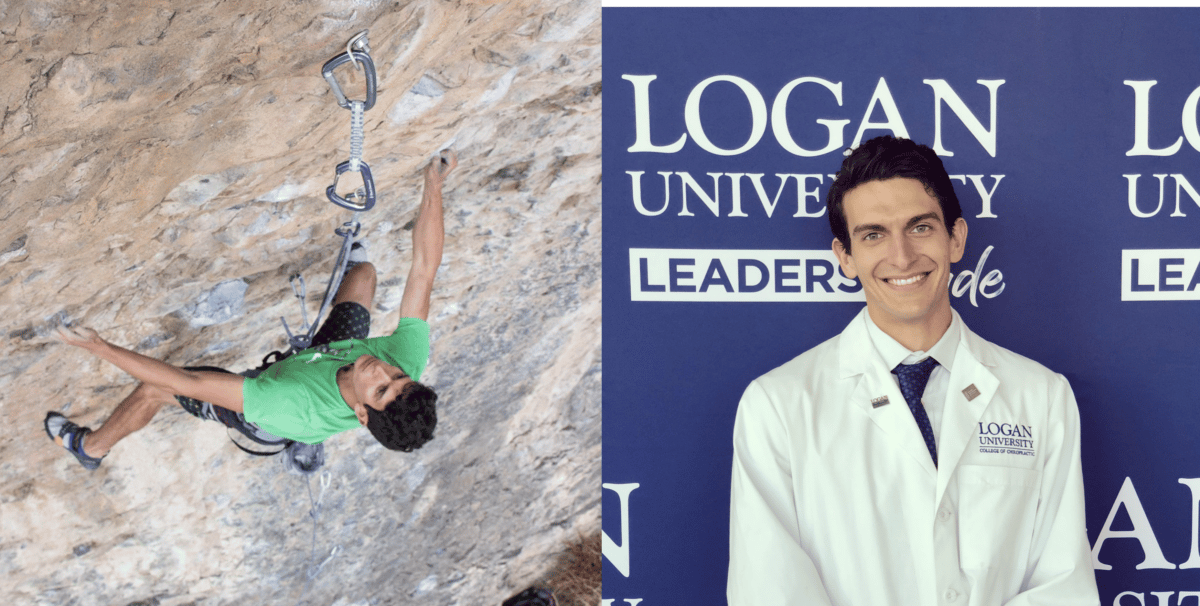
Nicholas Hedges graduated from Logan University with both his Doctorate in Chiropractic, and a Masters degree in Sport Science and Rehabilitation. He now practices in Summit County Colorado at Summit Chiropractic and Rehabilitation. When not at work, he enjoys being outdoors climbing, trail running, and skiing. He hopes that this article helps people that experience both acute ankle sprains, as well as those that have had an ankle sprain previously, and have not been able to return to the activities they love to do. When not in the great outdoors he loves cooking, reading and teaching.
Email: drhedges93@gmail.com
Office phone: 970-513-9234
Office Instagram: summit_cr3
References
- Bachmann, L. M., Kolb, E., Koller, M. T., Steurer, J., & ter Riet, G. (2003). Accuracy of Ottawa ankle rules to exclude fractures of the ankle and mid-foot: systematic review. BMJ , 326(7386), 417.
- Biller, J., Gruener, G., & Brazis, P. W. (2011). DeMyer’s the neurologic examination: A programmed text. New York: McGraw-Hill Medical.
- Kerkhoffs, G. M. M. J., Rowe, B. H., Assendelft, W. J. J., Kelly, K., Struijs, P. A. A., & van Dijk, C. N. (2002). Immobilisation and functional treatment for acute lateral ankle ligament injuries in adults. Cochrane Database of Systematic Reviews , 3, CD003762.
- Lee, D.-R., & Choi, Y.-E. (2019). Effects of a 6-week intrinsic foot muscle exercise program on the functions of intrinsic foot muscle and dynamic balance in patients with chronic ankle instability. Journal of Exercise Rehabilitation, 15(5), 709–714.
- Lee, E., Cho, J., & Lee, S. (2019). Short-Foot Exercise Promotes Quantitative Somatosensory Function in Ankle Instability: A Randomized Controlled Trial. Medical Science Monitor: International Medical Journal of Experimental and Clinical Research, 25, 618–626.
- McKeon, P. O., & Mattacola, C. G. (2008). Interventions for the prevention of first time and recurrent ankle sprains. Clinics in Sports Medicine, 27(3), 371–382, viii.
- Meulders, A. (2019). From fear of movement-related pain and avoidance to chronic pain disability: a state-of-the-art review. Current Opinion in Behavioral Sciences, 26, 130–136.
- O’Connor, R. F., King, E., Richter, C., Webster, K. E., & Falvey, É. C. (2020). No relationship between strength and power scores and anterior cruciate ligament return to sport after injury scale 9 months after anterior cruciate ligament reconstruction. The American Journal of Sports Medicine, 48(1), 78–84.
- Stiell, I. G., R. D. McKnight, G. H. Greenberg, I. McDowell, R. C. Nair, G. A. Wells, C. Johns, and J. R. Worthington. 1994. “Implementation of the Ottawa Ankle Rules.” JAMA: The Journal of the American Medical Association 271 (11): 827–32.
- Schöffl, V., Popp, D., Küpper, T., & Schöffl, I. (2015). Injury trends in rock climbers: evaluation of a case series of 911 injuries between 2009 and 2012. Wilderness & Environmental Medicine, 26(1), 62–67.
- Vlaeyen, J. W. S., Crombez, G., & Linton, S. J. (2016). The fear-avoidance model of pain. Pain, 157(8), 1588–1589.
- Vlaeyen, J. W. S., & Linton, S. J. (2012). Fear-avoidance model of chronic musculoskeletal pain: 12 years on. Pain, 153(6), 1144–1147.
- Vuurberg, G., Hoorntje, A., Wink, L. M., van der Doelen, B. F. W., van den Bekerom, M. P., Dekker, R., van Dijk, C. N., Krips, R., Loogman, M. C. M., Ridderikhof, M. L., Smithuis, F. F., Stufkens, S. A. S., Verhagen, E. A. L. M., de Bie, R. A., & Kerkhoffs, G. M. M. J. (2018). Diagnosis, treatment and prevention of ankle sprains: update of an evidence-based clinical guideline. British Journal of Sports Medicine, 52(15), 956.
- Prentice, W. E. (2016). Principles of Athletic Training: A Guide to Evidence-Based Clinical Practice. McGraw-Hill Higher Education.
- Disclaimer – The content here is designed for information & education purposes only and the content is not intended for medical advice.

Great article for working on everyday aches and pains as we age. These excersises help muscles stay stretched and loose. Great job Dr Nic
What a great article! You are amazing, and I am so impressed at how knowledgeable and articulate you are! So proud I know you!
Thank you both!
Thank you for a great article that meets me where I am with my ankle injury. Helpful and hopeful.
Right on, thanks heaps for this article.