Finger Training Recommendations After Pulley Injury
You are finally at the end of your training cycle, months, or multiple weeks of weights, hangboarding and a lot of board climbing. You are ready to start the new season and start projecting the line you were dreaming of. But, unfortunately during the last few weeks, your fingers were feeling sore and tired. Excited at the prospect of getting stronger, you pushed more and more avoiding the necessary rest. Because “no pain no gain”, right?
Multiple days in a row on a fingerboard without listening to signals of fatigue puts you in a condition of overtraining and makes you prone to getting injured. The general soreness transformed into a specific sharp ache at the base of the middle of your finger. What happened? And what to do now?
Signs and Symptoms
With a pulley injury you are going to feel soreness and rigidity in your finger. If you try to massage it gently with the other hand you are probably going to perceive a sharp and immediate discomfort at the base of the finger or around the middle knuckle. In this case the injured pulleys will be respectively the A2 and A4, the most common ones. At this point if you try to pull with the finger while performing a one finger grip, it will feel almost normal in a finger drag position, while in a half crimp position the discomfort will increase due to the increased force applied in the half crimp position.
On the wall you will find a similar scenario. With more passive grips such as three fingers drag or slopers it should feel fine, while the half or full crimp position will unleash an uncomfortable sensation that will make you want to reduce the force you are exerting on the hold or let go. The discomfort is correlated to the type of climbing and grips you will use, such as in overhangs when the load on the fingers is higher, on small holds, on latches or dynamic moves to crimps and in some pinch grips too. Moreover, the barbell bar, juggy climbing holds, or pull up bar will trigger the ache because it can squeeze the injured finger.
You will feel more discomfort at the beginning of your climbing session or the next morning when the tissues are less rich in blood and nutrients. After the warm up you could feel that it is not too bad and maybe you will be more likely to underestimate the issue and keep training the same as you were doing before. But this is not the best approach. You will need to step back and reduce load or adjust some of your training.
Assessment
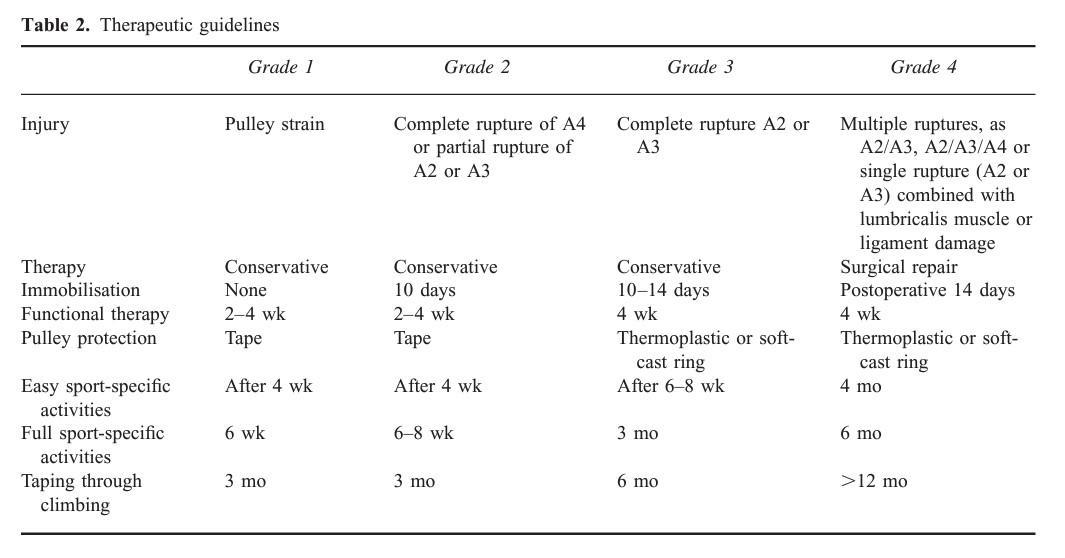
In 2003 Schöffl proposed a finger flexor pulley injuries classification (see Figure 1) that is nowadays still used to identify and evaluate pulley lesions. There are four grades where 1 is the lowest grade of injury and 4 is the most severe with multiple full pulley ruptures. Schöffl suggests that for grade 1-3 the conservative treatment is the best approach and to save the surgical method just for grade 4. Therefore, for most of the pulley injuries (from 1-3) it is necessary to understand the conservative rehabilitation process, however so far this process is not described well in scientific literature.
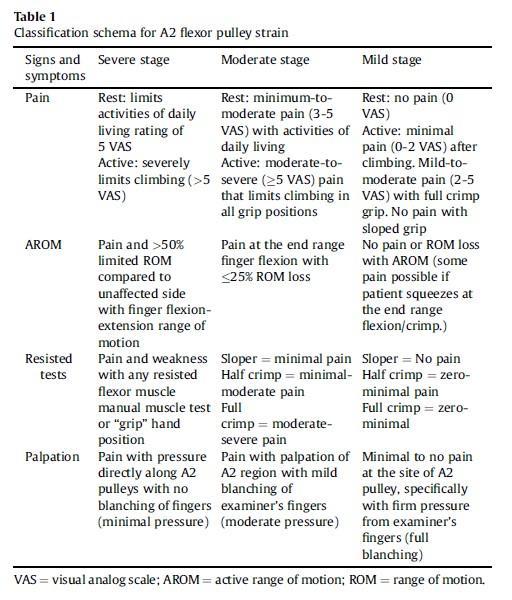
In 2020 Cooper proposed a potential classification schema for individuals with A2 flexor pulley strains (see Figure 2). The objective of her publication is to classify strains into subcategories of severity that aim to guide therapeutic pathways. Her approach allows anyone to self-diagnose a pulley injury since the assessment is intuitive and it doesn’t require medical devices. It is important to note that to really understand the severity and the length of the lesion it is necessary to seek a medical professional and submit the finger to a more accurate investigation with ultrasounds.
Cooper suggests addressing the severity of the injury includes combining the signs and symptoms like pain, active range of motion, resisted tests and palpation.
Common Finger Training Tools and Protocols
There are many ways to prepare your fingers to be better at crimping and holding small/bad holds. One of the most intuitive ways is to do board climbing on small edges. The idea is to expose your fingers to the condition you want to get better at (crimping). This exercise is really close to the actual sport movement because while you train your fingers you develop your skills.
Hangboarding is another really common way to achieve finger gains. It’s a really controlled setting because you are hanging just a few inches from the ground, and you can drop as soon as you want. It allows you to train different grip types and to measure the load and time you are recruiting your fingers, making it one of the best ways to build protocols for prescribing training. Another option is finger lifts where you lift a weight trough using an edge, instead of hanging.
Nowadays it is becoming more accessible and popular to use a dynamometer (a device that measures force), built in the hang board or in a separate device which can be attached between an edge and weight, so that you can keep track of the exact amount of load as a function of time.
More specifically about finger training protocols, some examples are:
- Long duration hangs (>20-40 seconds)
- Max hangs (<7 seconds)
- Repeaters (7:3; 5:10; 7:53)
There are many parameters to decide in the protocol, including edge size (smaller edges or bigger edges), 2 hands or 1 hand, lifting or hanging, type of contractions, speed, volume, frequency and more.
As we can see the options to train the fingers are huge, but what happens during an injury? What’s the best combination of tools and protocols to rehab a pulley strain and get back to climbing sooner?
The Rehabilitation Process
So far, the scientific research can’t help us with a definitive answer. The finger training protocols are not tested enough to elect the best one.
However, we can look around in the fields that have been explored so far and we can learn more about the behavior of connective tissue under different types of load. Pulleys are not tendons, but they share the same main constituent that is collagen, so we can assume that they will behave similarly under stress.
A good example of an injury common in many sports and therefore having a large resource of literature is Achilles tendinopathy. The good news is that there are positive outcomes in terms of tendinopathy recovery, however different protocols and loading factors are used and it is still unclear which were optimal for recovery. So, let’s dive into it.
A good start will be to acknowledge that the treatment with the highest level of evidence for tendinopathy treatment is exercise rehabilitation. So, yes! We can (and must) use the hangboard for overcoming a pulley strain!
The purpose of exercise as a treatment is to provide mechanical load to the pulley to promote remodeling, decrease pain, and improve forearm strength, endurance, and hand grip function. The tendon appears to respond more favorably to heavier loads at longer durations than to lighter loads at shorter durations.
Isometric contractions have been proposed as superior treatment for tendinopathies but there is no current evidence that supports it as better than any other type of contractions like eccentric or concentric. Based on this we can assume that any type of muscle contraction can be used to mechanically load the tendon. The choice of exercise should be progressive and based on the individual’s response like effort and pain perception.
To improve tendon strength and size, exercise with higher loads and slower contractions seems to be the greatest benefit.
A recent systematic review and meta-analysis by Lazarczuk et al. found that resistance training protocols completed by healthy individuals at high intensities (greater than 70% of 1RM) elicited large increases in tendon stiffness and modulus, and small increases in CSA (Cross Sectional Area). In contrast, low-intensity protocols (less than 70% of 1RM) produced moderate increases in tendon stiffness, large increases in modulus, and no clear change in CSA. This suggests that we must load the tissue and we should do it with high loads. However this research has been done on healthy individuals, so it is important to consider how and when we want to use this information during in the recovery phase. We will most likely stress the fingers with heavy loads at the latest stages of the process because the injured tissue will not respond positively during the early stages.
The rehabilitation process can be divided into 4 phases:
- Gentle Loading Phase
- Recovery
- Rebuilding
- Return to sport
Exercise to promote recovery is initiated immediately in the symptom-management and load-reduction phase, whereas sport-specific loading is generally introduced in the later phases. Complete rest from all activities during the early phases of treatment may not be necessary if rest is adjusted based on the symptoms.
1. Gentle Loading Phase
The purpose of this phase is to stop the negative cycle of overloading and continued injury progression. Because complete rest and tendon unloading can be detrimental and prolong recovery, it is helpful to use the level of symptoms and pain as a guide when determining the appropriate level of activity. Patients vary in their pain perception and tolerance, but avoiding moderate and severe pain and worsening symptoms over time is a priority when considering the activity level. The pain monitoring model like the numeric pain rating scale (NPRS) scale is a useful tool that helps clinicians and patients determine how exercise programs and load management should progress.
Researchers suggest that education and understanding of the injury is the prerequisite for successful outcomes. This will allow you to be more prone to stick to the recovery program and commit to the treatment. Moreover it has been seen to be very useful to use a training diary to monitor the exercises performed correlated with the load and pain rating. This will help to assess progress.
At this stage, gentle and lightweight hangs or lifts should be performed, preferably for a short session (20-30 min) but frequently during the week (4-5 times). We should be guided by the pain rate. There should be 0/10 NRS pain but some clinicians will allow climbers to train at a threshold that is relatively low (<3/10 NRS). Pain should not increase after the session or the day after. Progression is key but in this phase, it is better to not rush increasing the load.
Example:
- Edge size: 20-30 mm
- Rep duration: 30-45 seconds
- Load: < bodyweight (few kg in case of lifts)
- Rest: 3-4 minutes (complete)
- Sets: 4 Frequency: 4-5 times a week up to 2-3 times a day
2. Recovery Phase
The aim of this phase is to regain the strength of the forearm muscles and improve pulley tolerance to load. As symptoms and function improves, the exercises are progressed by increasing the number of repetitions, and load. The evaluation of symptoms, stiffness, pain, and swelling after training, especially the following day, is crucial before determining the appropriate increase in training intensity.
Example:
- Edge size: 20-30 mm
- Rep duration: 10 seconds
- Load: >= bodyweight
- Rest: 2 minutes
- Sets: 6
- Frequency: 4 times a week up to twice a day
3. Rebuilding Phase
The purpose of this phase is to transition to heavier strength training, increase or start of activities characterized by higher rate of recruitment both through load and speed.
Tendon tissue requires a longer recovery from heavy loading activities (36–72 hours), whereas lighter activities can be performed more often. So, at this stage, the session intensity should increase while the volume should be reduced through decreasing the number of sessions. Moreover, some recruitment finger curls should be integrated at this stage to regain the rate of force development (RFD) necessary for climbing.
Example:
- Edge size: 10-20 mm
- Rep duration: 5-10 seconds
- Load: > bodyweight
- Rest: 2 minutes
- Sets: 4-6
- Frequency: 3 times a week
- Speed: high velocity during recruitment (first phase of the hang)
4. Return to Sport Phase
The goal of this phase is to return the athlete to full sport participation and performance while pulley and hand functions continue to improve.
At this stage the finger training session should be alternated with a on the wall training with the awareness that the injured finger cannot tolerate high speed forces like latches. Initially, the approach to the board must be with slow movements in a controllable environment. The progression must consider the steepness of the wall, the size of the hand and feet holds, and the weight distribution between upper and lower limbs.
The finger training should be a progression of the rebuilding phase protocol with the aim to use the amount of weight close to the pre-injury stage.
Conclusions
Why do we get injured?
The current scientific rhetoric suggests that the initial repetitive stressing of the tendon (the pulley in this context) results in the deterioration and disorganization of collagen fibers, prompting an immediate inflammatory reaction. If this repetitive overloading reoccurs, the condition of the pulley deteriorates further due to a cycle of injury affecting both the original tissue and inadequately repaired tissue, accompanied by inflammation and unsuccessful healing attempts.
How to manage the pulley injury?
First, we need to stop and reconsider the amount/type of current training to avoid the worsening of the injury. We should try to evaluate the grade of injury using the assessment proposed by Schöffl and Cooper. Then we should start the rehabilitation program through the 4 stages we analyzed in detail before.
We should keep in mind that the focus of the treatment will be a gradual recovery of the functions and loading tolerability of the pulley.
The research suggests that there is not a favorite contraction type, high magnitude loading induces greater tendon adaptations (always in relation with the recovery stage), and to prioritize load progression over time. Moreover, the frequency of exercise sessions and numbers of sets/repetitions in sessions can vary considerably, largely depending on the loading intensity and tolerability.
Both the assessment and the implementation of the recovery phase can be complex to figure out. Since every injury can differ from the other it is highly recommended to address a specialist like a physical therapist (PT). A PT can guide you step by step through the journey from the assessment to the return to sport phase.
Author Bio

My name is Simone Tentori and I’m an Italian climber, coach (Sport Science Bachelor), PT student and routesetter. I’ve been climbing for 14 years from competing in the Italian National Team to outdoor bouldering up to 8C (V15). Climbing is both a personal and a professional passion. My pursuit is to travel to put my hands on world-class boulder problems while assisting people with their climbing training whether is for performance or recovery.
The Research
- Carrie Cooper DPT, P. L. (2020). A potential classification schema and management approach for individuals with A2 flexor pulley strain. Journal of Hand Therapy.
- Karin Gr¨avare Silbernagel, P. P., Shawn Hanlon, M. A., & Andrew Sprague, D. M. (2020). Current Clinical Concepts: Conservative Management of Achilles Tendinopathy. Journal of Athletic Training.
- Kohle Merry, C. N. (2022). Foundational Principles and Adaptation of the Healthy and Pathological Achilles Tendon in Response to Resistance Exercise: A Narrative Review and Clinical Implications. Journal of Clinical Medicine.
- Lazarczuk, S., Maniar, N., Opar, D., Duhig, S., Shield, A., Barrett, R., & Bourne, M. (2022). Mechanical, Material and Morphological Adaptations of Healthy Lower Limb Tendons to Mechanical Loading: A Systematic Review and Meta-Analysis. Sports Medicine.
- Moraes, S. A. (2022). Novel insights into the pathogenesis of tendon injury: mechanotransduction and neuroplasticity. Neural Regeneration Research.
- Uzo Dimma Ehiogu, M. B., Volker Schöffl, M. M., & Gareth Jones, P. M. (2023). Rehabilitation of Annular Pulley Injuries of the Fingers in Climbers: A Clinical Commentary. Current Sport Medicine Reports.
- Volker Schoffl, M., Thomas Hochholzer, M., Hans Peter Winkelmann, M., & Wolf Strecker, P. M. (2003). Pulley Injuries in Rock Climbers. Wilderness and Environmental Medicine.
- Disclaimer – The content here is designed for information & education purposes only and the content is not intended for medical advice.

Related Posts