Pull-Ups for Climbers: Technique, Training, and Transfer
I dropped down to the mat and was swiftly met with congratulations from my friends that brought me along with them down to our local climbing gym. I had just flashed and essentially campused my first V3 climb, which looking back, was meant to be completed elegantly with a drop knee here and a rear flag there. My absolute lack of climbing technique was overshadowed by my calisthenic skill – I grabbed onto whatever handholds that had most resembled a pullup bar and floated upwards until I found a foothold. From there on, finishing the climb was easy enough, and I had bypassed the hardest midsection handedly! We cannot overlook how perfectly the pull-up transfers over to climbing. Having decent pull-up strength allowed me to focus on climbing technique even without any experience. Performing clean pull ups free of momentum allows for efficient, beautiful climbing in its purest form. The ability to cleanly perform pull-ups, i.e. without using momentum, is so central to the physicality of climbing that mastering it allows one to immediately focus on the technical facets of the sport.
To understand this relationship, we must take the pull-up and strip it down to its most basic form. We analyze the pull-up by breaking the body down into four distinct parts that synchronize to produce efficient movement. All of these listed muscles are worked in the pull up.
Here is a video of a pull-up that you can reference throughout this article.

1. The Hand, Finger, and Wrist
A cylindrical grip is standard. The flexor digitorum superficialis and profundus muscles contract to flex the fingers to maintain grip. Wrist muscles, such as the flexor and extensor carpi muscles, isometrically contract to stabilize the wrist for better finger force production.

2. The Scapula
The scapula glides along the thoracic wall in four directions. Elevation (shrugging your shoulders) and depression (down to the ground), protraction (rounding shoulders forward) and retraction (pulling shoulders back).
Scapular depression occurs via the pectoralis minor and lower trapezius, and scapular retraction by the rhomboids and middle trapezius. Ensuring scapular depression and retraction isolates and targets the latissimus dorsi to contract in the next phase.1
3. The Arm
Adduction and extension of the arm (elbows moving towards the side of the body) is what actually pulls the body up. The main contributor is the latissimus dorsi, along with secondary muscles such as the biceps brachii, posterior deltoid, and triceps brachii.
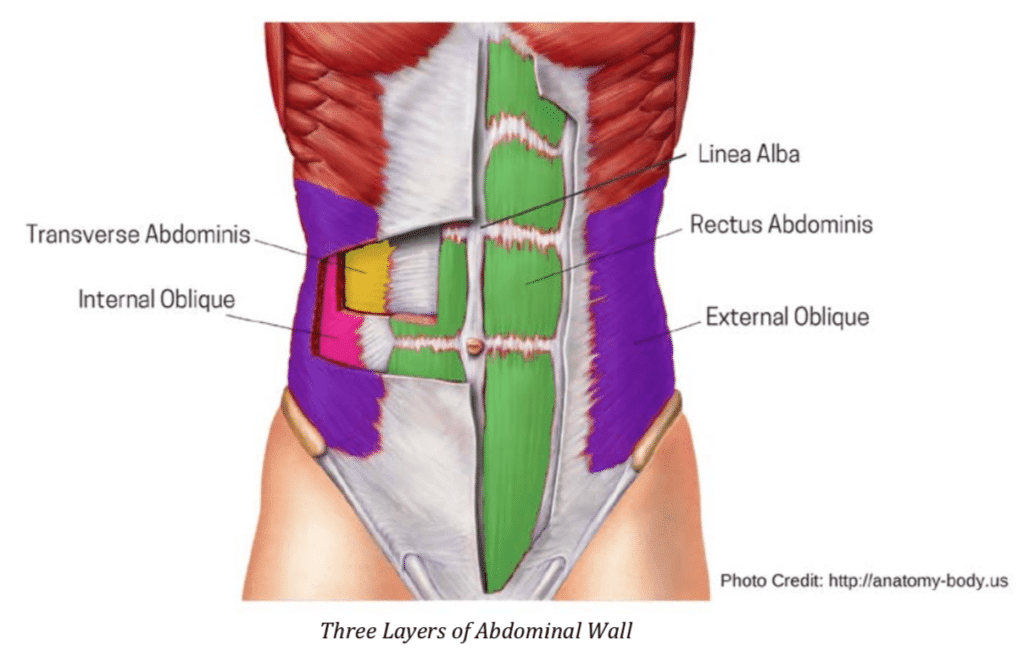
4. The Core
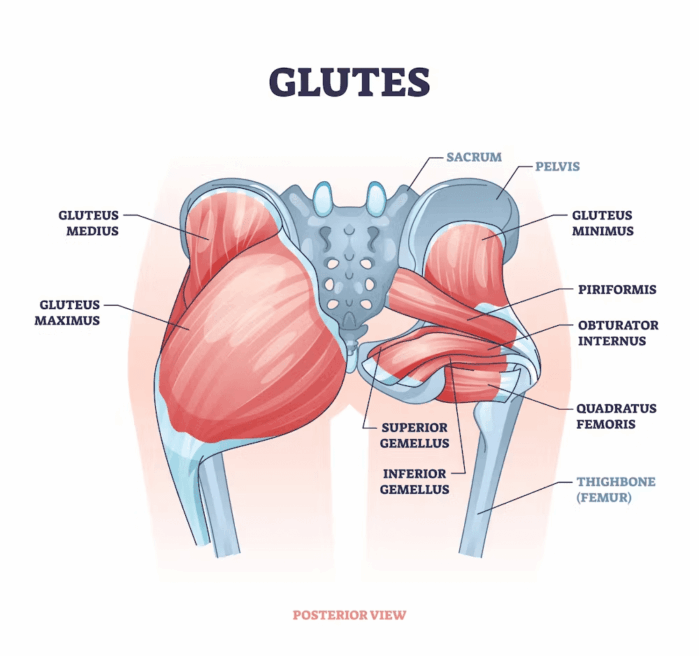
The lumbar spine moves from being arched to hollow as the pull up progresses. This requires the rectus abdominis (the six pack!), external/internal obliques, and transversus abdominis to contract, causing posterior pelvic tilt and lumbar flexion, keeping a hollow body. The relative hip extension allows for better muscle length tension for the gluteal muscles to contract effectively. The trunk and leg musculature stiffens our lower body up and prevents our pelvis and legs from flopping around, which causes unwanted energy leakage. If done correctly, the feet should be lifted slightly off the floor when dead hanging.
Designing a training regimen for pull ups is simple. Before attempting to do the full pull up, certain warmups can be good in preparing the relevant muscle groups for activation in the correct order. With or without a bar, raise both arms overhead and think about bringing your fists down towards the floor without bending your elbows. This limits motion to the scapula and forces the lats and lower trapezius to work. This may be done for reps with a prolonged hold at end range. The client may initially struggle to do this without bending their elbows and frequent cues may be required.
Beginners can use a resistance band to decrease total force needed to work through a full range of motion.
Stay with the bands and test periodically during your training to see if you can complete one clean pull-up, then slowly work you way up from there. Clients that try and progress off the bands too quickly may see shoulder elevation compensations. In this case, the muscles we discussed earlier in the scapula section aren’t trained/used as efficiently. Here is what that compensation could look like.
Advanced performers can increase repetitions to train endurance or perform weighted pull ups for further strength and power. It is a versatile exercise that is easily adjustable to one’s skill level that will introduce real gains if performed with correct technique.
Hanging progressions:
Dead Hang: Prerequisite to doing the pullup and requires sufficient finger and hand flexion strength. A good way to begin pull-ups is to do sets of 30 sec dead hangs to get the upper extremity used to supporting full body weight. Regressions and progressions include using a band or loading with a weighted belt, respectively.
Active Hang: This includes the warmup drill discussed earlier. Sets of scapular retraction and depression before doing your working set of pullups helps prime the scapular stabilizers such as the middle and lower trapezius, as well as the priming the latissimus dorsi. The video from the section where we discussed the scapula demonstrates this.
Perfect Hang: The perfect hang is a sizable jump in difficulty from the active hang and should not be attempted too soon if not supported with a band. Starting from the active hang, think about pulling your fists to where your pockets would be while keeping your elbows relatively straight (doesn’t need to be locked out). The scapular retractors will be maximally challenged at this point, so make sure to keep them engaged as much as possible. Maintain a posterior pelvic tilt and crunch the abs to help properly engage the glutes. You can use the “coin cue” (think about squeezing a coin between your butt cheeks) in order to engage the glutes. For the extremely advanced, perform a horizontal row by pulling the bar to the chest while maintaining the feet in the air.
Helpful Cues:
Here are a couple cues that can be very helpful in getting the client past a mental block or hump in their pullup training. The pull up is a more advanced exercise that requires multiple parts of the body to work together cohesively. The high degrees of freedom in movement mean that considerable mental load is placed, and it can be hard to selectively activate specific muscles that we discussed above.
- Grab the bar and “spread the curtains” outwards both ways.
- Bend the bar and try to turn your whole arm/shoulder outwards so that your palms would face yourself (shoulder external rotation).
- Because the pull-up is named as it is, many people think of pulling themselves up and find that difficult. Instead, imagine pulling elbows down towards the floor, or pulling the bar towards the chest.
- Lead with the chest as you are pulling up, instead the head. This prevents forward head posture (potential levator scapulae muscle strain due to extreme end range lengthening), which in turn causes scapular protraction/elevation (rounded shoulders). Leading with the chest causes more lat activation.
HOW PULLUPS TRANSFERS to CLIMBING
A recent electromyography study examining upper extremity muscle activity during rock climbing found the highest levels of activation for the latissimus dorsi, flexor digitorum superficialis (finger flexor), and extensor carpi radialis brevis (wrist extensor and stabilizer).2
These are all muscles that we’ve discussed earlier and are all trained thoroughly in a pull up. It makes sense, then, to incorporate pull ups in any climber’s training routine. The pull up should be the bread and butter of any climber’s training regimen, just like free throws are for a basketball player. The majority of climbing can be boiled down needing sufficient finger strength and adduction/extension of the shoulder, making pull ups perfect for beginners looking to advance to intermediate climbs and above.
Overhangs highlight the benefits of training pull ups perfectly. Unlike being on a slab or vertical wall, being on an overhang means that gravity is pulling you down towards the mat instead of pulling your foot into a foothold. The climber must have sufficient grip/finger strength to hold on in the first place. A retracted and depressed scapula in combination with sufficient shoulder adduction and extension strength is required for the climber to move between handholds. The glutes must be active to maintain hip extension to keep the legs on footholds. The abdominals work to create a stiff trunk so our arms and legs can generate force effectively. Here’s a cave climb demonstrating everything we’ve talked about.
Nearly every aspect in this climb can be attributed to having sufficient pulling strength. Every instance of shoulder extension, elbow flexion, scapular movement, trunk stiffness, and glute activation can be traced back to the pull-up’s movement pattern.
- The climb starts with a partial range pull up that lets me navigate to the handholds behind me.
- On multiple occasions, dangling legs are able to get back on footholds. This is due to the tension generated from the rhomboids, trapezius, and latissimus dorsi, causing shoulder extension. Simultaneously, the abdominals contract resulting in spinal flexion.
- After exiting the overhang section and getting both hands on the flat handholds, I do two big pull ups that get me to the finishing hold.
We should also note that this climb can really be separated into a horizontal and vertical portion. The vertical portion is exactly as we have described above. The horizontal portion has their body starting perfectly perpendicular to the line of gravity – it pulls mercilessly on all parts of the body and the lever arm is maximally elongated. (A lever arm is how long an object or body part extends away relative to its point of contact to a surface. The longer that lever arm, the more gravitational force is experienced at any given point of that object). This makes that portion much more similar to a horizontal row than a pullup, placing much more stress on the scapular adductors: the rhomboids and middle trapezius.
Everything we discussed regarding posterior chain engagement with the pull up and vertical movement is even more paramount during horizontal pulling. The remarkable soreness that comes the day after doing a bunch of cave climbs or horizontal rows will remind the climber just how many muscles exist along their back side and just how instrumental they are.
Downclimbing is crucial in preventing potential ligament and meniscus ankle and knee injuries, and should not be skipped unless necessary. The movement pattern used to navigate down the hand holds is akin to the pull-up’s eccentric portion. We see exactly that at the end of the video where I downclimb instead of hopping off of the finishing hold.
In the event that the climber loses their foothold or core tension (which won’t happen because they’ll have practiced their pullups!) forcing the upper extremities to take the entirety of their bodyweight, they can simply pull themselves up to the next hand hold. Even a partial pullup can be incredibly useful by revealing more options for footholds that were previously unavailable due to limitations in hip range of motion or simply because they are unattainable. This second example is a more vertical climb demonstrating exactly that.
The pullup is also very accessible for youth climbers that are trying to have a program to supplement their climbing. Kids typically have a higher strength to weight ratio. A study that evaluated pullup repetition count and plank hold times found that increasing body weight had negative correlation on activities that involved lifting the body off of the floor, making typically developed kids suitable candidates for pull-up training.3
The pull-up is a beautiful, full body exercise that has so many benefits and can be a very functional movement pattern to learn (even outside of climbing!) It needs to be stressed that climbing isn’t always an affordable or accessible activity for everyone. People that are looking to get into climbing or are currently a climber without access to a climbing gym can easily train pullups on the side. A doorframe pullup bar is affordable and some urban and suburban environments have pull-up bars in public parks. A bar is also optional. Any safe, sturdy surface that people can easily grab on can be trained on.
I hope this was a helpful, comprehensive introduction to pull-ups. I truly believe that any climber will see massive improvements in their climbing ability by adding a proper pull-up routine to their training regimen. Stay safe, pull up, and climb on :)
Author Bio:
Brian Hsiao (he/they) is currently a third year Doctorate of Physical Therapy student at Stony Brook University in Long Island, New York. Four years ago he randomly got into doing pullups after spontaneously ordering a pullup bar and taught himself from zero. He is currently more focused on training weighted pullups rather than climbing (the nearest climbing gym is 2.5 hours away by bike). Other than rock climbing, his main interests currently include cycling (both riding and fixing!) and calisthenics. You can catch him street riding solo or with friends and larger groups in Manhattan, Brooklyn, and Queens (in order from most to least likely). He has been getting more into longer distance rides and most recently did a 80 mile ride to Montreal. You can reach him at bonsaihair21@gmail.com.
Reference List:
- Luijkx T, Bell D, Baba Y, et al. Scapula. Reference article, Radiopaedia.org (Accessed on 07 Dec 2024) https://doi.org/10.53347/rID-30653.
- John William McCann, Rebecca R. Rogers, Nicholas B. Washmuth. Upper Extremity
Electromyography During Bouldering: Research Report. Indian Journal of Physiotherapy and Occupational Therapy 2023;17(3). - Ervin RB, Fryar CD, Wang CY, Miller IM, Ogden CL. Strength and body weight in US children and adolescents. Pediatrics. 2014 Sep;134(3):e782-9. doi: 10.1542/peds.2014-0794. PMID: 25157016; PMCID: PMC4768737.
- Disclaimer – The content here is designed for information & education purposes only and the content is not intended for medical advice.

Related Posts