Hang-Boarding Prehab Routine For Intermediate Climbers
You are climbing on your project for the third time this week and you are getting closer to the crux. The pump clock is ticking so you frantically throw for that tiny crimp that has been haunting you for the past month. As you latch onto the crimp with your right hand, your left foot blows off of the sad excuse of a foothold it was on and you begin to barn-door. You squeeze your core, pull harder with your right hand and then…Pop! You hear that dreaded sound in your right ring finger… You begin to tear up and… Just kidding!…You have been doing prehab on a hang-board for the previous 6 months which prepared your fingers for this moment. You hold the move, keep it together, and send the route injury free!
Before you begin!
This program was based on a hang-board protocol performed by climbers who had been climbing for the previous 6 months, were > 25 years of age, and had a minimum of 2 years of climbing experience14.
Anatomy review
Before discussing how to hang-board, it is important to have a basic understanding of the anatomy of the fingers, hands, and forearms. When a climber uses a hang-board, the type of grip that they choose will influence the specific structures (muscles, tendons, and ligaments) that are loaded. Here is a brief introduction to the key structures that will be targeted in this training program:
Muscular/tendinous structures
1) Flexor digitorum superficialis1
- Origin – medial epicondyle of the humerus via the common flexor tendon + proximal half of anterior border of radius1
- Insertion – palmar aspects of the bodies of the middle phalanges of the index, middle, ring, and little finger1
- Action – flex the metacarpal phalangeal joints and proximal interphalangeals joint of index, middle, ring, and little finger1
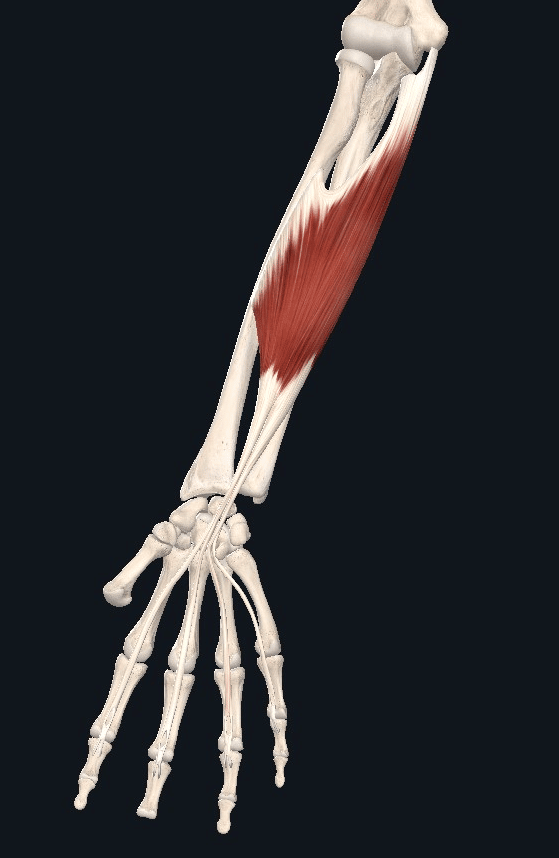
Image taken from Elsevier Complete Anatomy (2021)
2) Flexor digitorum profundus1
- Origin – medial aspect of coronoid process of ulna and the anterior and medial surfaces of the body of the ulna1
- Insertion – palmar aspect/base of distal phalanges of index, middle, ring, and little fingers1
- Action – flexes distal phalanges1
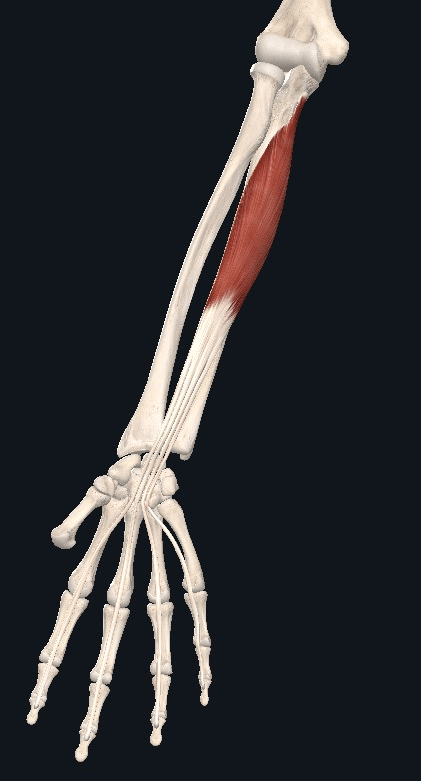
Image taken from Elsevier Complete Anatomy (2021)
Ligamentous structures
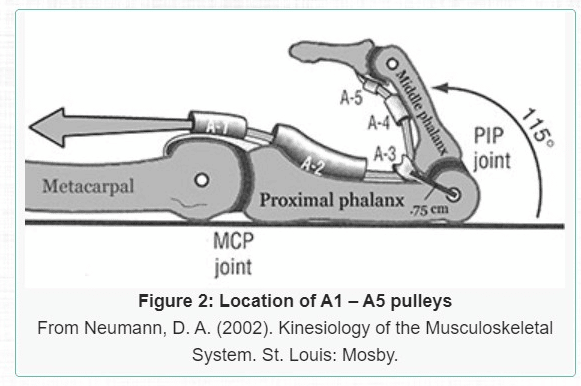
- Each finger tendon has a sheath which is made up of a synovial component and a set of pulleys2. The synovial component allows the finger tendon to glide within its sheath while the pulleys are fibrous bands which secure the tendon to the proximal, middle, and distal phalanxes2.
- The annular pulleys (A1-5) play a larger role in securing the flexor tendons than the cruciate pulleys as they are more rigid. Two key pulleys are the A2 and A4 as they attach directly to the bone3.
- A1, A3 and A5 overlie the MP, PIP, and DIP joints and originate from the palmar/volar plate (a thick ligament connecting two finger bones together3.

Image taken from this link at science direct
Biomechanics review
Now that we have a bit of an understanding about our anatomy, let’s talk about how these structures work together to produce movement in our fingers.
Pulley Functions
- Biomechanically the function of the pulley system is to keep the tendon close to the bone to allow the direct transfer of the translational force developed in the flexor muscle/tendon unit into a rotational moment of the phalanges4
- Without the pulleys the tendon will deviate away from the bone in a flexed position and will lead to a complete flexing of the muscle before the finger achieves a fully flexed position4
Climbing grip review
Climbers use a wide variety of grips to navigate routes/boulder problems. Each type of grip places a slightly different amount of load through the fingers. It is important for a climber to vary the grips that they use as this will reduce their risk of injury, and will help to strengthen their fingers, hands and forearms in a more well rounded manner.
Slope Grip
- In this grip only the DIP is flexed to approximately 50° while the other digits remain in a more neutral position (PIP <25° flexed)5
Half Crimp Grip
- In this hand position the PIP is flexed to approximately 90 degrees while the DIP is hyperextended5
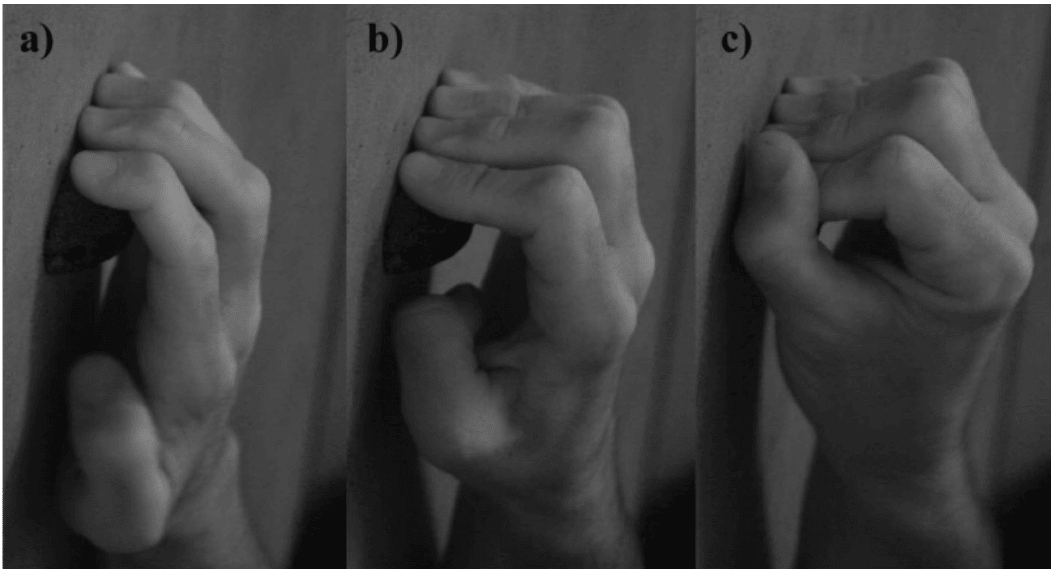
This image demonstrates a slope grip (a), half crimp (b), and full crimp (c). The full crimp will not be discussed further in this article but was provided as a reference.
Image taken from: https://www.researchgate.net/figure/Illustration-of-the-slope-a-half-crimp-b-and-full-crimp-c-grip-techniques-used_fig1_221837117
Jug grip
- For the purposes of this article I will be talking about a jug grip as being when the PIP is flexed to 90 degrees while the distal interphalangeal joint remains in a neutral/slightly hyperextended position5.
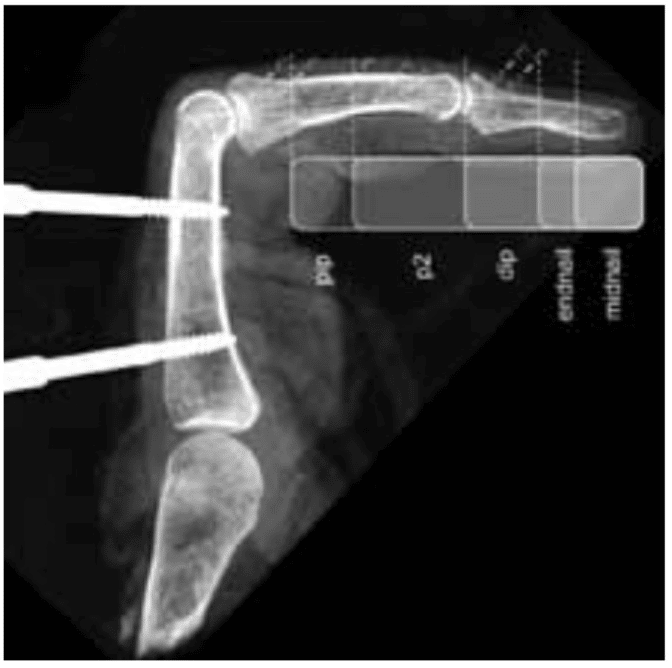
This image demonstrates how forces were measured in a jug grip on a flat surface. Image taken from:
https://journals-humankinetics-com.proxy1.lib.uwo.ca/view/journals/jab/27/2/article-p116.xml
Pulley and tendon loads during gripping
Half crimp loaded at the fingertip
Using this hand grip:
-> preferentially loads the flexor digitorum profundus tendon compared to the flexor digitorum superficialis6
-> this grip places higher loads on the A2/A4 pulleys and lower loads on the flexor tendons in comparison to the slope grip6
-> the flexor digitorum profundus produces more flexion force on smaller holds compared to flexor digitorum superficialis5
Slope Grip
Using this hand grip:
-> places increased loads on the flexor digitorum superficialis and flexor digitorum profundus tendons and less load on the A2 and A4 pulleys when compared to the crimp grip6
-> the flexor digitorum profundus produces more flexion force in this hand position compared to the flexor digitorum superficialis5
Jug Grip
-> using a jug preferentially loads the flexor digitorum superficialis (it produces more force than the flexor digitorum profundus on large flat holds)5
How to hang-board
*Esther Smith is a physiotherapist who works with Black Diamond athletes. Her recommendations for how to hang-board properly are as follows:
How to practice proper body position on the floor prior to hang-boarding
- Lie belly down with arms overhead and palms down7.
- Shrug the shoulder blades up and reach with your hands as far overhead as possible, while keeping contact between your hands and the floor7.
- While keeping your palms in contact with the floor, rotate your upper arms outward by turning your elbow creases toward the ceiling7.
- While maintaining that position in your arms, gently slide your shoulder blades down your back to the bottom of your available range of motion7.
- Finally, make fists with your hands, and attempt to lift your hands off the ground, while keeping your fists positioned palms-down and your elbows nearly straight7.
- This final position is “hanging right.” You should feel your muscles lightly working to press your shoulder blades securely against your rib cage, while also feeling as though you could hold/squeeze a tennis ball in each armpit (this is the feeling you get when your rotator cuff and scapular sling muscles are engaged)7. This engaged posture can also be translated into a hanging position with arms overhead7.
How to Hang-board
The following video provides a description of proper hang-boarding technique:
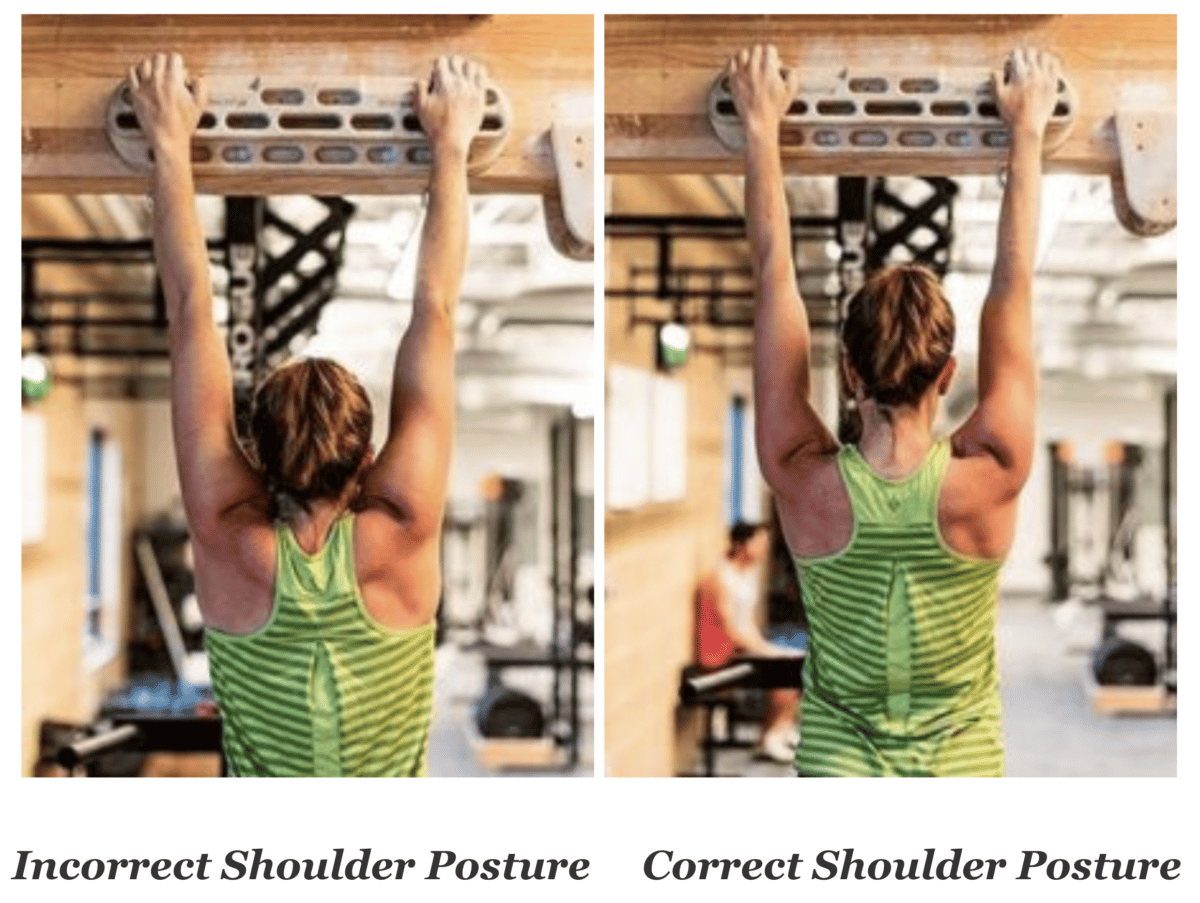
Images taken from: https://www.blackdiamondequipment.com/en_CA/experience-story?cid=esther-smith-shoulder-maintenance-for-climbers
Training adaptations
Neuro-muscular adaptations to training
When initiating a strength training program the adaptations that occur within the first 3-4 weeks are due more to neural adaptations than changes in muscle size (hypertrophy)8. These neural adaptations occur due to increased neural drive to the primary agonist (contracting) muscle causing increased motor unit recruitment, improved coordination between agonist and synergist muscles, and decreased agonist-antagonist co-activation9.
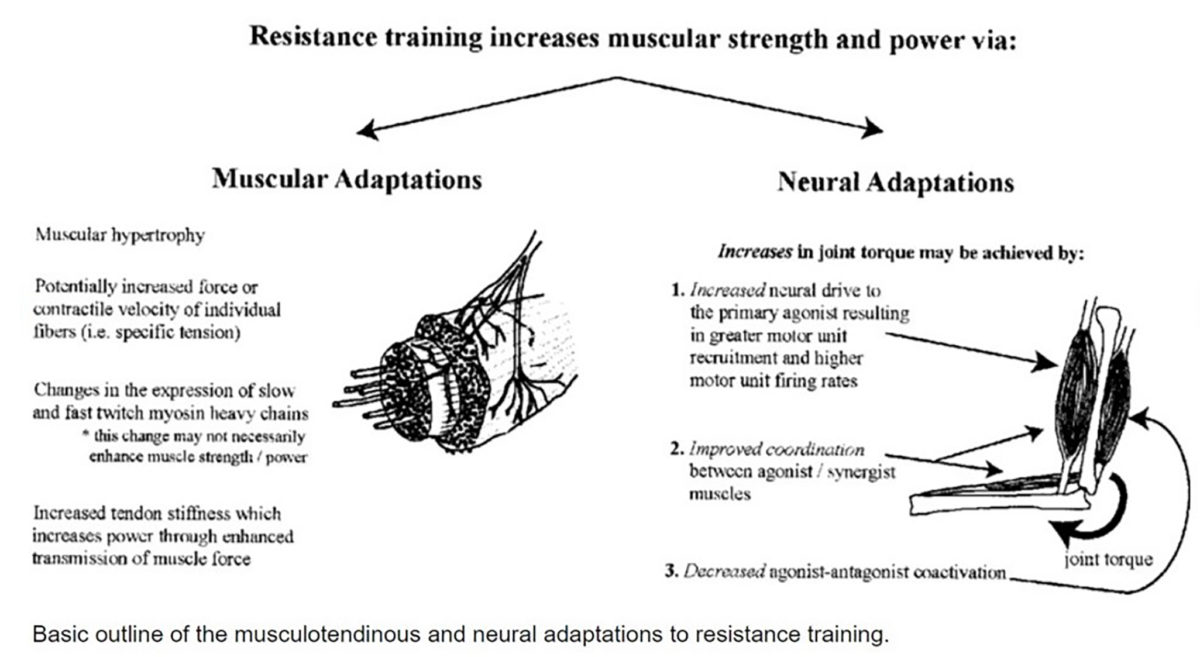
Image taken from: https://www.researchgate.net/figure/Basic-outline-of-the-musculotendinous-and-neural-adaptations-to-resistance-training_fig1_8405816
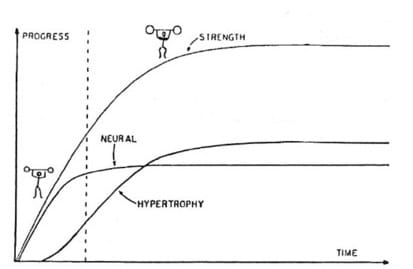
This graph provides an example of how neural adaptations are responsible for early changes in strength, while later changes in strength are due to hypertrophy.
Image taken from: https://www.researchgate.net/figure/Basic-outline-of-the-musculotendinous-and-neural-adaptations-to-resistance-training_fig1_8405816
Muscular adaptations to training
Hypertrophy (increased size of skeletal muscle cells) typically occurs within one to two months of performing a strength training program10. Strength training programs that train high-repetitions and low-weight or high-weight / low-repetitions have both been found to stimulate hypertrophy over a period of 6 weeks, however strength gains were found to be greater with high-weight / low-repetitions11.
Tendinous adaptations to training
Tendon stiffness adaptations to strength training typically occur within 3-12 weeks, however it has been found that programs greater than 12 weeks are more beneficial than shorter ones12.
Mechanical loading can influence the gross morphology of a tendon (increased tendon cross sectional area) but typically takes months to years12.
Intensity – Moderate to high loading intensities (70-90% MVC, 5-15 RM) lead to increases in tendon stiffness while light loading intensities (< 70% MVC) were not found to produce changes in tendon stiffness12.
Type of contraction (isometric vs concentric-eccentric vs purely eccentric) – The type of muscle contraction has not been found to impact tendon stiffness as much as amount of load12.
Warm-up
Warm-ups should consist of climbing 3 to 4 routes with 40 moves or 8-12 boulder problems of increasing intensity for 20-30 minutes13. It has been found that the amount of bowstringing of the flexor tendons increases up to 30% after climbing 100-120 moves13. This effect only occurred after climbing and was not seen during other warming-up techniques13. Bowstringing of the finger flexors indicates increased pliability of the pulley system and can help to reduce the risk of injury.
Video description of how to warm up before hang-boarding
Hang-boarding as a form of pre-habilitation
We can use a hang-board as a tool to help strengthen the muscles/ligaments/tendons of our hands and forearms. In order to have a well-rounded pre-habilitation, we need to target each type of hold (half-crimp, sloper, jug) in our training program.
Maximal dead-hang protocol:
*Prior to commencing the program:
-you must determine how much weight needs to be added to cause you to fail after hanging for 13 seconds on an 18mm edge for the half-crimp, sloper, and jug holds14.
*you do not need to reach failure during the actual dead-hang protocol, and for this reason each hang will be performed for 10 seconds14.
*you can keep your feet touching the ground or use a rubber band to off-set your weight in order to complete a 10 second hold with proper form for each hold14.
*listen to your body and if you are feeling pain in your fingers, elbows, shoulders, do not continue your work out!
Video examples of how to:
Use a band to off-set your weight while hang-boarding
Use a hang-board with only your bodyweight
Hang-board with added weight
Phase 1 (4 weeks)
Day 1
*minimum 2 days rest between hang-board workouts
Jug hold: 2 sets, 2 reps, 10 second hold, 18mm edge, + added weight14
Half Crimp: 1 set, 3 reps, 10 second hold, 18mm edge, + added weight14
*if you feel like you are going to fail before 10 seconds you can reduce the weight in order to reach 10 seconds between each repetition14.
Day 2
*minimum 2 days rest between hang-board workouts
Jug Hold: 2 sets, 2 reps, 10 second hold, 18mm edge, + added weight14
Sloper: 1 set, 3 reps, 10 second hold, 18mm edge, + added weight14
*if you feel like you are going to fail before 10 seconds you can reduce the weight in order to reach 10 seconds between each repetition14.
Phase 2 (4 weeks)
*re-test your hang to determine if a different sized edge/increased amount of weight is needed to reach failure after 13 seconds14.
Day 1
*minimum 2 days rest between hang-board workouts
Jug hold: 2 sets, 2 reps, 10 second hold, 18mm edge + increased weight, or new smaller edge size14
Half Crimp: 2 sets, 2 reps, 10 second hold, 18mm edge, + increased weight, or new smaller edge size14
*if you feel like you are going to fail before 10 seconds you can reduce the weight in order to reach 10 seconds between each repetition14.
Day 2
*minimum 2 days rest between hang-board workouts
Jug hold: 2 sets, 2 reps, 10 second hold, 18mm edge + increased weight, or new smaller edge size
Sloper: 2 sets, 2 reps, 10 second hold, 18mm edge, + increased weight, or new smaller edge size
When to seek medical attention…
If you have suffered an injury while climbing or training for climbing and are experiencing any sharp pain, swelling, or lasting discomfort it is a good idea to get it checked out by a qualified health care practitioner. Physiotherapy is a great option to help you to reduce your pain, improve your mobility and strength, and educate you on proper climbing technique to help ensure a full and lasting recovery.
About the author
James Lobb is a second year Master of Physical Therapy Student at the University of Western Ontario. He is passionate about the outdoors and has been climbing for ~7 years. He is currently obsessed with bouldering and sushi burritos so if you know any good areas to find either please let him know. He is hoping to specialize in athletic rehabilitation when he graduates and would love to hear from you if you have any questions about the above program.
If you have any questions, please contact him at JLobb4@uwo.ca
References
- Elsevier (2021). Complete anatomy (version 6.4.1) [Computer software]. https://3d4medical.com/
- Chang, C. Y., Torriani, M., & Huang, A. J. (2016). Rock Climbing Injuries: Acute and Chronic Repetitive Trauma. Current Problems in Diagnostic Radiology, 45(3), 205-214. doi:10.1067/j.cpradiol.2015.07.003
- Flexor Pulley System. (n.d.). Retrieved January 17, 2021, from https://www.orthobullets.com/hand/6004/flexor-pulley-system
- Schöffl, V. R., Einwag, F., Strecker, W., & Schöffl, I. (2006). Strength Measurement and Clinical Outcome after Conservatively Treated Pulley Ruptures in Climbers. The Engineering of Sport 6, 287-290. doi:10.1007/978-0-387-46051-2_51
- Schweizer, A., & Hudek, R. (2011). Kinetics of Crimp and Slope Grip in Rock Climbing. Journal of Applied Biomechanics, 27(2), 116-121. doi:10.1123/jab.27.2.116
- Schöffl, I., Oppelt, K., Jüngert, J., Schweizer, A., Neuhuber, W., & Schöffl, V. (2009). The influence of the crimp and slope grip position on the finger pulley system. Journal of Biomechanics, 42(13), 2183-2187. doi:10.1016/j.jbiomech.2009.04.049
- Smith, E. (N.D)Shoulder maintenance for climbers. Retrieved Jan 17, 2021, from: https://www.blackdiamondequipment.com/en_CA/experience-story?cid=esther-smith-shoulder-maintenance-for-climbers
- Gabriel, D. A., Kamen, G., & Frost, G. (2006). Neural Adaptations to Resistive Exercise. Sports Medicine, 36(2), 133-149. doi:10.2165/00007256-200636020-00004
- Barry, Benjamin & Carson, Richard. (2004). The Consequences of Resistance Training for Movement Control in Older Adults. The journals of gerontology. Series A, Biological sciences and medical sciences. 59. 730-54. 10.1093/gerona/59.7.M730.
- Brumitt, J., & Cuddeford, T. (2015). CURRENT CONCEPTS OF MUSCLE AND TENDON ADAPTATION TO STRENGTH AND CONDITIONING. International journal of sports physical therapy, 10(6), 748–759.
- Schoenfeld, Brad J.1; Grgic, Jozo2; Ogborn, Dan3; Krieger, James W.4 Strength and Hypertrophy Adaptations Between Low- vs. High-Load Resistance Training: A Systematic Review and Meta-analysis, Journal of Strength and Conditioning Research: December 2017 – Volume 31 – Issue 12 – p 3508-3523 doi: 10.1519/JSC.0000000000002200
- Heinemeier KM, Kjaer M. In vivo investigation of tendon responses to mechanical loading. J Musculoskelet Neuronal Interact. 2011 Jun;11(2):115-23. PMID: 21625048.
- Schweizer, A. (2012). Sport climbing from a medical point of view. Swiss Medical Weekly. doi:10.4414/smw.2012.13688
- López-Rivera, E., & González-Badillo, J. J. (2019). Comparison of the Effects of Three Hangboard Strength and Endurance Training Programs on Grip Endurance in Sport Climbers. Journal of Human Kinetics, 66(1), 183-195. doi:10.2478/hukin-2018-0057
- Disclaimer – The content here is designed for information & education purposes only and the content is not intended for medical advice.

How much rest between sets? How much rest between exercises?
With hangboard prehab exercises, I typically recommend to perform them as a part of a resistance training / core training circuit and to split exercises into 3. For example, 1 core exercise, 1 resistance training exercise, 1 hang. Then repeat. This works well and allows full recovery between sets. But if you are just focusing on the hangs, then 1-2 minutes is adequate for rest since loads are low.
This is great. I’m going to try it out in my next training period starting later this month. Questions about grip types, though:
1. Is the “slope” grip basically equivalent to an open-handed “drag” grip?
2. Is the difference between the jug grip and the half crimp just a matter of degree of extension in the DIP joint?
I typically use different terminology than the author when describing grip and hangs, but based on the article, see below:
1. Yes, in the article it describes it this way. You can also use a sloper instead of a crimp to achieve the same finger position.
2. Yes, in the article it describes the jug with DIP neutral and half crimp as DIP hyperextended. Note that based on finger strength and hypermobility, some climbers will need to have a large edge that extends to their middle phalinx in order to prevent the DIP from hyperextending
Also – how would you recommend integrating this program with regular climbing training? Before a session but after a warmup? Or after a session and, say, before pull-ups or other strength training?
Best to incorporate at least 6 hours between any climbing to give the fingers the best opportunity for recovery. I typically perform finger prehab during circuit training so that I can easily build in productive rest. For example, a set of core exercise between each hang.