Self-Assessment and Rehab for a Climbing Hamstring Strain
As you’re sending the first climb of the day or continuing to battle with that tricky bouldering problem, you inevitably find yourself at the crux of the climb. As you begin to assess your options you notice a crimp just out of reach above you that will take you to the top if you can just elevate your body a few more inches. While working the problem in your head and trying to conserve energy you look to the right and see a decent jug just above waist height. You decide to jam the heel of your right foot onto the protruding hold, tensing your body while pushing through your heel to elevate your hips allowing you to almost reach that crimp standing between you and glory. Suddenly you feel a “pop” in the back of your thigh followed by a sharp burning pain that causes you to lose your footing, miss the crimp, and separate from the wall as you begin to fall having just strained your hamstring.
The heel hook is a dynamic maneuver requiring flexibility, strength, and power to execute safely and effectively. The mechanism of injury and symptoms depicted in the scenario above are rather typical when it comes to climbers that suffer hamstring strains. The hamstrings are a group of three muscles that include the biceps femoris, semitendinosus, and semimembranosus which originate on the ischial tuberosity (sit bone) of the pelvis and insert on the lower leg just below the knee joint line. This muscle group’s primary actions are to bend the knee and extend the hip, which for the climber, are observed while performing the heel hook maneuver. A tool in any climber’s tool bag, the heel hook is performed when the climber uses their heel to lock into or on top of a hold and using that to apply pressure through the heel via the large hamstring muscles. This maneuver pulls the body into the wall or elevates the body to reach that next hold/anchor just above. Understanding the anatomy and function of these muscles allows the climber to appreciate the amount of stress placed on this tissue as a result of this dynamic movement.
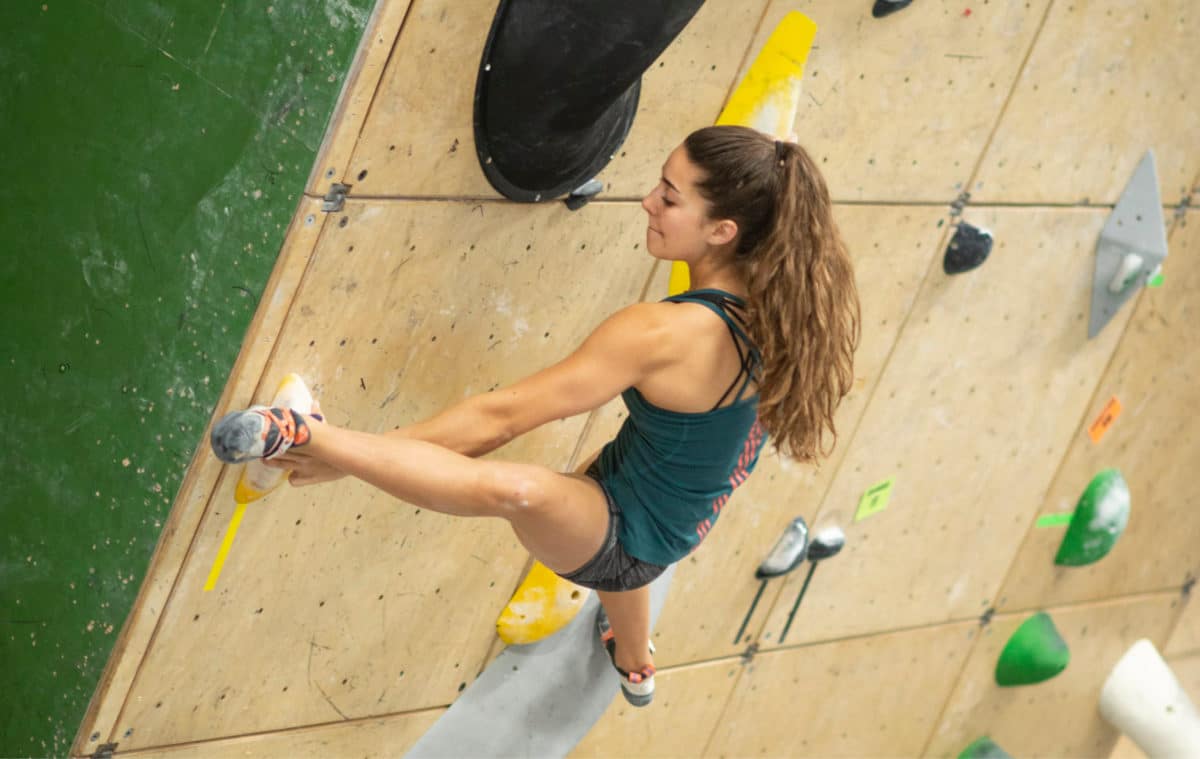
Brooke Raboutou Heel Hooking. Photo Credit: Stephen Gross
This article will provide climbers the knowledge and tools needed to self-assess the severity of their hamstring injury as well as guide the climber through an evidence-based rehabilitation protocol and prevention program.
Assessment
The gold standard for accurately assessing the severity and nature of a hamstring strain is through magnetic resonance imaging (MRI)1 accompanied by an evaluation from a doctor of physical therapy (DPT). While this is the ideal avenue, not everyone has the resources, time, or desire to seek direct care from a DPT and can therefor benefit from this self-assessment and rehab protocol.
Similar to how climbing routes are graded by difficulty, hamstring strains are graded based on severity of the injury with higher numbers signifying more severe injury. Hamstring strains are classified into three grades that includes grade one (mild), grade two (moderate), and grade three (severe).2As a climber there are a few questions that need to be answered to determine the severity of the injury as there may be a need for further medical care if there is significant damage to the muscle or myotendinous junction where the muscle attaches to the tendon which ultimately attaches to the bone.1
Is the climber experiencing any of the following: Pain in the back of the upper leg during hamstring contraction? Is there observed bruising to the posterior thigh? Is the climber experiencing tenderness to palpation anywhere along the path of the muscle from the origin at the pelvis to the insertion at the knee? Are they experiencing reduced hamstring flexibility compared to the non-involved side? Is there a palpable lump or bulky mass on the posterior thigh?1
- Grade 1: With a grade 1 strain the climber will likely be able to walk normally, however, they will notice some hamstring discomfort and tightness in the posterior thigh. They will also likely experience some pain with running at full speed and contracting the hamstrings against resistance.
- Grade 2: With a grade 2 strain the climber will likely have an impaired walking pattern seen as a limp due to sudden painful twinges from activation of your hamstrings. They may notice some swelling with tenderness to palpation as well as pain with stretching.
- Grade 3: With a grade 3 strain there is tearing to all or half the muscle involved. The climber may need crutches to walk due to severe pain and weakness. Swelling and bruising will likely be noticed within 24 hours and a palpable mass or lump may be noted on the posterior thigh. A climber suspecting a grade 3 strain should be evaluated by a doctor of physical therapy or through MRI via your general medical doctor.
The Rock Rehab Pyramid
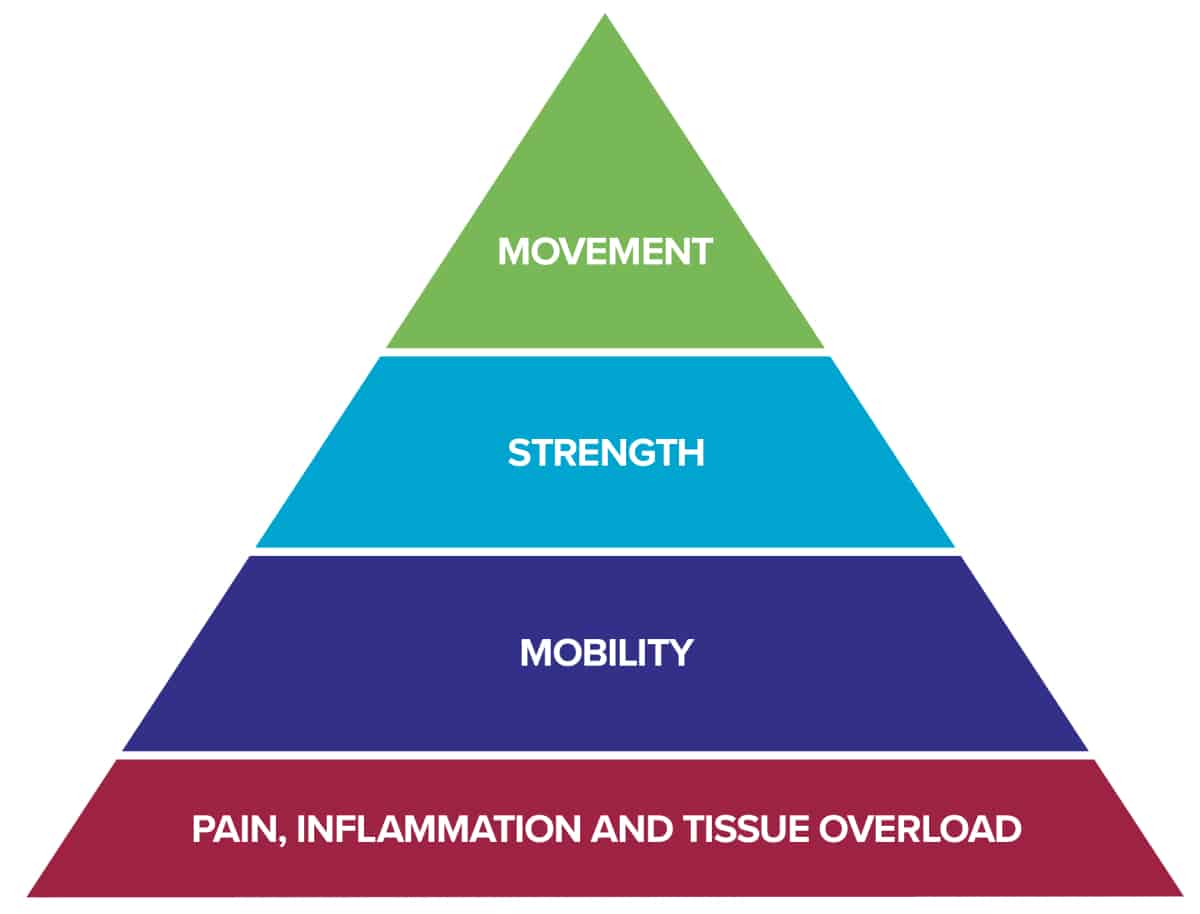
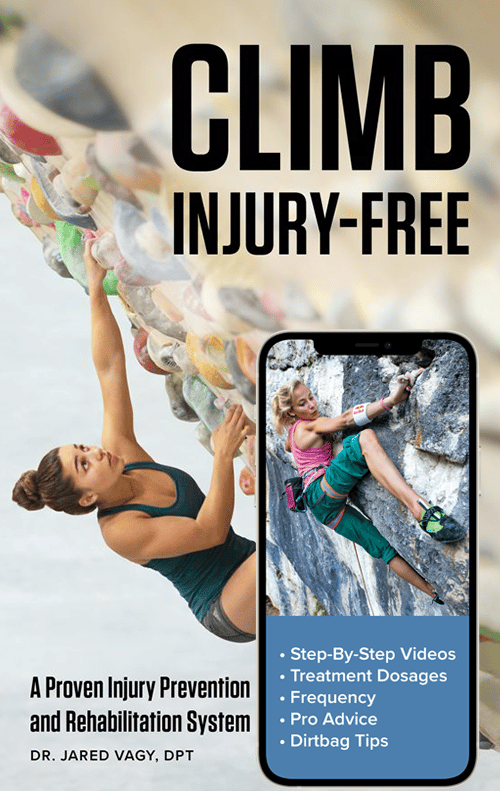
The rock rehab pyramid was developed by physical therapist and rock climber Dr. Jared Vagy in his book Climb Injury-Free. This injury prevention and rehabilitation system developed for rock climbers structures the rehabilitation process into four distinct levels with general rules used to determine a climber’s appropriateness for progression to the next level. As pictured the rock rehab pyramid begins after injury and is broken down into the pain, inflammation and tissue overload phase where unloading techniques are used to allow the injured tissue to heal, the mobility phase where techniques are focused on breaking up fibrotic adhesions and promoting tissue mobility, the strength phase to build strength and help prevent future injury, and the movement phase where technique and movement strategies are introduced to promote proper movement mechanics.3
Within each level there are several techniques and exercises through which the climber will self-assess their ability to move onto the next exercise through the rules outlined below. These rules are established on a day-by-day basis in which the climber performs the first level of exercise within a phase and then the next day determines the severity of soreness experienced. An increase in soreness or pain means the climber should regress the exercise, no change in soreness means the climber should stay at that current level for one week followed by progression to the next level, and a decrease in soreness/pain the following day signifies the climber is appropriate to progress.3

Unload
Unloading refers to reducing the amount of stress being placed on the injured tissue from stimuli such as contraction of the muscle, massage, or stretching. It is important to allow the hamstrings to rest as more damage can be done with continued stressors.
- Step 1: Avoid any activity (yes, that means climbing) that causes an increase in pain for the first 2-3 days after injury. The “no pain no gain” theme does not apply in this situation.
- Step 2: Apply ice to the injury site for 10-15 minutes, 2-3x/day. Ensure the ice is wrapped in a pillow case or towel to prevent any skin damage from direct contact with the low temperature.
- Step 3: Crutches may be needed for the first few days if the climber experiences pain while walking.
Mobility
The goal of the mobility phase is to break up any adhesions or fibrotic changes that can be present after an injury occurs and to increase the extensibility of the tissue in order to achieve full functional range of motion.
- Mobility Level 1
- Foam Roll: 1-2 minutes, 2-3x/Day
- Lay the foam roll on the ground horizontally, sit the back of your upper leg on the foam roll with your ankle relaxed. Use the opposite foot on the ground to help balance. Rock back and forth rolling out the hamstring tissue from the knee up to the pelvis. Avoid any painful response by adjusting the amount of weight you are putting into the foam roller by placing more weight through your foot located on the floor and your hands that are behind you.
- Foam Roll: 1-2 minutes, 2-3x/Day


- Butterfly Stretch: 3 x 20 second holds, 2-3x/Day
- The butterfly stretch is a fantastic way to improve your hip mobility so that you can keep your body close to the wall. Hip flexibility is often necessary during strenuous heel hooks and by mobilizing your hips, you can minimize the stress on the hamstrings when you ultimately return to heel hooking. From a seated position bring both feet together in front of you so that your knees are off the ground. While keeping the spine in a neutral position, hinge forward at your hips focusing on bringing the navel towards the ground until you experience a strong but comfortable stretch.


Now that the climber has improved the pliability of the hamstrings through foam rolling and has improved the mobility in their hips, it is time to stretch the tissue in order to increase the climber’s available range of motion. Remember to follow the rules illustrated above to ensure proper timing for progression to the next exercise.
- Mobility Level 2
- Seated Single Limb Hamstring Stretch: 3 x 20 second holds, 2-3x/Day
- Begin long sitting on the floor, mat, or bed and bend one knee so as to bring the foot in contact with the opposite knee. It is important to maintain a neutral spine (don’t round your back) as you lean forward, bringing the navel towards the floor and holding a strong but comfortable stretch experienced in the hamstrings.
- Seated Single Limb Hamstring Stretch: 3 x 20 second holds, 2-3x/Day


- Mobility Level 3
- Contract/Relax Supine 90/90 Hamstring Stretch: 4 x 15 second stretch holds w/ 5 second hamstring activation in between.
- Begin supine (on your back) with one heel on a chair and your knee and hip both flexed to 90 degrees. Attach a rope or belt around your foot in preparation for the stretch. Begin by digging the heel into the chair to activate the hamstrings for 5 seconds, followed by straightening of the knee by using the belt to pull the foot up and back thus stretching the hamstrings for 15 seconds. Repeat four times. Contract/relax stretching techniques are used to gain increases in tissue extensibility. Contracting the muscle for a short period stimulates sensory receptors in the muscle itself which then causes the muscle to perceive less of a stretch sensation that allows for increased range.2
- Contract/Relax Supine 90/90 Hamstring Stretch: 4 x 15 second stretch holds w/ 5 second hamstring activation in between.


- Golfers Pick Up: 2 x 15 repetitions
- Begin in a standing position with all of your weight on one leg. Keep the other leg in line with your spine as you hinge forward at your hips and reach toward the foot that is on the ground thus eccentrically loading the hamstrings. Remember, we want a strong but comfortable stretch that is pain free so only bend forward as far as is comfortable.


Strength
Once the climber no longer has increased soreness/pain the following day after performing mobility level 3 exercises they are ready to move onto strengthening. While the climber has been cleared to move onto the next level of the rock rehab pyramid this does not mean stretching and foam rolling ends. These are activities that should be done daily, especially on days that you climb, to help ensure a proper warm up and prevent future injury.
- Strength Level 1
- Single Limb Bridges: 2 x 15 repetitions holding for 2 seconds each
- Begin lying supine (on your back) with your knees bent in a hook lying position. Tighten your abdominals and push through your heels and upper back to lift your hips off the ground to a height where your knees, hips, and shoulders are in a straight line. From this double limb bridge position, squeeze your glutes (buttock) and straighten on leg off the ground for 2 seconds, after which you may replant that foot on the ground and proceed to lifting the other leg for 2 seconds. Continue alternating each side until you reach the set and rep values listed above.
- Single Limb Bridges: 2 x 15 repetitions holding for 2 seconds each


- Calf Raises: 2 x 15 repetitions each side
- Begin by finding a step or curb that you can perform heel raises on. Place the forefoot of both feet on the step with the rest of the foot not in contact with the step. Squeeze your calf muscles to elevate your body up onto your toes and proceed to slowly lower yourself back down to where your heels drop below the level of the step that your forefoot is on. Repeat the heel raise from this lowered position to promote strengthening in a full range of motion. Strengthening the gastrocnemius (calf muscle) is important in preventing future injuries from occurring which will be further discussed in the movement phase.


- Strength Level 2
- Longer Duration Single Limb Bridges: 2 x 15 repetitions holding for 5 seconds each
- Follow instructions for the Single Limb Bridge listed above with extended hold periods to increase the difficulty.
- Prone Resistance Band Hamstring Curls: 2 x 15 repetitions
- Begin by lying prone (on your stomach) on a table or bed with the resistance band of your desired tension tied around a point directly below your foot. In the picture below the resistance band is tied to the foot of the table. Tie the other end of this resistance band around your ankle and proceed to pull your heel toward you buttock in the prone position to activate your hamstring musculature. Slowly lower your leg back down toward the table to promote eccentric (lengthening) muscle strengthening.
- Longer Duration Single Limb Bridges: 2 x 15 repetitions holding for 5 seconds each


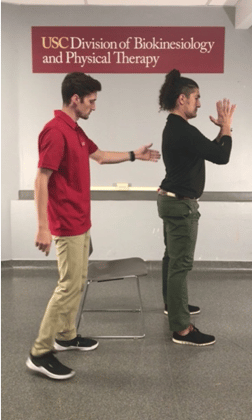
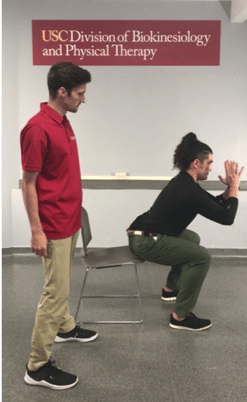
- Goblet Squat: 2 x 15 repetitions, 10-15 lbs to start
- Begin by standing with your feet about shoulder width apart and the weight grasped in both hands held close to your chest. Keep a chair behind you as a tactile cue to maintain the proper depth. Begin to squat as if you’re sitting back in a chair keeping your spine in a neutral position and ensuring your knees do not move anterior to your toes. Squat low until your buttock lightly touches the chair (do not sit down) or until you feel you lose your neutral spine position. From here push through your heels and drive your hips upward and forward to elevate back to the starting position, make sure to squeeze your buttock at the end to push your hips forward.
- Romanian Deadlift: 2 x 15 repetitions, 5-10 lbs to start
- Hold the dumbbells or barbell at hip level with both your grip and stance about shoulder width apart. While maintaining a straight neutral spine, begin to lower the weight by sitting your bottom back keeping the weight close to your body by allowing your hands to slide down your thighs. Lower to just below the knee and you should feel your hamstrings activating. From this position drive your hips forward to elevate your body back to the starting position.
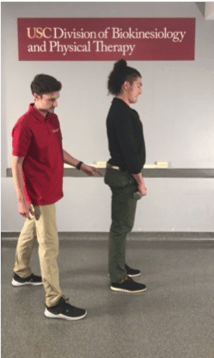
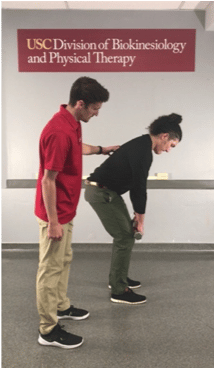
The movement phase focuses on strategies and techniques to provide the climber with tools to help prevent future injury. Once here it is highly recommended that the climber continue to strengthen and mobilize the involved tissues in order to provide the best chance at remaining injury free.
- Movement Strategy 1
- When initiating heel hooks after injury keep the heel close to the body to decrease the movement arm thus decreasing torque on the muscle. With decreased torque there is decreased stress on the muscle. The further you attempt the heel hook away from your body there is a greater force being put through the hamstring tissue and the chance of re-injury increases.
- Movement Strategy 2
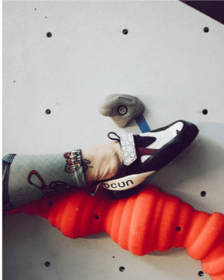
- Plantarflex the ankle (point your toes) after you jam your heel into a hold. It is important to point your foot away from you when you are about to activate your hamstrings as this provides a mechanical advantage when flexing the knee. The gastrocnemius (calf) muscle is used to plantarflex (point) the ankle as well as flex the knee, in this way it can be used to take some of the load off the hamstrings during a heel hook to ultimately decrease the amount of stress being put on the muscle.
Image #1
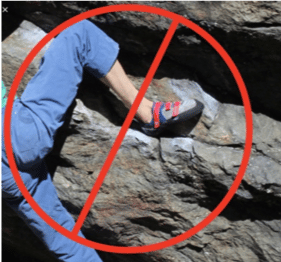
Image #2
- Movement Strategy 3
- Attempt to gradually contract the hamstring during a heel hook rather than using an explosive maneuver. Once the climber has progressed through this rehabilitation protocol it is recommended to practice this movement in a low risk controlled environment low on the climbing wall to facilitate muscle memory and increase confidence. Choose a few holds low to the ground and close to you to practice your heel hook. Slowly activate your hamstrings and calf muscle to elevate your body and bring your heel toward your bottom, eventually progressing to holds that are further away to increase the difficulty.
- Movement Strategy 4
- Always ensure you are properly warmed up to ensure the hamstrings are ready for the intense loads and movements associated with rock climbing.
Summary
Whether you’re a world class climber training for your next championship competition, a weekend warrior having fun at your local crag, or you just bought your first pair of climbing shoes and are dreaming of El Capitan and glory, injuries can disrupt your hopes and plans at any moment. While not the most common injury associated with rock climbing, hamstring strains can be debilitating and prevent the climber from participating in the sport they love.
Using this article the climber will better understand the anatomy behind their hamstring injury, how to properly rehabilitate from their injury using an evidence based protocol, and how to use exercise and knowledge of movement mechanics to better prevent future injury. Remember to always listen to your body and to adjust your fitness regime and climbing technique to facilitate pain free activity and to promote a long and successful rock climbing career. Cheers!
About the Author
Kevin Reichel is a third year doctorate student of physical therapy at the University of Southern California. An avid outdoorsman, he just recently took trip to Wild Iris in Wyoming to climb and spends his free time hiking, backpacking, cycling, and surfing. With a drive to combine his passion for physical therapy with his love of the outdoors he hopes this paper can help those with injury return to their prior level of function as well as aid in preventing injury in the first place.
Please feel free to contact Kevin with any questions:
Email: kreichel77@gmail.com

References
- Schöffl V, Lutter C, Popp D. The “Heel Hook”—A Climbing-Specific Technique to Injure the Leg. Wilderness & Environmental Medicine. 2016;27(2):294-301. doi:10.1016/j.wem.2015.12.007.
- Dutton M. Duttons Orthopaedic Examination, Evaluation, and Intervention. New York: McGraw-Hill Med.; 2012.
- Vagy J. Climb Injury-Free: a Proven Injury Prevention and Rehabilitation System. The Climbing Doctor; 2018
- Image #1. https://www.ukclimbing.com/photos/dbpage.php?id=265932
- Image #2. https://www.mamaclimbs.rocks/home/2018/9/19/3-pairs-of-climbing-shoes-for-high-arched-feet
- Disclaimer – The content here is designed for information & education purposes only and the content is not intended for medical advice.

Love this article! I’m a rockclimber from Brasil and i just had this hamstring injury yesterday besides i do most of the strengh and scretches exercicies listed above. It is not the first time i got this injury, but on that time i didn’t do nothing about and just climb. It took me about two years to get completed recovery. This time i will try those phases. Hope it won’t last two anothers years!! Tanks a lot!